How to Add Color Variations in WooCommerce Products

What is the most important factor for a well-structured eCommerce store?

It is to attract your clients. Because it may affect your conversion rate. Unless you can attract customers to your online store, it will be difficult to covert them.

Moreover, the online shopping experience of the customers can be enhanced by the product’s appearance. So, you need to make it more appealing. Obviously, the interested customers are going to buy from a good UX.

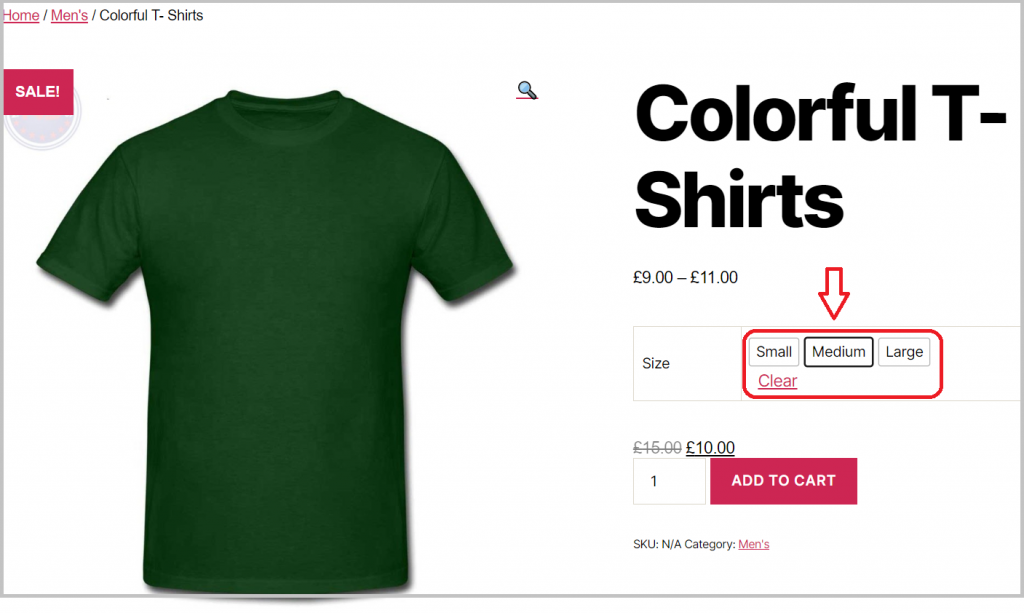
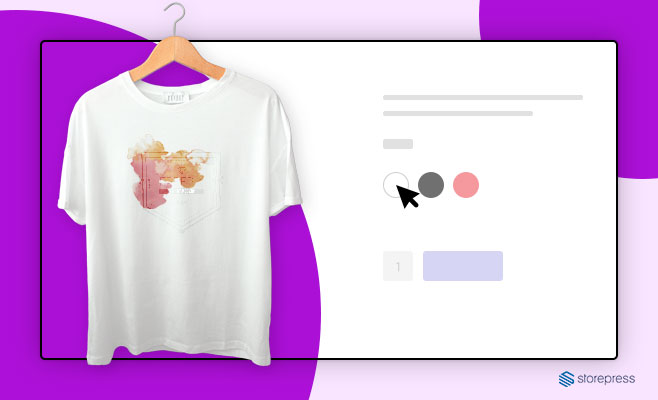
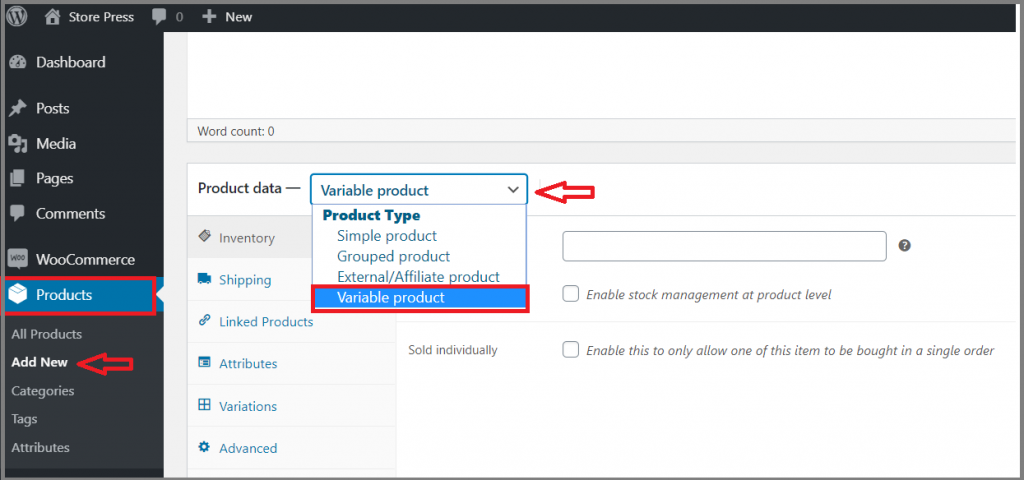
That’s why a store owner’s dream is to show a pleasant product page to the customers. If you have variable attribute products, then adding color variations is one of the best ways to bring more life into it.

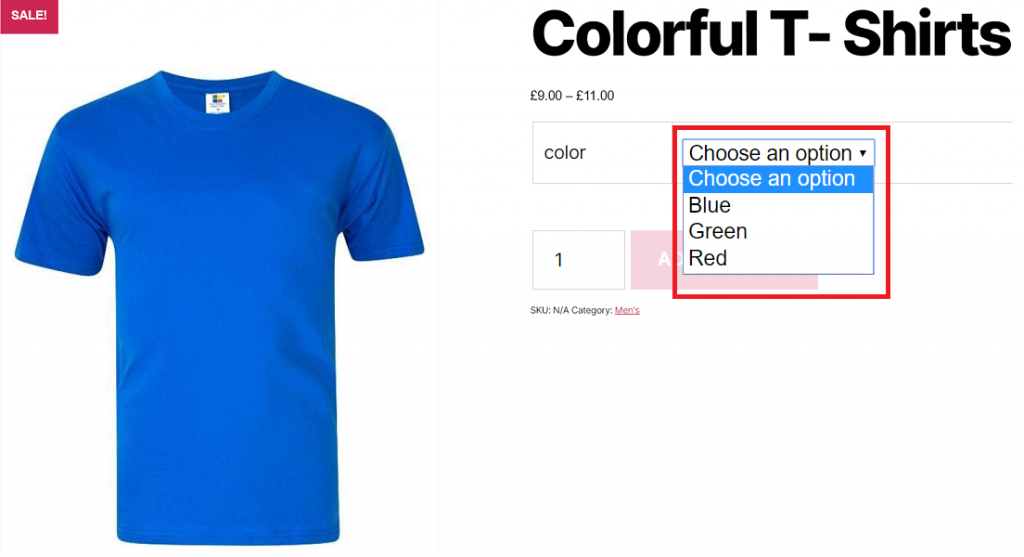
For providing variable options, WooCommerce already has a default drop-down menu. But it shows product variations with an annoying list. However, it is a must-have requirement for you to show the variations of product properly.

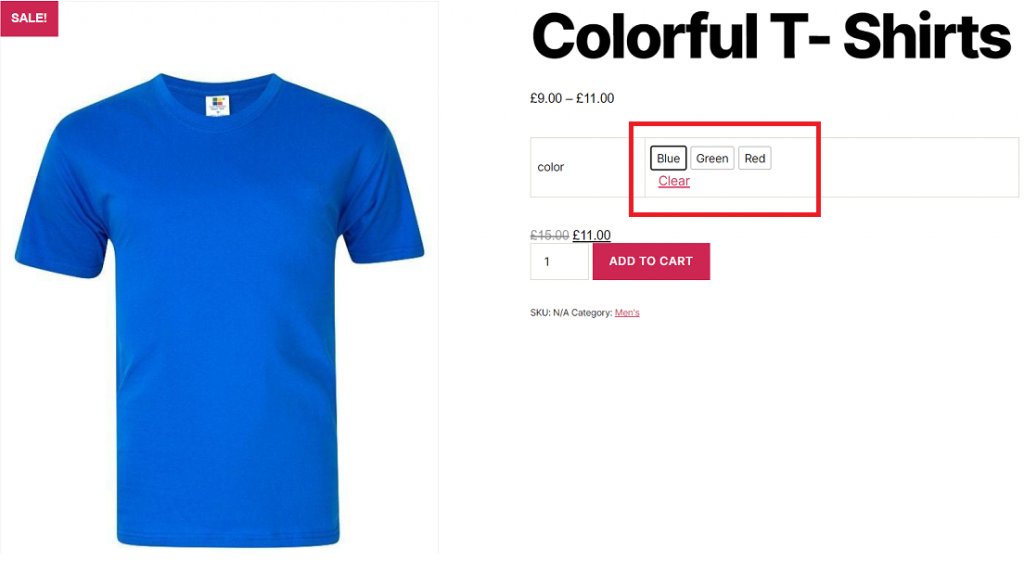
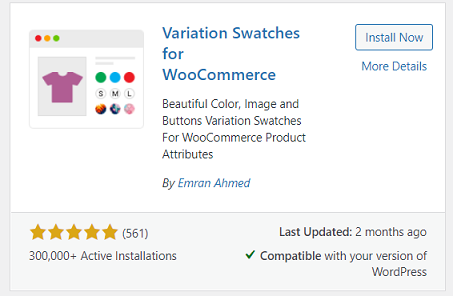
Rather than a generic drop-down, let your customers click on visual representation for each product variant. That’s the perfect way to introduce customers to the options they can choose from. A useful variation swatches plugin easily meets the mentioned requirement.

The question is – how to enable color variations in WooCommerce products.


https://www.youtube.com/watch?v=rYNQOtFjkVc


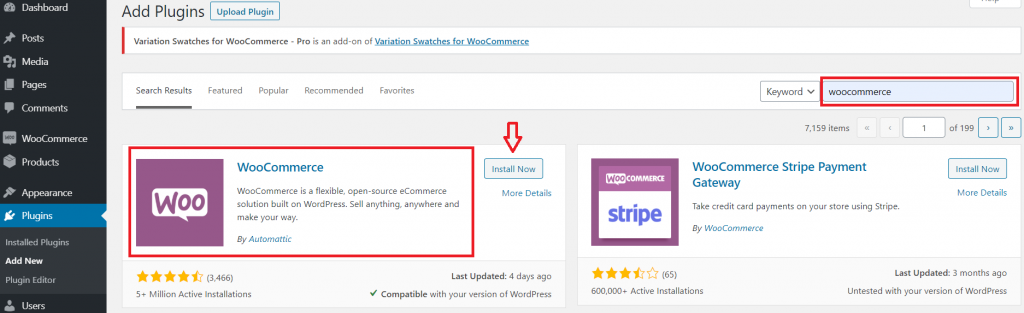
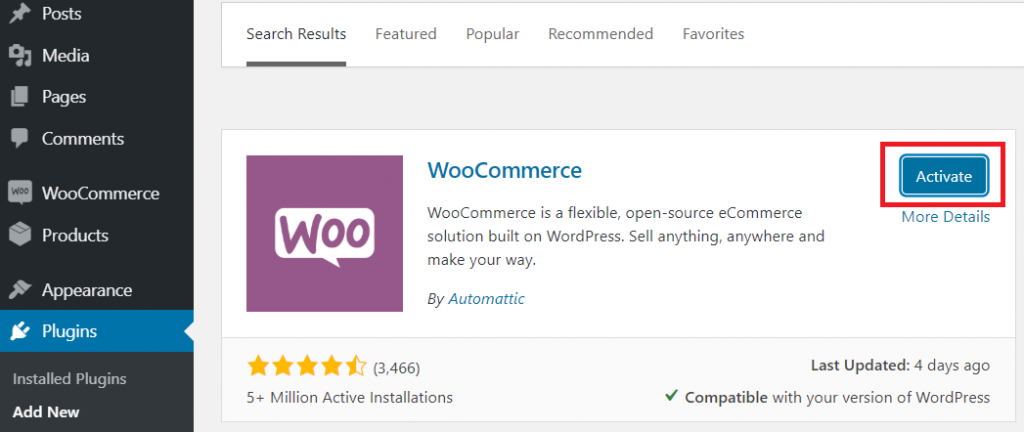
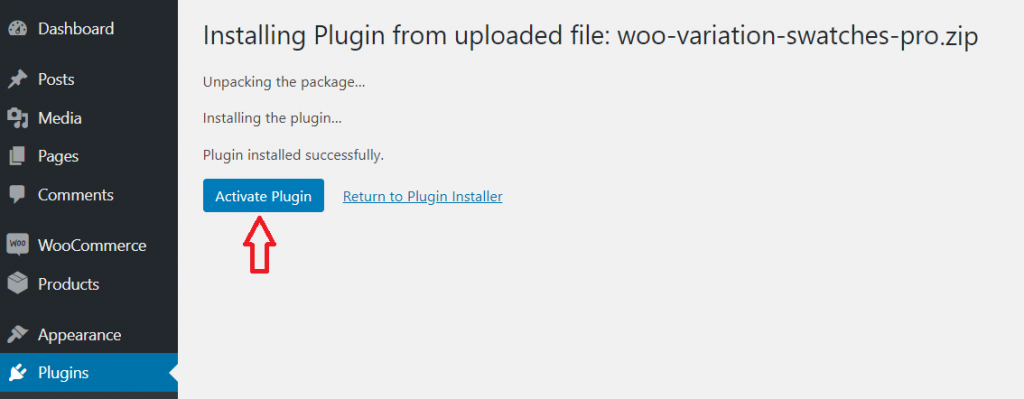
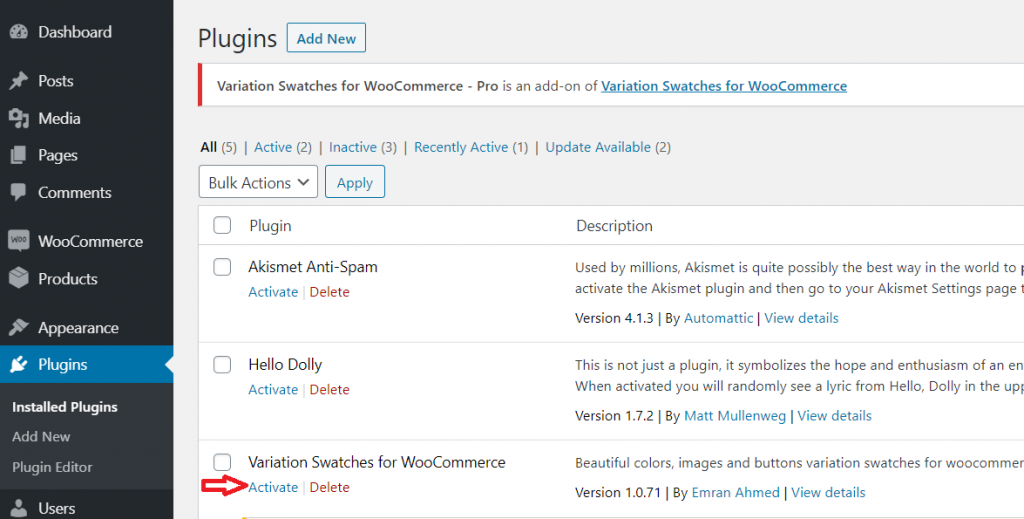
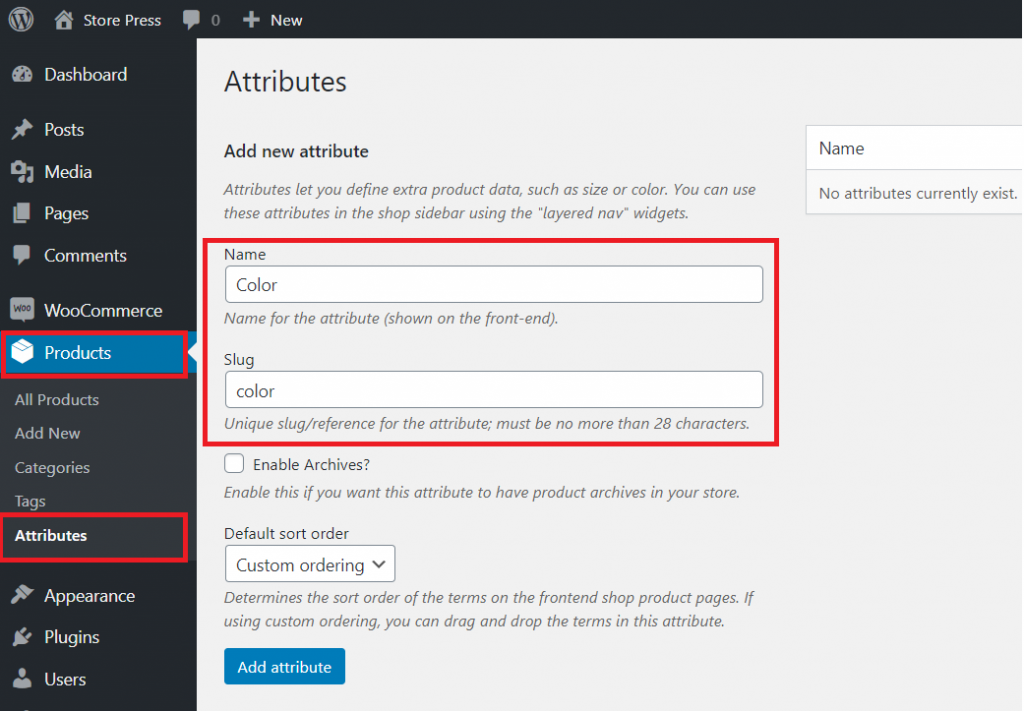
First, download the WooCommerce Variation Swatches plugin or you can directly install it from your dashboard. Various methods to install WordPress plugins have been shown in the linked article.


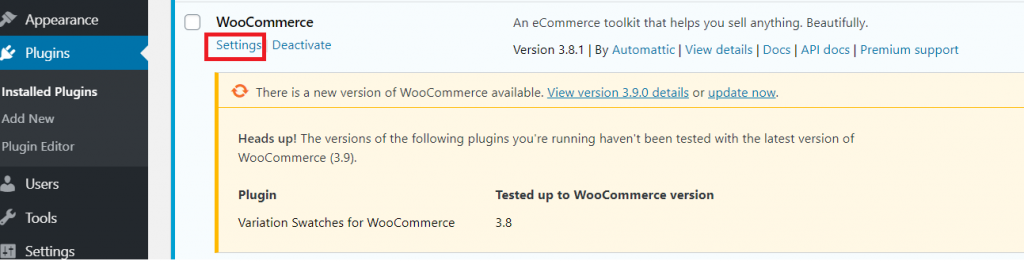
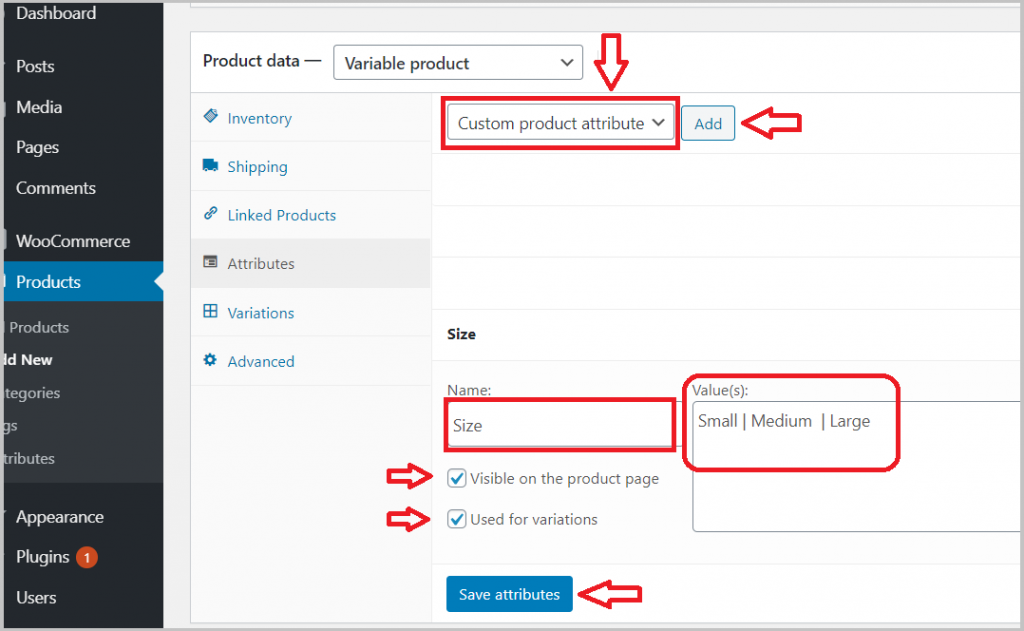
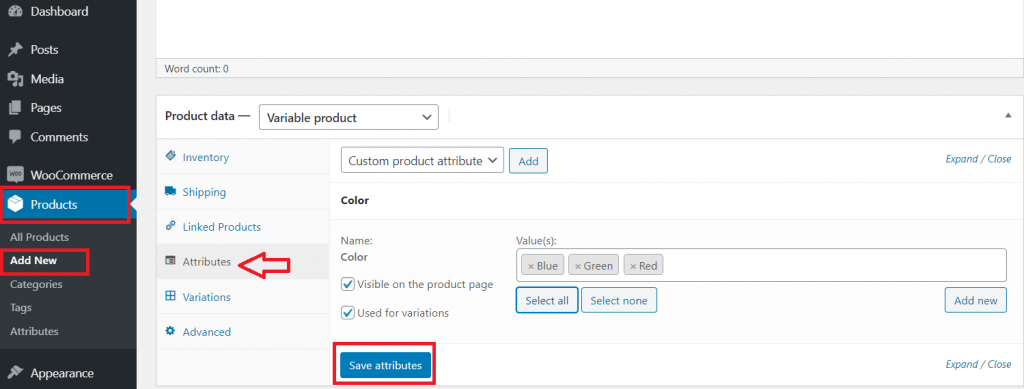
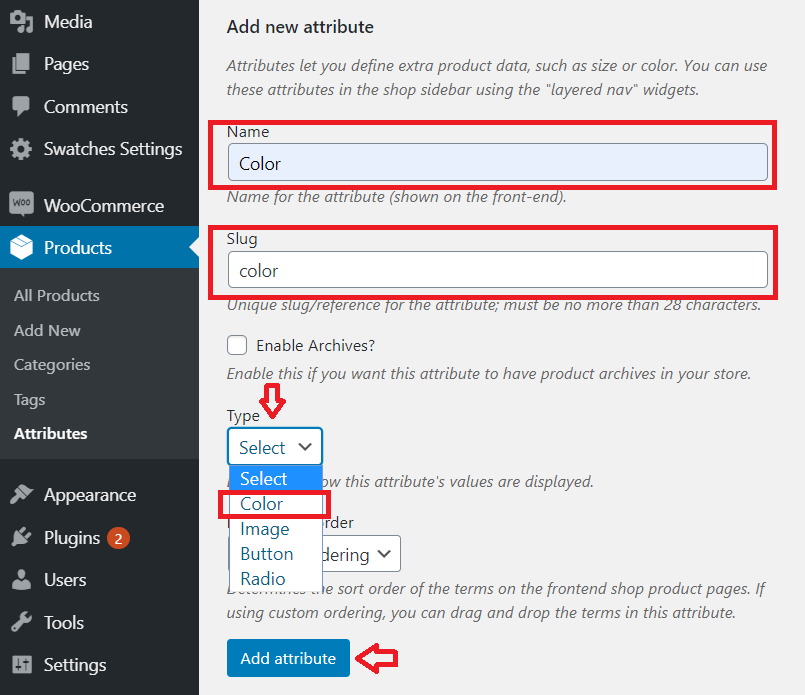
Once the plugin is installed and activated, you can create attribute variations for your WooCommerce products. There is an option to edit existing variations as well. Select your attribute type as ‘Color‘ from the ‘Type‘ drop-down menu.

add new attribute

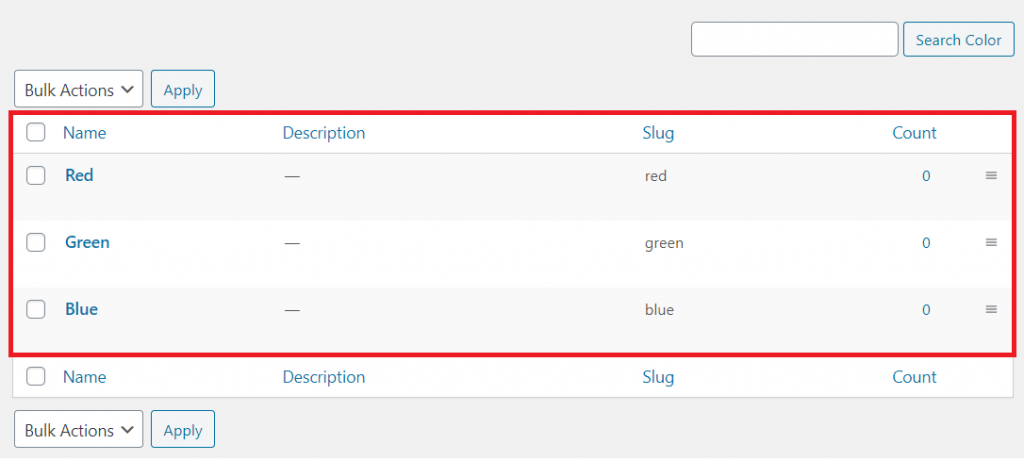
Once you have added attributes, click on the ‘Configure terms’ from the attribute list to create product variations.

Keep adding new colors for each term by clicking the ‘Add new Color’ button. From the color-picker add your desired color. An alternate way is to type the HEX value for the color.

add your desired color

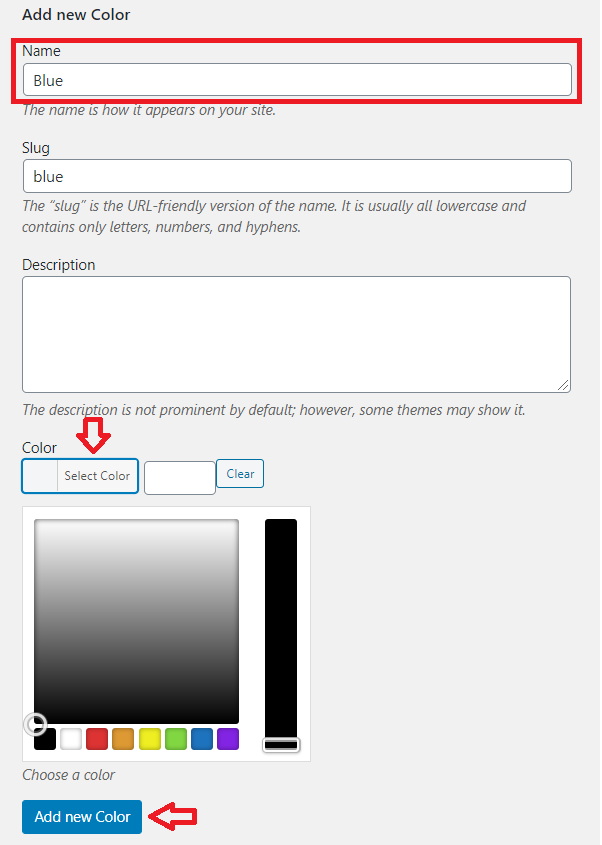
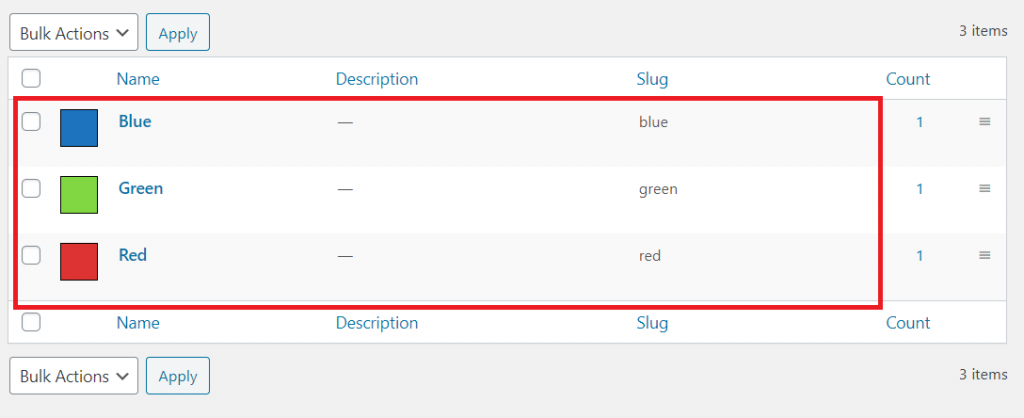
You can add as many colors as you need. Here, I have added 3 different colors for variations (blue, green and red) to show you an example.

see the color variations appearance

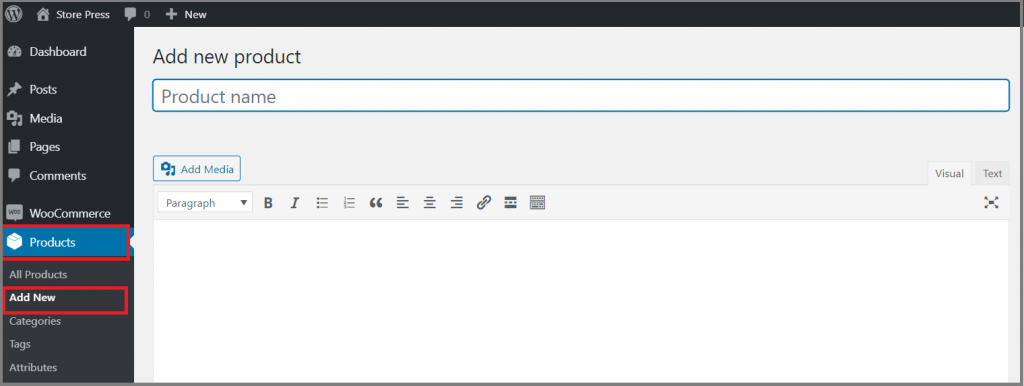
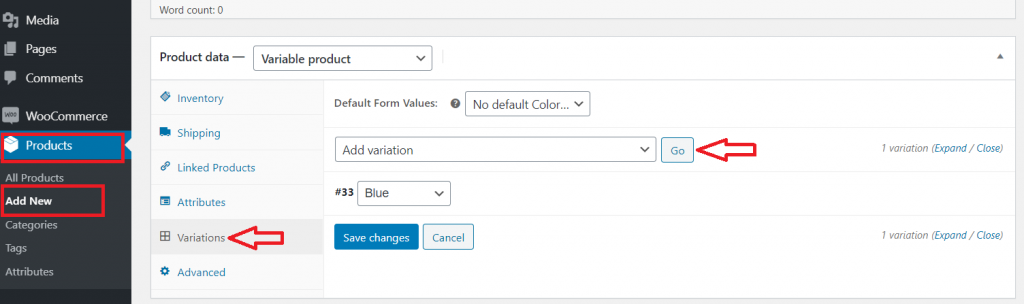
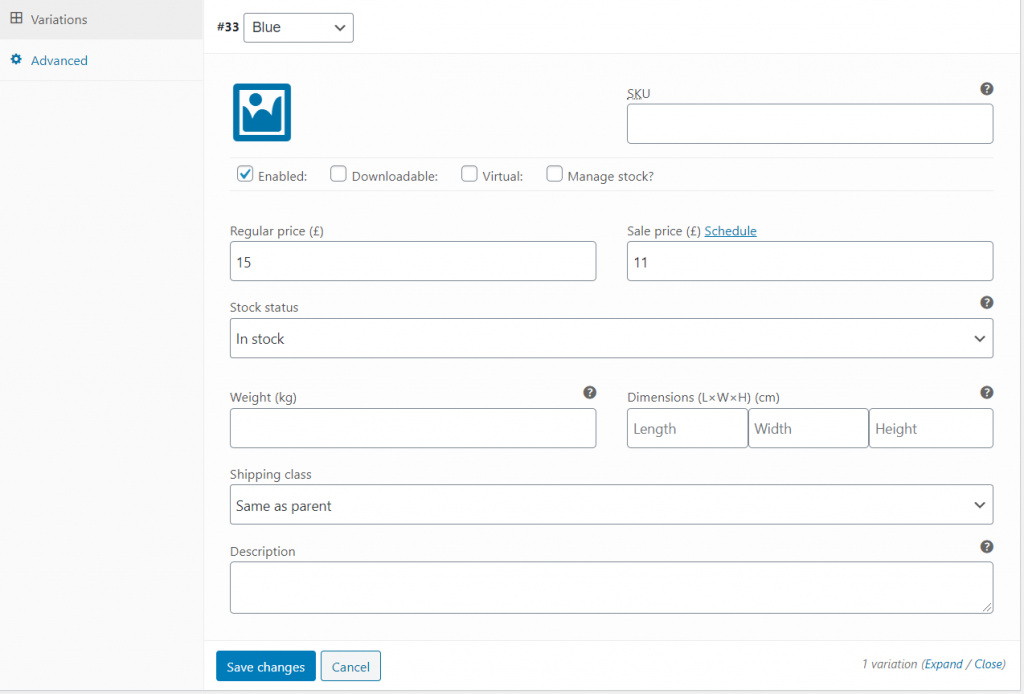
Now, you’ll have to add variation specific details and customize the rest of the settings.

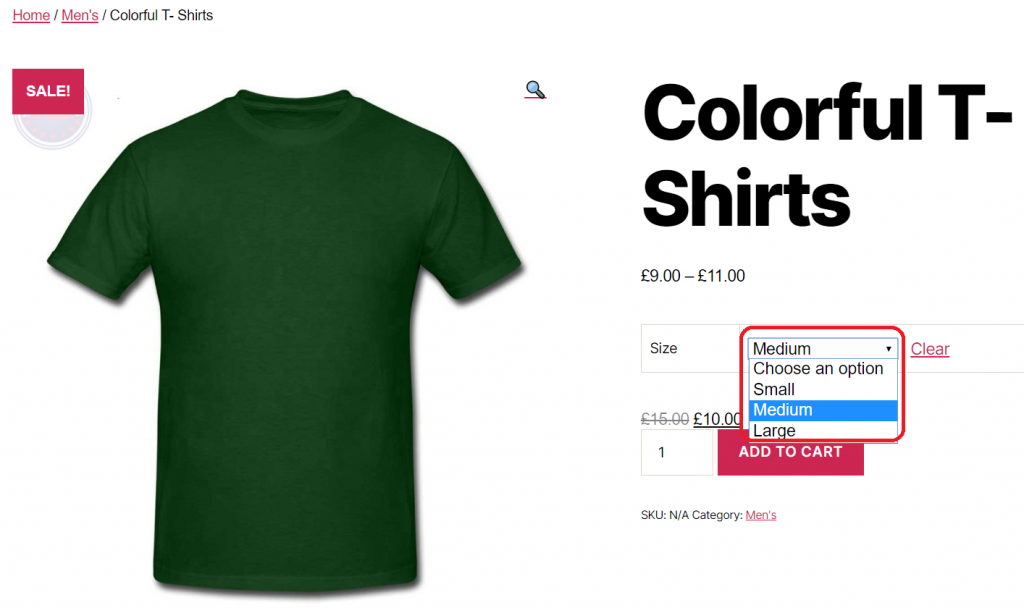
Now, see the view of your product frontend, once you have completed all the required steps.

color variation plugin effect

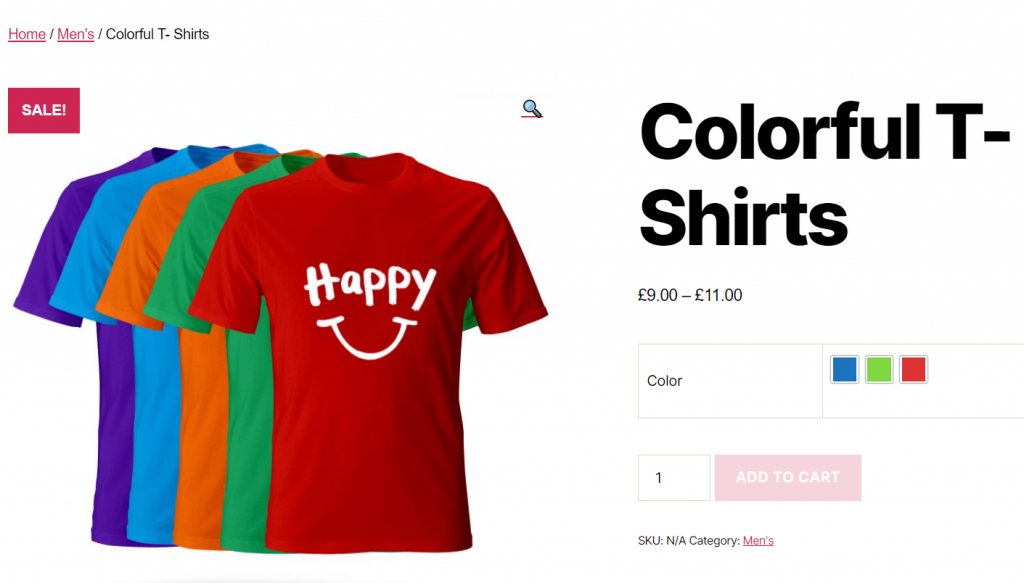
It is necessary for you to make your WooCommerce site more accessible to customers. By using the color swatches plugin, you are making it easier for them to choose their desired products. Furthermore, it makes your online store more accessible and also helps to skyrocket your conversion.

If you require any further information, feel free to ask in the comment section.

How to Install WordPress Plugins – Step by Step Guide

WordPress is the most popular Content Management System. But it comes with only the basic features to get your website online.

However, the unique part of WordPress is its vast number of plugins that allow you to add more features to your site. There are tons of free and premium plugins that you can choose to fully customize your WP website.

The need for plugins is increasing continuously. If you are using WordPress, you have to deal with plugins at some point.

Hiring experts to get install a plugin might not be an option in all scenarios. That’s why you need to know the step to installing WordPress plugins.

Here, I will discuss 3 different methods of installing WordPress plugins.

Before that, make sure to install WordPress on your computer.

In the following example, we are going to use the WooCommerce plugin. It’s the most popular WordPress plugin to build an eCommerce store.

Install a plugin from the WordPress Plugin Directory (admin dashboard)

The simple and easiest way to install plugins on your WordPress site is to use your WordPress dashboard.

The steps are:

  • Go to ‘Plugins’ from the left side admin panel and navigate to ‘Add New
  • You’ll find several tabs that let you switch the list of available plugins.
  • Use the top right-hand corner of the search field to find your desired plugin. ( I am showing WooCommerce as an example).
  • Simply click on the ‘Install Now’ button.
  • Once the plugin is installed, the button label will be changed from ‘Install Now’ to ‘Activate’.
  • Click on the blue ‘Activate’ button.
  • The plugin will be installed, activated and ready to use.
active your wp plugin

To check and configure the settings of your installed plugins, go to ‘Installed Plugins’ from the ‘Plugins’ section.

You have successfully installed the WooCommerce plugin. Now, it’ll take the basic WordPress operating system to turn into a fully functioning eCommerce store.

 Install a plugin using the upload option (manually)

The best option for installing a premium WordPress plugin is to upload it manually. Premium plugins can’t be installed by using the first method. Moreover, paid plugins are not listed in the WordPress plugin directory.

Before following other steps, you need to purchase your desired plugin from a valid source. I have purchased WooCommerce Variation Swatches and, in the following example, I am going to use this plugin. It is the most popular attribute variation swatches plugin in the WordPress plugin directory.

install variation swatches plugin

You may have started using WooCommerce for your online store, and selling physical products like watches, clothes, shoes or anything else. This plugin will help you to turn product variation into color, button, and image as swatches.

Follow these steps to install:

  • Download the plugin from the source (.zip file)
  • Head to your WordPress dashboard.
  • Navigate to the ‘Add New’ page under the ‘Plugins’ section.
  • Click on the ‘Upload Plugin’ button on the top of the page.
  • Now select the plugin by clicking on ‘Choose File’. 
  • Once the file is selected, click on the ‘Install Now’ button.
upload manually to install wordpress plugin

It’ll take some time before the plugin is installed. You’ll see the ‘Activate Plugin’ button when it is done. Press that button.

install wordpress plugin

Install a WordPress plugin manually using FTP

The third way to install WordPress plugins is by using FTP (a File Transfer Protocol). This process is slightly complicated as compared to the other two ways. There are several options for FTP, like FileZilla, FireFTP and etc. Here, I am using FileZilla to show you the process.

Steps to be followed:

  • Download the plugins source file and extract the zip file on your computer.
  • Establish an FTP connection to your hosting account using login credentials.
  • Navigate and access the path /wp-content/Plugins/
  • Open the folder where you store the plugin’s file from the ‘Local Site’ panel.
  • Upload the extracted folder from the zip file to your site’s plugin directory.
upload the file to install
  • Once the file is uploaded, visit the WordPress admin dashboard.
  • Activate the plugin by clicking on the ‘Activate’ link button.
active to install wordpress plugin

Once activated, then you may need to configure the plugin settings.

In this article, various methods to install WordPress plugins have been shown. Each of them is different and varies from beginner level to advanced level of difficulty. We hope this guide was helpful to you. So, what are you waiting for?

In addition, you can check out some of the useful WooCommerce plugins for your store that we highly recommend to use. If you still have any queries, feel free to ask in the comment section.

Custom Product Attribute with WooCommerce Variation

Custom product attributes are created per product (variable product) and should be used when the attribute is set to only that specific product. It should not be used on any other product in your store.

You may sell a variety of different items that do not share common attributes. For those types of products, you can set custom attributes.

To learn how to create product attributes for your WooCommerce products, read my linked article. The basic concept of WooCommerce variable products is also outlined there. 

Once you have created attributes for your WooCommerce products and added specific values of attributes –

Now select your desired product type:

  • Go to ‘Products’ from the left menu bar. You can add either a new item or edit an existing one.
  • Select ‘Variable product’ from the drop-down of the ‘Product data’ section.
select custom product type

It’s time to add custom product attributes:

  • Go to the ‘Attribute’ tab. A list of attributes that you have created for your products is visible here.
  • Keep the ‘Custom product attribute’ dropdown selected and click on the ‘Add’ button.
  • Enter the name of your attribute in the ‘Name’ field. (for example, size).
  • Enter the name of your terms in the ‘Value(s)’ section (for example, small, medium or large).
  • Don’t forget to separate each term with this “ | “ symbol.
  • Make sure to check both ‘Visible on the product page’ and ‘Used for variations’ for each attribute.
  • Then click on ‘Save attributes.
custom product attribute variable

The attributes have been added to your chosen products. Add variations to your selected products and customize the rest of the settings.

You can see the live result:

default variable product option

This is how your variable product options appear in a dropdown.

Expand feature with “WooCommerce Variation Swatches Plugin

See how it turns product attribute select dropdown options into beautiful swatches.

swatches plugin button

You can download the WooCommerce Variation Swatches Plugin for free, or purchase a license from the main site.

How to Bulk Edit or Update WooCommerce Products & Prices

As a WooCommerce store owner, don’t you need to edit your products quite frequently? But it could be a tough job to open each individual product details page and edit them one by one.

Suppose, you need to offer a discount to all your products on a special occasion.

Think of a scenario where inflation forces you to increase the price of all products. Assume that you have more than 500 products. How frustrating does it seem to click on each product to edit manually? It’s just a one-off situation!

Here are some common reasons to bulk edit WooCommerce products:

  • For changing ‘product visibility’ status.
  • To add or remove tags.
  • To define shipping classes.
  • When the price is required to increase or decrease.
  • To keep Featured product status or not.
  • If changes required in product categories.

There’s no doubt that you want to be able to update your products easily and in a faster way. Bulk editing becomes essential when you are dealing with a large number of products.

Making changes in bulk seems like a life-saving option. Not only it helps to avoid the hassle, but also saves your quality time. Bear in mind that, you are here to grow your store sales, and not for wasting your time.

The question is, does WooCommerce allow to bulk edit or update products & prices?

Yes, it does! There is an in-built option in WooCommerce for editing bulk products. The option helps you to select multiple products and make changes to the product data fields and update them.

This article will guide you on how to edit or update WooCommerce products & prices. Follow the step by step instructions given below:

Step 1:

  • Gain access to your WordPress dashboard.
  • Then click on ‘Products’ from the left side panel.
  • Select the products that you want to edit.
edit your bulk products

Step 2:

  1. On the top left of the screen, there’ll be a drop-down ‘Bulk Actions’.
  2. Choose the ‘Edit’ option.
  3. Click the ‘Apply’ button.
bulk options

Step 3:

Now you can see a bulk editing screen will appear, where you can make changes to the desired no. of products.

  • If there are any products you want to exclude from your selection, click the cross (x) under the ‘Bulk Edit’ field.
  • You can assign ‘Product categories’, ‘Product tags’, ‘Comments’ and change the product ‘Status’.
assigned your desired things

Step 4:

There are different product properties you can edit here. The changes that you can make in ‘Product data’ fields include:

  • Increase or decrease ‘Product price’
  • Set ‘Product price’ to Regular or Sale price.
  • ‘Weight’ and ‘Dimension’ of the products.
  • ‘Shipping class’ and ‘Visibility’.
  • Enable’ or Disable ‘Featured product’.
  • ‘Manage stock’ and modify ‘Stock quantity’.
  • Allow or ‘Do not allow ‘Backorders’.
  • ‘Sold individually’ or not.
  • Once the desired changes are made, click on the ‘Update’ button.
bulk product properties
An Example Scenario:

On a special occasion, you may want to offer a 5% discount to your customers from your sales price.

Here, I have selected the top 3 products. Note the current sales price of these products.

select your bulk product

To decrease the sales price of the selected products:

  • Go to the ‘Sale’ option from the Product data.
  • Select ‘Decrease existing sale price’ from the drop-down filed.
  • Enter the percentage and click on ‘Update’.

Note: Don’t forget to use the percentage (%) sign, if the price is being adjusted.

make your bulk changes

Now compare! The sales price for the selected products is decreased by 5%.

compare the changes

Keep in mind that, the price will not be changed for a grouped product with the bulk product option. In case you have any grouped products, you need to change it individually.

How to selectively filter products to Bulk edit or updates?

One of the common customizations every store owner looks in a WooCommerce is, filtering products to bulk updates.

In many scenarios, you have to handle a lot of products and there’s no time to do it one by one. Your online store is growing continuously. On the other hand, your time is getting shorter.

The question is, how can you select a specific set of products for bulk edit or updates? Filtering options would come to your rescue in such situations.

There are three different options you can filter your products:

filter your bulk products

Filter by category:

  • Select one of the categories from the dropdown menu.
  • Click on the ‘Filter’ button to list out all products under the chosen category.
  • All the products under that category are listed. You can make changes where required.
filter by category

Filter by product type:

filter by product type

Filter by stock status:

  • As per your requirements, you can filter products by stock status. To do so:
  • Go to ‘Filter by stock status’ from the drop-down menu.
  • You can choose in stock, out of stock or backorder.
  • Once selected, click on the ‘Filter’ button.
filter by stock status

Let me remind you once again, the bulk operation won’t be able to change variation products. You need to manually change the price for individual variations.

Read the linked article, in case you are struggling to create WooCommerce variations for your products.

As a WooCommerce store owner, you may have to manage a large number of products. It’s difficult to edit single products individually and also, it’ll take a considerable amount of time.

WooCommerce in-built edit option is enough when you have less than 999 products and most of them are simple products. But if you have a large number of variable products then you might need the help of a third-party plugin.

How to Create a WooCommerce Variable Product

Are you struggling with how to create WooCommerce variations for your products? I observed a large number of Google searches is about WooCommerce variable products.

Thus, I have decided to write about it in more detail.

The great thing about WooCommerce variable product is as easy as it sounds. Adding variable products to your WooCommerce store is even more comfortable. By following a simple process, your online store can get the benefits of WooCommerce variable products.

This article will provide you with everything that you may need to know about a variable product, variations, attributes, and other product options. You’ll also learn how to set them up for your products and extend them with a WooCommerce variable product plugin. 

To make it easy for you, we have created a video tutorial on how to create WooCommerce Variable Products.


https://www.youtube.com/watch?v=RPg8Np-y88c


However, if you want to follow text instructions, then you can continue reading the text version below:

The guide to WooCommerce variable product

You may already have basic knowledge about running a WooCommerce store.  So, if you want to jump to any specific points in this article, click on any one of the following links.

Here you’ll get an overview of what is covered in this article :

What is a WooCommerce variable product?

A variable product in WooCommerce is a type of product that allows a product to be divided into different variations.

Is it sounds complex? Don’t worry! A variable product in WooCommerce is a type of product that allows you to select different options.

These options are called ‘attributes,’ and you are allowed to create as many as you like.

A typical example would be a t-shirt which is available in different colors and sizes. If a customer can choose between a ‘red’ or a ‘blue’ t-shirt, that’s a variation. Instead of adding several versions of a t-shirt as a separate item, WooCommerce store owners can use the variable product to combine them.

How to add a variable product in WooCommerce?

The basic concept of WooCommerce variable products as outlined above. So, it’s time to put that knowledge into action. Follow the step-by-step instructions to create variable products for your WooCommerce store.

Step 1: Create product attributes for your WooCommerce products:

You need to set up attributes before creating the variations for products. To set up attributes, you need to follow these given steps:

  • Choose ‘Attributes’ in the left menu bar under the ‘Products’ section.
  • Add the title of the attribute in the ‘Name’ field.
  • The slug field is optional.
  • Click on the ‘Add attribute’ button to finalize the changes.
  • You can see new attributes are now listed in the table to the right.
add your attribute here


Step 2: Add specific values of an attribute.

  • In the ‘Terms’ column of your attribute, click ‘Configure terms.’
  • On the left side, there is an ‘Add new Color’ form. Add each color you sell clothing in (such as red, blue, or green)
  • Keep adding new color for each term by clicking the ‘Add new color’ button. (you can add as many colors as you need).
 
list looks like
This is what my list now looks like.

Step 3: Adding attributes to an individual product.

  • Go to ‘Products’ from the left menu bar. You can add either a new item or edit an existing one.
add your product
Add new products from the ‘Add New’ menu and ‘All Products’ to edit existing ones.
 
  • Select ‘Variable product’ from the drop-down of the ‘Product data’ section.
variable product
 
  • Go to the ‘Attribute’ tab. A list of attributes that you have created for your products is visible here.
  • Select one of the attributes from the list (Here, I have selected the ‘color’ attribute).
  • You can select more than one option or click on the ‘Select all’ button.
  • Don’t forget to check both ‘Visible on the product page’ and ‘Used for variations’.
  • Then click on ‘Save attributes.
  •  Note: if you want, then more attributes can be added. (from the ‘Add new’ button).
attributes is added
Attributes have been added to your products.

Step 4: Add variations to your product.

  • Right below the Attributes, go to the ‘Variations’ section and select ‘Add variation’ from the drop-down.
  • There will be a new drop-down menu after you hit the ‘Go’ button.
  • Now it’s time to choose the attribute for your variations (such as a particular color).
add your variation

Step 5: Customize the rest of the settings.

  • Expand the variations panel
  • This allows you to add different information for each variation.
  • There are options to upload an image, add the price, stock status, dimensions, and more.
  • But it’s mandatory to set a price for variation.
  • To finalize the changes, click on ‘Save changes.’
make your changes here
 

You are almost done. Just press the ‘Publish’ button after picking up the appropriate category for your variable product and see your result.

without a plugin


Now you can see the live results. This is how your variable product options appear.

Extend with a powerful WooCommerce plugin

The standard WooCommerce settings for variable products are covered. Still, these things don’t meet your exact requirements? Then, I think you are looking for ways to make your variable product extend with a more powerful and rich feature.

You need a plugin to create a new experience for WooCommerce product variations.

output using WooCoomerce variable product plugin
 

Here is an example of a single feature of “WooCommerce Variation Swatches Plugin.” You can download it free or purchase a license from the main site.

All you need to do is, Install and activate the plugin. Now see, it turns the product attribute select drop-down into beautiful swatches.

In this article, you have learned the basics of WooCommerce variable products and step-by-step instructions to improve your store’s customer experience.

I hope you can create a major impact on your online store by opting to use WooCommerce variable products. If you require any further information, feel free to ask in the comment section.