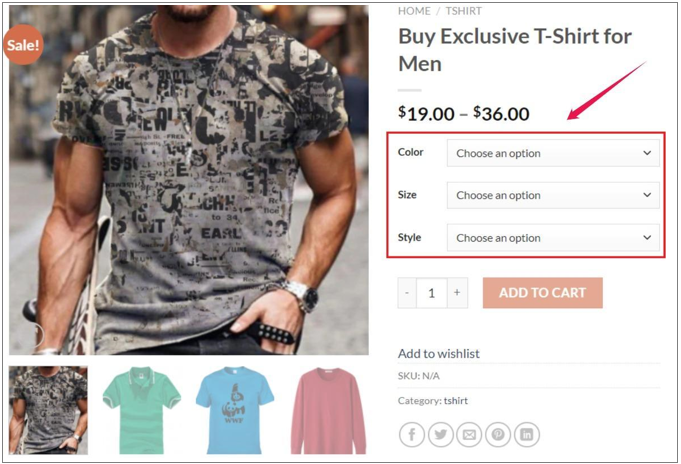
The default feature of WooCommerce shows product variations as a drop-down list. It’s simple, but your customers won’t have a good overview of the products that they desire to buy.
This is how a product drop-down option appears on the default WooCommerce store –
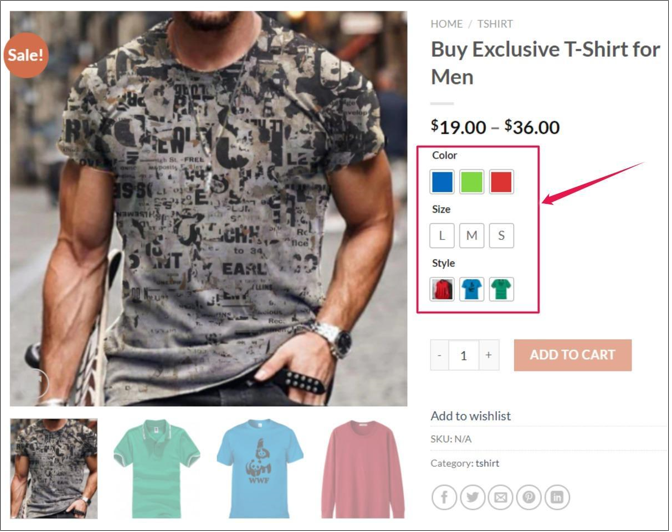
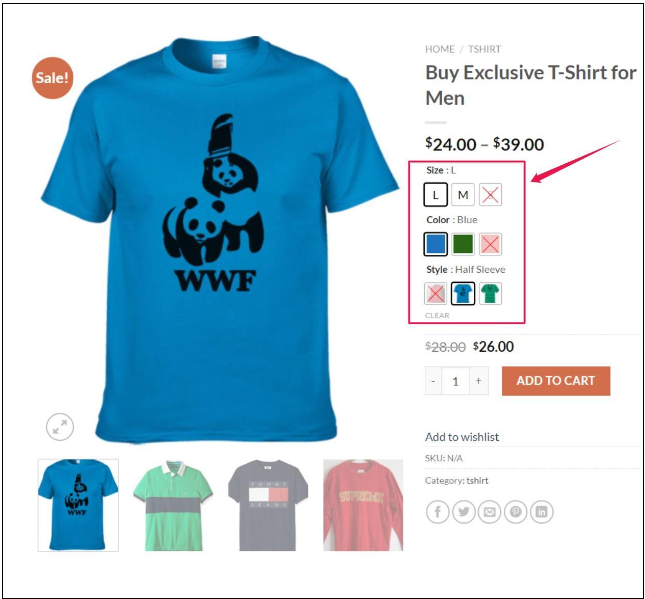
However, once attribute types for product attributes are selected using the Variation Swatches plugin, the front end of the product page will look like the following screenshot –
Now, let’s get into enabling swatches for WooCommerce Variable Product Variations. It’s straightforward to configure. Three are two ways to install this plugin. We are going to describe both ways in this tutorial.
- Enable Variation Swatches on Existing Variable Products.
- Setup Variation Swatches for New Variable Products.
Suppose you don’t have any variable product created on your site. In that case, you can start from here –
❖ Enable Variation Swatches on Existing Variable Products
The great thing about the WooCommerce variable product is that it is as easy as it sounds. This setup process includes creating variable products and variation swatches simultaneously.
Setup Swatches Plugin:
It requires a simple WooCommerce plugin to enable color, label, image, and radio swatches. You can download the Variation Swatches plugin and upload or directly install it from your dashboard.
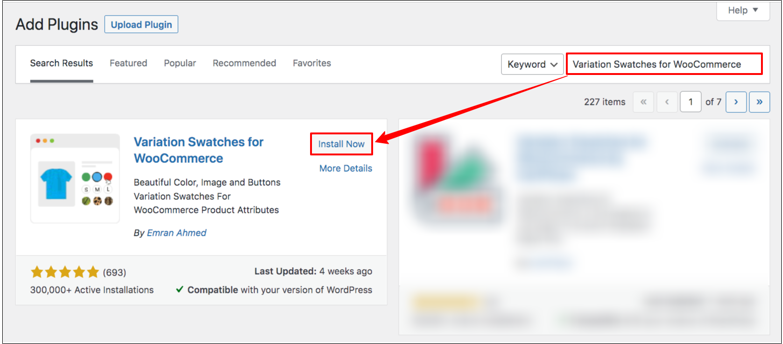
To install directly, follow the below steps:
- Head to WordPress Dashboard and navigate to
- After that, click the Add New
- and search for Variation Swatches for WooCommerce.
- Now install and activate the plugin.
Once you successfully install and activate the plugin, you need to create global attributes. Before that, set up attributes before creating the variations for products.
Your products will be visible immediately. You can notice all your variable products, which have variations, are now turned into buttons. That’s because of installing the WooCommerce Variation Swatches plugin.
This will be the look of your product page once the swatches plugin is installed –
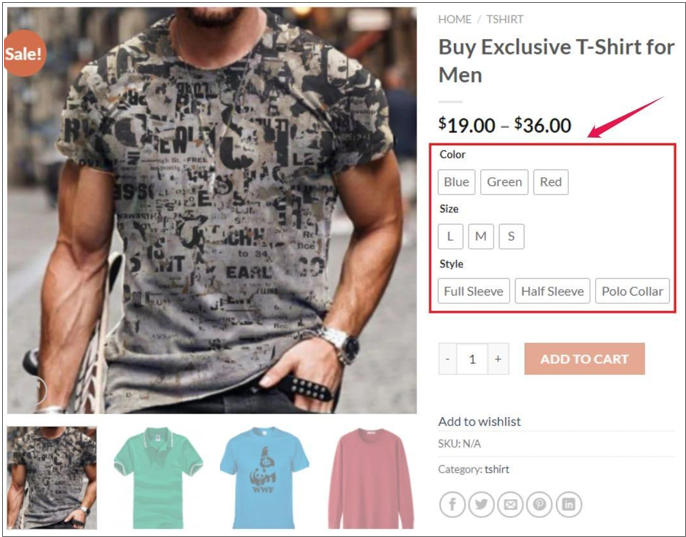
You can change the product variation selection drop-down into color, button, image, and radio swatches. The Swatches technology turns product attribute select drop-down into beautiful swatches, as you have seen screenshot above.
Follow the below steps:
Please note that the WooCommerce Variation Swatches plugin comes with four attribute types: Color, Image, Button, and Radio.
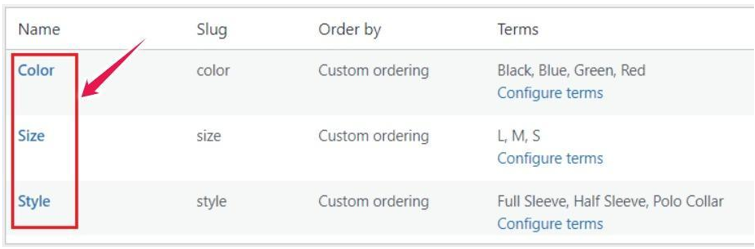
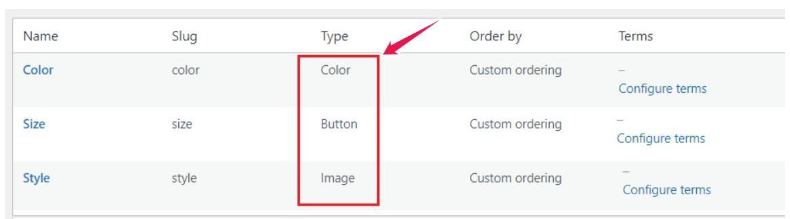
We have created Color, Size, and Style attributes for demonstration purposes.
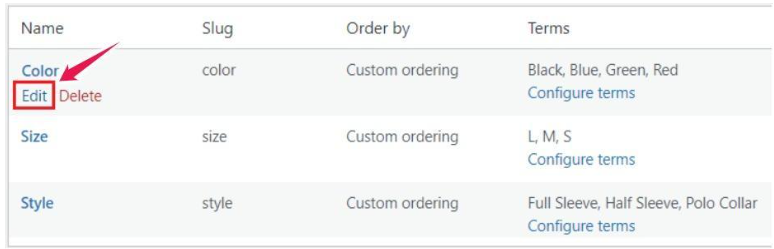
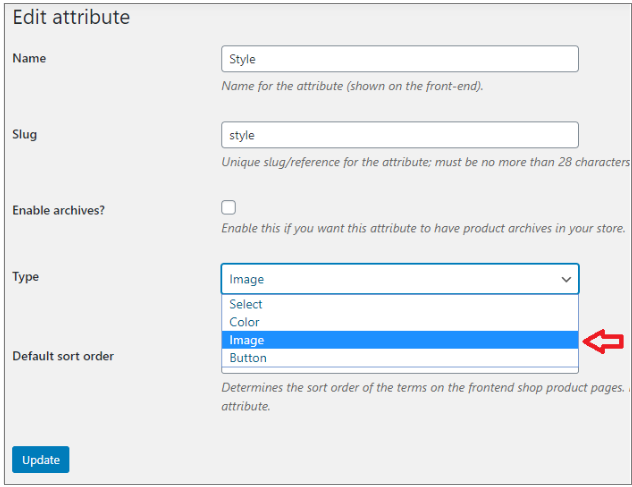
Now it’s time to edit the Color attribute type for the Color, Image for the Style look, and Button attribute type for the Size attribute.
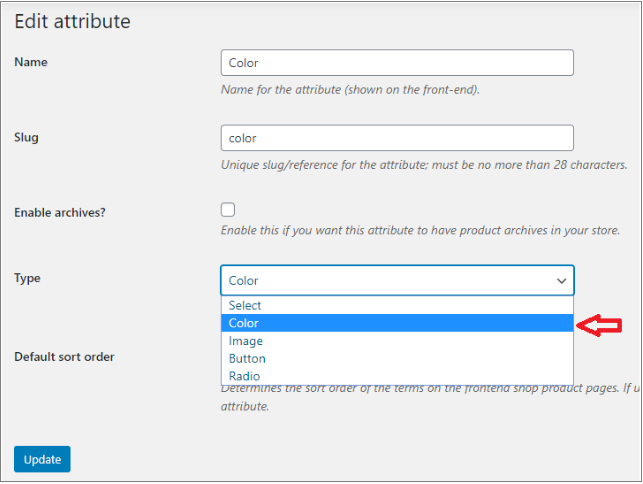
Click on Edit to set the color attribute type to Color attribute.
From the Type drop-down, select Color type, and press Update.
- Get back to Attribute from the Products menu.
- Edit Style attribute as like Color attribute.
Repeat the same steps for the Size attribute like Color and Image attributes.
After completing the attribute type selection, return to the attribute list page. You’ll notice that the attribute list looks like the following screenshot.
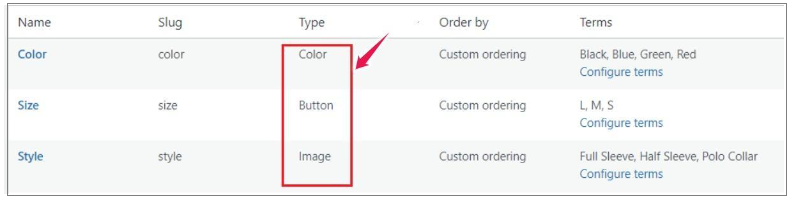
Variations for the Size attribute now look fine, but variations for a Color attribute need to be defined colors, and variations for the Style attribute need to add images.
Continue to the next steps-
Editing Variations:
To define colors as variations inside the Color attribute –
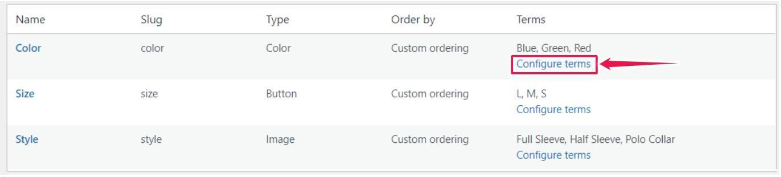
- Head over to Attributes under the Products section.
- Select Configure terms from the Color attribute.
From the color-picker, you can add your desired color. An alternate way is to type the HEX value for the color.
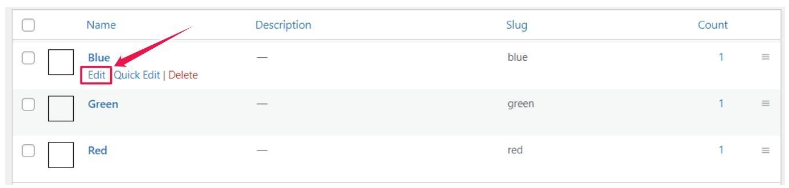
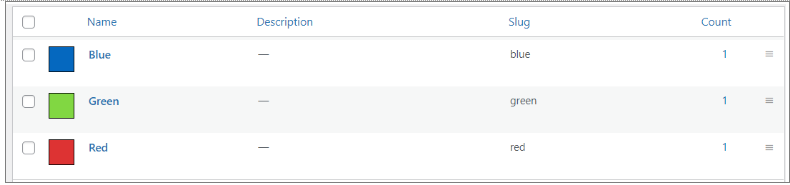
- For Pattern, three variations are listed here: Blue, Green, and Red.
- Edit each variation one by one to add variation color.
- For demonstration purposes, we are editing the blue color variation here.
- Edit link for Blue variation.
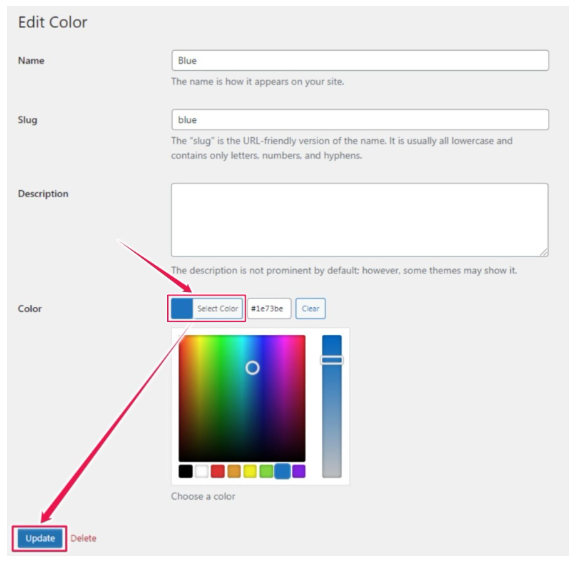
- Select desired color from Color-Picker from the variation edit panel.
- After that, update the changes by clicking on the Update button.
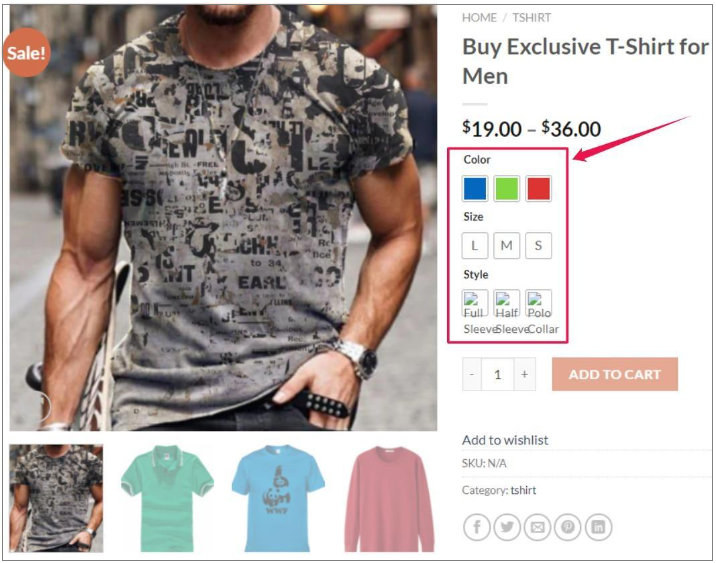
When all color variations are updated successfully, the front end will look like the following.
- After updating Color attribute variations, now edit the Style attribute by selecting Configure terms like pattern attribute,
- Again press the Configure terms for style, and a list of Style terms comes up, like Color.
Edit each variation to insert image variation. For demonstration purposes, we are showing an Edit link for the Basic Half Sleeve attribute.
- Upload your desired variation image from Upload / Add Image from the variation edit panel.
- After that, save the changes by pressing the Update button.

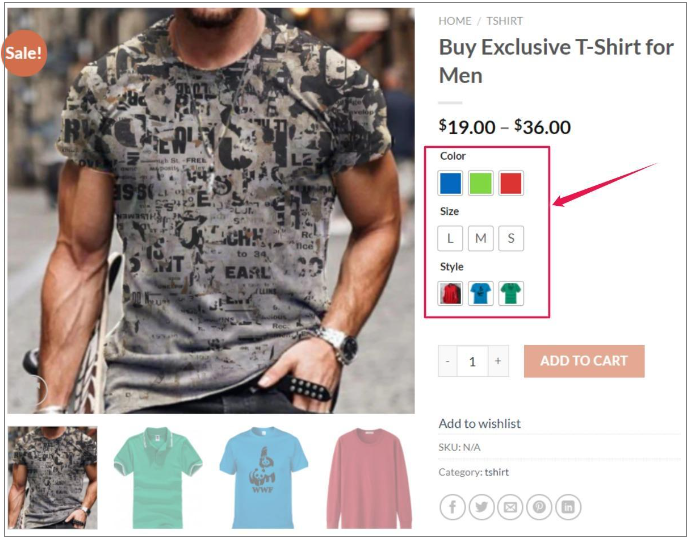
Now check the view of your product front-end. After updating images for all variations, the front-end would like the following screenshot.
There are options for styling swatches such as rounded or squared attribute variation swatches shape style as well.
❖ Set up Variation Swatches for new variable products
Step 01: Create Global Attributes and Variations:
Once you successfully install and activate the plugin, you need to create global attributes. But, the first setup attributes before creating the variations for products.
Follow the below steps:
- Choose ‘Attributes’ in the left menu bar under the ‘Products’ section.
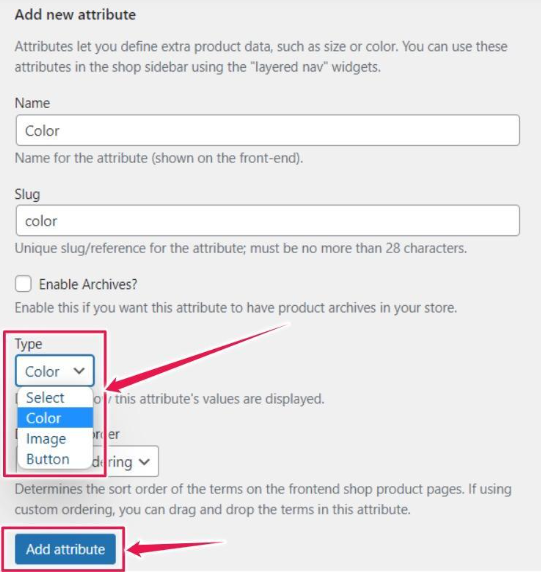
- Add the title of the attribute in the ‘Name’ field.
- The slug field is optional.
- Enter the corresponding attribute type from the Type drop-down.
- Click on the ‘Add attribute’ button to finalize the changes.
Once color, image, and button attributes are created successfully, you can see new attributes are now listed in the table to the right.
Step 2: Add specific values of an attribute:
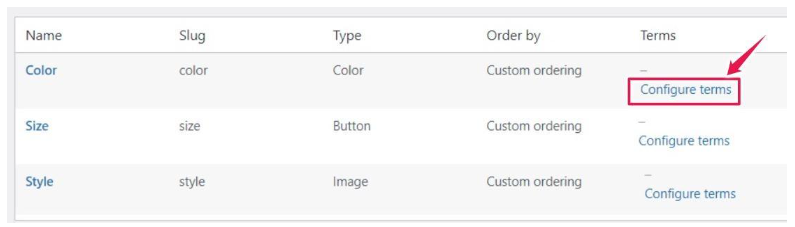
To create variations for each attribute, select Configure terms links for attribute types.
Steps to create variations for Color attributes
- Select Configure terms links for Color type to create variations for Color attributes.
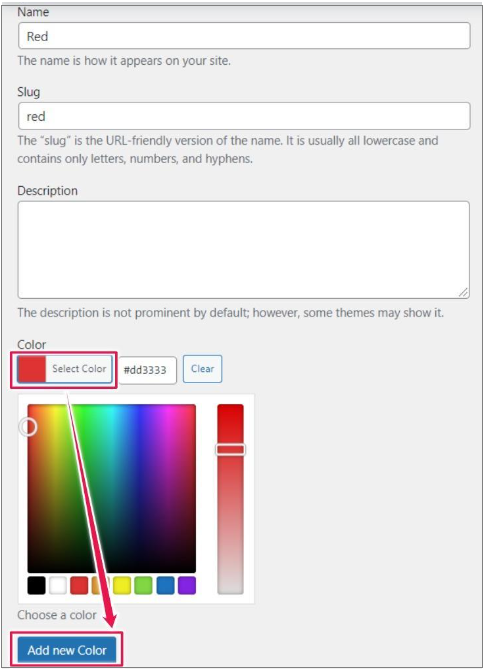
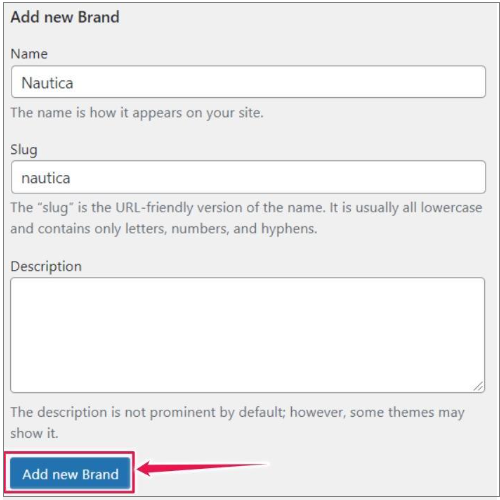
- There will be a ‘Add new Color’ form.
- Add each color you sell clothing in (such as red, blue, or green)
- Keep adding new colors for each term by clicking the ‘Add new Color’ button.
- Add your desired color from the color picker.
- An alternate way is to type the HEX value for the color.
You can add as many colors as you need. We have created blue, green, and red color variations for demonstration purposes for color attributes.
Steps to create variations for Image attributes
- Select Configure terms links for Image type to create variations for Image attributes.
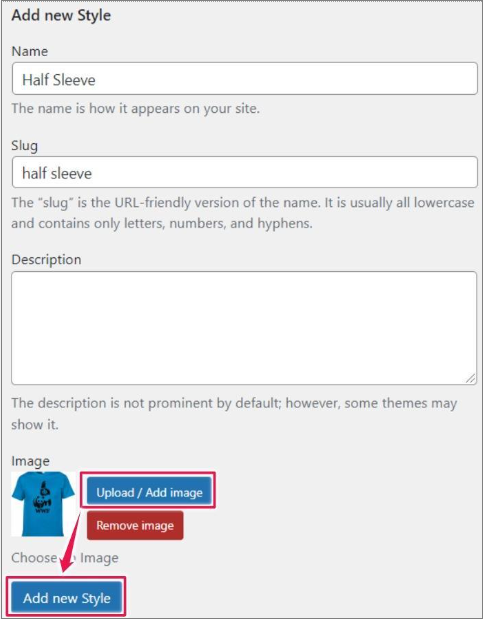
- Click on the Upload / Add image button to add images. Add each image you sell clothing in.
- There is an option to upload the desired variation image, image size, tooltip option, etc.
- Click the ‘Add new Style button once done.
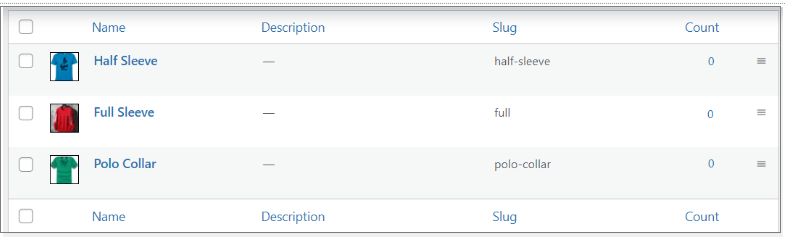
Here, we have added three different image variations (Half Sleeve, Full Sleeve, and Polo Collar) to show you an example.
Repeat the same steps for the Size attribute like Color and Image attributes.
Step 04: Display Swatches on Variable Product Page
- Now, you have to enable swatches on the variable product page.
- Go to ‘Products’ from the left menu bar.
- Scroll down to the ‘Product data’ section.
- Select ‘Variable product’ from the ‘Product data’ drop-down section.
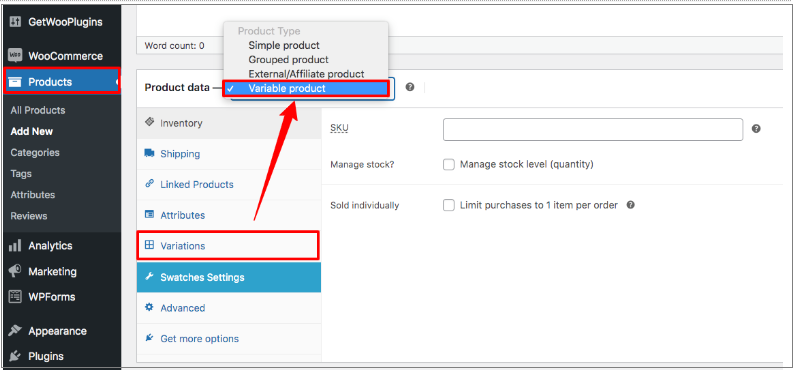
- Head to the ‘Attribute’ tab.
- A list of attributes you have created for your products will be visible here.
- add custom product attribute from the list.
- All globally created attributes will appear here.
We are going to add all attributes one by one.
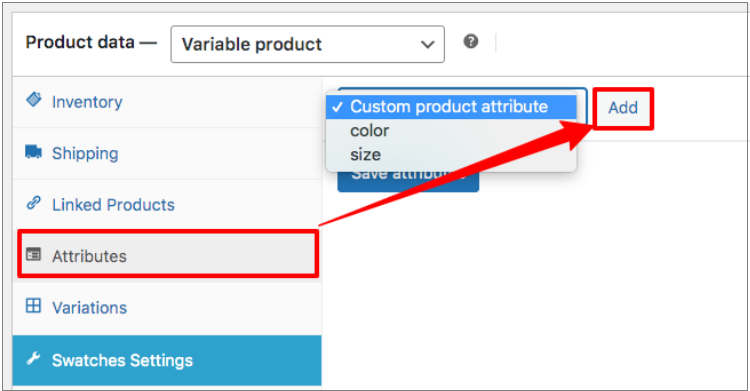
Add Color, Image, and Label attributes by clicking the Add button.
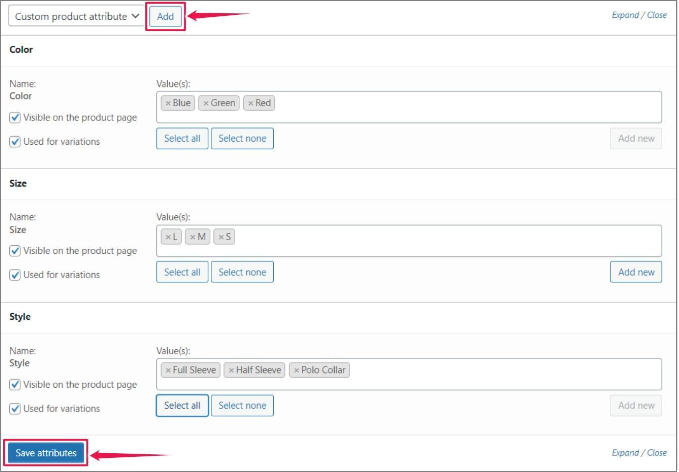
- Click on the Select All button from each attribute setting to add all its available variations.
- Don’t forget to check both ‘Visible on the product page’ and ‘Used for variations.’
- Then press Save attributes.
Step 5: Add variations to your product
- Right below the Attributes, head to the ‘Variations’ section
- Select your desired option from the drop-down list.
- Press the Go button.
Here, it’ll add all available variations combinations for created attributes.

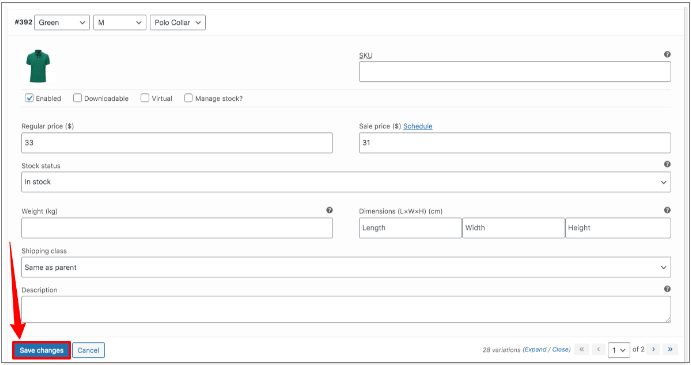
Step 6: Customize the rest of the settings.
- Expand the variations tab.
- This allows you to add different information for each variation.
- There are options to upload an image, add the price, stock status, and more.
- But it’s mandatory to set a price for variation.
- Add price and variation image for individual variation.
- To finalize the changes, click on the Save changes button.
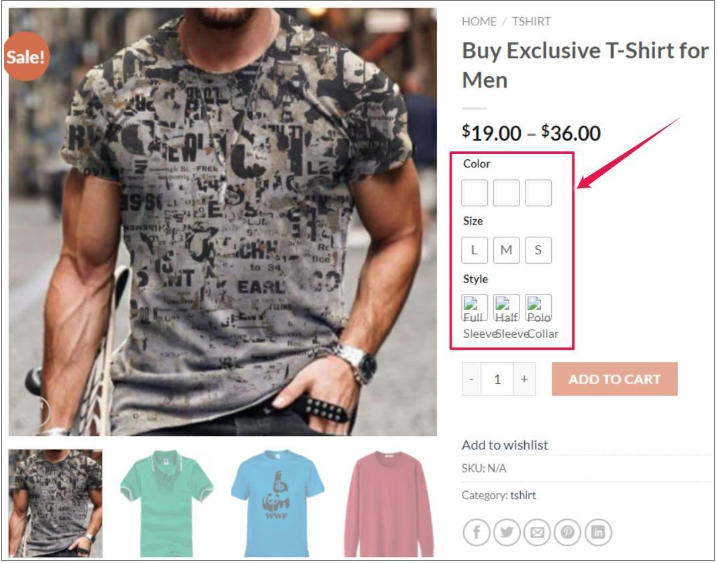
Once you have completed all the required steps, check the view of your product page.
See how it turns the product attribute select drop-down looks by adding a label, image, and color swatches.

Rather than a generic drop-down, let your customers click on the visual representation for each product variation.
➔ Enable Radio Variation Swatches
A radio button is a quicker way for the user to scan all the options and choose one. This feature helps you to have a better UX in your WooCommerce site.
The option for radio buttons now comes with the free version of WooCommerce Variation Swatches.
The radio swatches feature was a premium version of the WooCommerce Variation Swatches plugin before.
Now, let’s start with how you can enable radio variation swatches.
You can create attribute variations for your WooCommerce products. There is an option to edit existing variations as well.
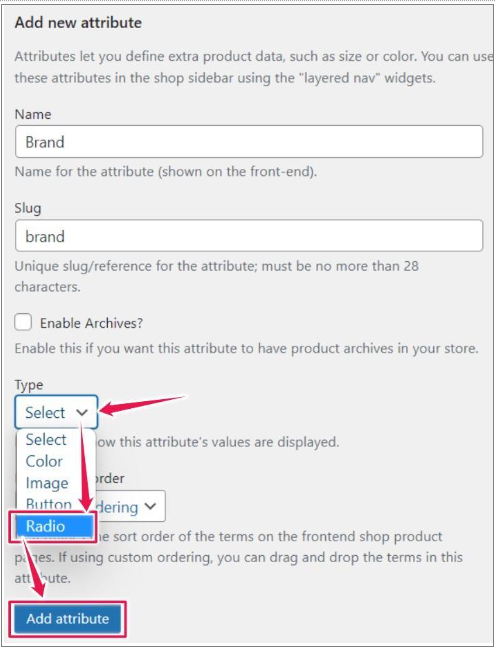
- Head to ‘Attributes’ under the ‘Products’ section.
- Fill in the ‘Name’ field, and the slug is optional. (For demonstration purposes, we have termed the attribute name as Brand).
- Select your attribute type as ‘Radio‘ from the ‘Type‘ drop-down menu.
- After that, click on the Add attribute button.
Once you have added attributes for Radio, click on the ‘Configure terms’ from the attribute list to create product variations.
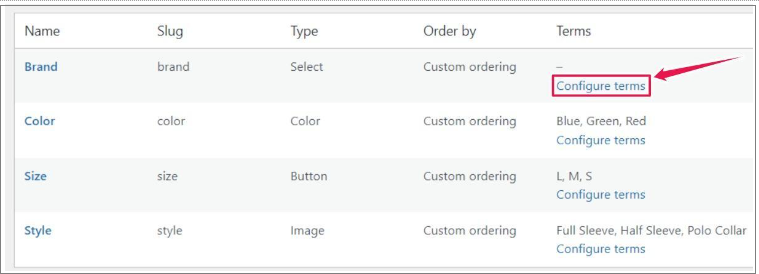
Keep adding new attributes to each term by clicking the Add new button.
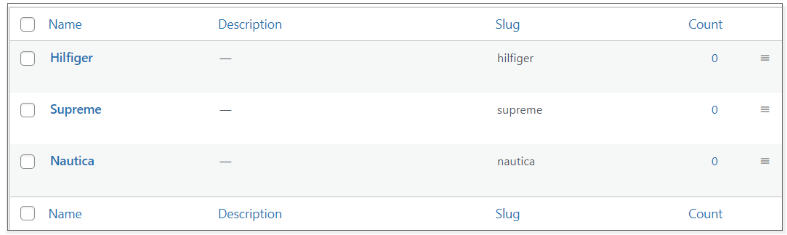
For demonstration purposes, we have added three brand names; Nautica, Supreme, and Hilfiger.
You need to complete the rest of the settings at this stage, as shown above.
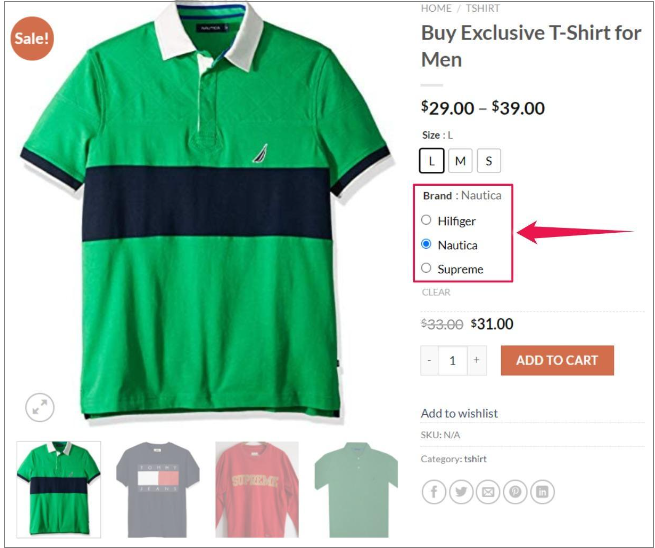
Once all the required steps are completed, check your product front-end’s view.
That’s how your customers can view all the possibilities without having to scroll through a drop-down list.
➔ Wait! Still more to come
A pro version of the WooCommerce Variation Swatches plugin is available, with many more effective features.
The premium version of this swatches plugin does a wonderful job. Let’s check out some of its amazing features.
As you have already installed the free version of the WooCommerce Variation Swatches plugin, now it’s time to install the pro version.
Note: the premium version of this plugin is the extension of WooCommerce Variation Swatches.
Once the pro plugin is installed and activated, you have to follow the below steps:
➔ Enable Swatches on Shop/Archive Page With Add To Cart Button
You can show entire attributes on the single product page or all selected attributes on the shop page. It’s a premium feature of the WooCommerce Variation Swatch plugin.
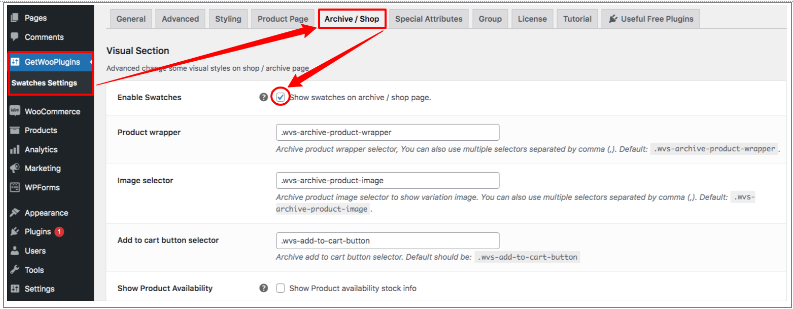
Steps to enable image, color, label, and radio swatches on the store page:
- Navigate to Swatches
- Click on the Archive/ Shop tab.
- You’ll get Show swatches on the archive/shop page option.
- Enable and save your settings.
You can enable Swatches before and after the add to cart button and set Swatches to align from the same page.
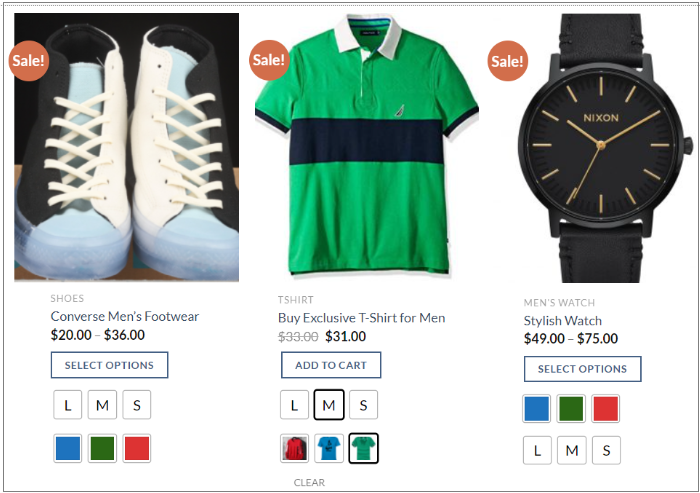
It’s time to check the outcome on your shop page. When desired options from the available product are selected, it’ll appear like the following screenshot on the shop page.
➔ Blur/ Cross Sign/ Hide of Stock Product Variation Swatches
You need to avoid user frustration by never letting them pick a product they can’t purchase. By default, WooCommerce doesn’t blur or cross any out-of-stock variations. It’s a premium version of this WooCommerce Variation Swatch plugin.
- Navigate to Swatches.
- Click on the Advanced tab.
- Select your desired option from Attribute behavior.
- Click on the Save Changes button.
Now you can check your product. It’ll show as out of stock on the shop page as well as the product page.
Final Words
There is no doubt that select drop-downs for variable products are no longer preferred. Variation swatch features will bring a real-time shopping experience.
Adding the variation swatches features to your WooCommerce site will attract more customers and increase your revenue. Many other sales-boosting features come with this plugin, which is very straightforward.