Are you struggling with how to create WooCommerce variations for your products? I observed a large number of Google searches is about WooCommerce variable products.
Thus, I have decided to write about it in more detail.
The great thing about WooCommerce variable product is as easy as it sounds. Adding variable products to your WooCommerce store is even more comfortable. By following a simple process, your online store can get the benefits of WooCommerce variable products.
This article will provide you with everything that you may need to know about a variable product, variations, attributes, and other product options. You’ll also learn how to set them up for your products and extend them with a WooCommerce variable product plugin.
To make it easy for you, we have created a video tutorial on how to create WooCommerce Variable Products.
However, if you want to follow text instructions, then you can continue reading the text version below:
The guide to WooCommerce variable product
You may already have basic knowledge about running a WooCommerce store. So, if you want to jump to any specific points in this article, click on any one of the following links.
Here you’ll get an overview of what is covered in this article :
What is a WooCommerce variable product?
A variable product in WooCommerce is a type of product that allows a product to be divided into different variations.
Is it sounds complex? Don’t worry! A variable product in WooCommerce is a type of product that allows you to select different options.
These options are called ‘attributes,’ and you are allowed to create as many as you like.
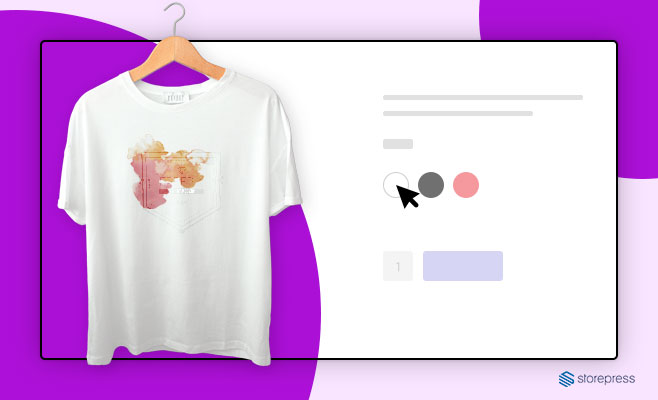
A typical example would be a t-shirt which is available in different colors and sizes. If a customer can choose between a ‘red’ or a ‘blue’ t-shirt, that’s a variation. Instead of adding several versions of a t-shirt as a separate item, WooCommerce store owners can use the variable product to combine them.
How to add a variable product in WooCommerce?
The basic concept of WooCommerce variable products as outlined above. So, it’s time to put that knowledge into action. Follow the step-by-step instructions to create variable products for your WooCommerce store.
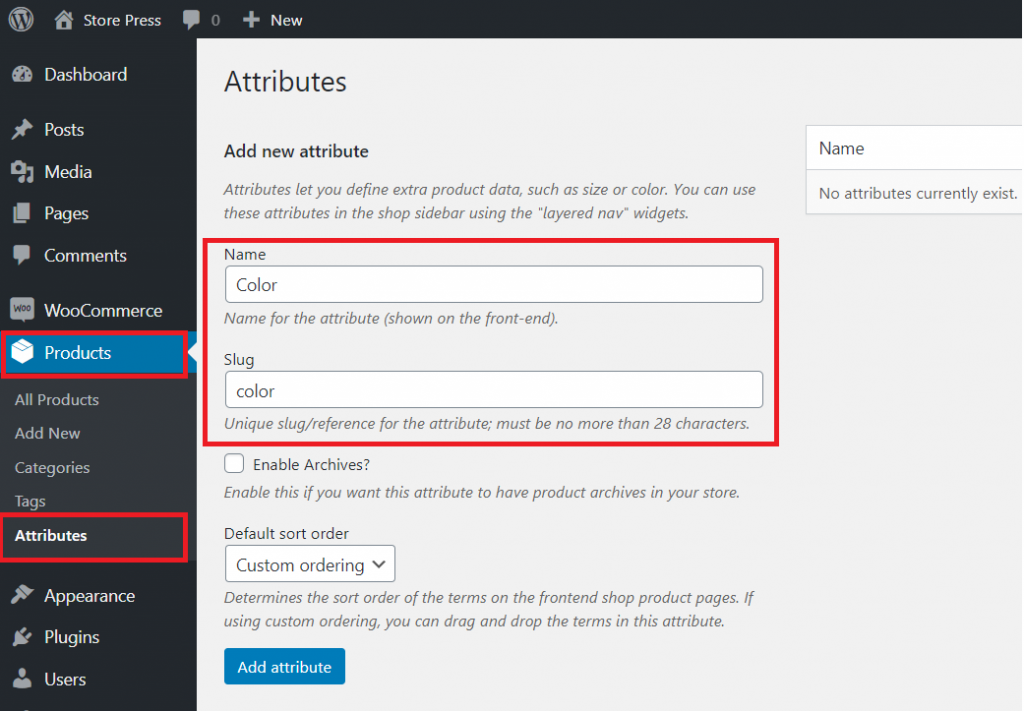
Step 1: Create product attributes for your WooCommerce products:
You need to set up attributes before creating the variations for products. To set up attributes, you need to follow these given steps:
- Choose ‘Attributes’ in the left menu bar under the ‘Products’ section.
- Add the title of the attribute in the ‘Name’ field.
- The slug field is optional.
- Click on the ‘Add attribute’ button to finalize the changes.
- You can see new attributes are now listed in the table to the right.
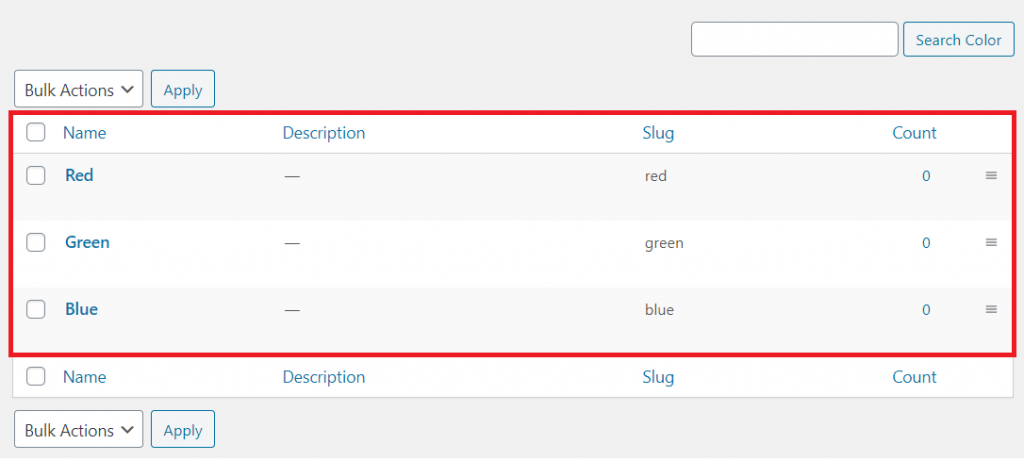
Step 2: Add specific values of an attribute.
- In the ‘Terms’ column of your attribute, click ‘Configure terms.’
- On the left side, there is an ‘Add new Color’ form. Add each color you sell clothing in (such as red, blue, or green)
- Keep adding new color for each term by clicking the ‘Add new color’ button. (you can add as many colors as you need).
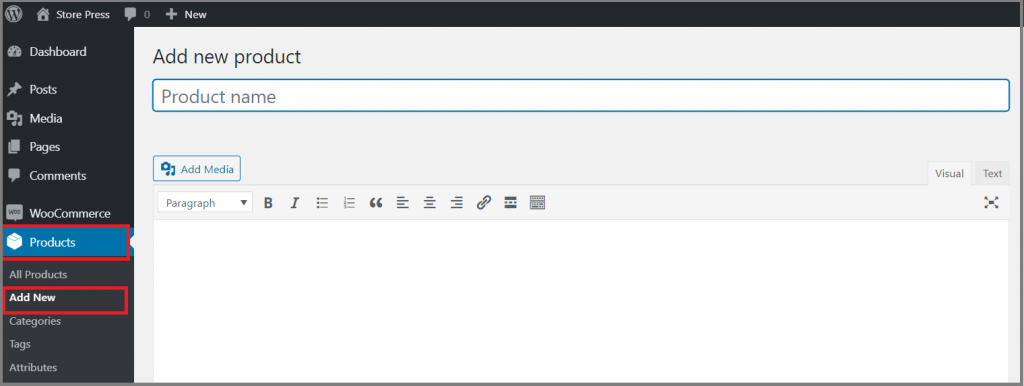
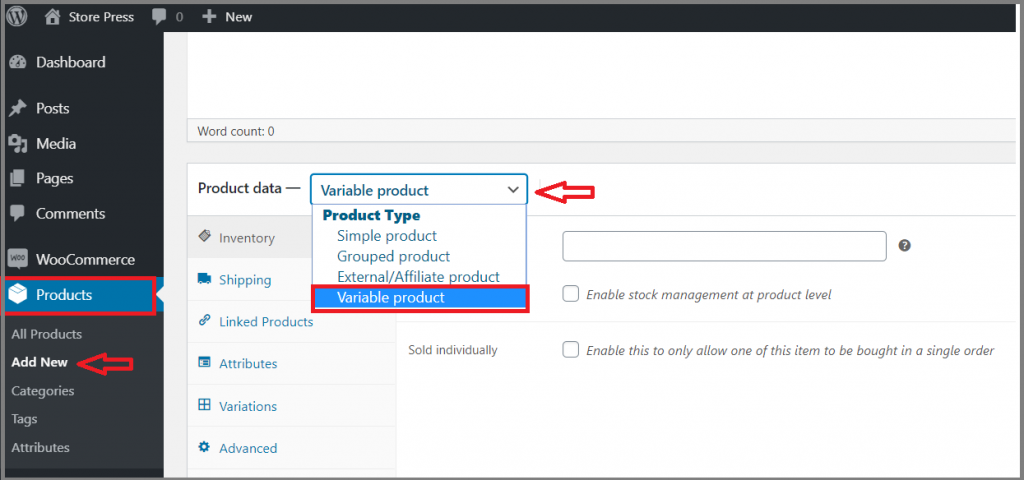
Step 3: Adding attributes to an individual product.
- Go to ‘Products’ from the left menu bar. You can add either a new item or edit an existing one.
- Select ‘Variable product’ from the drop-down of the ‘Product data’ section.
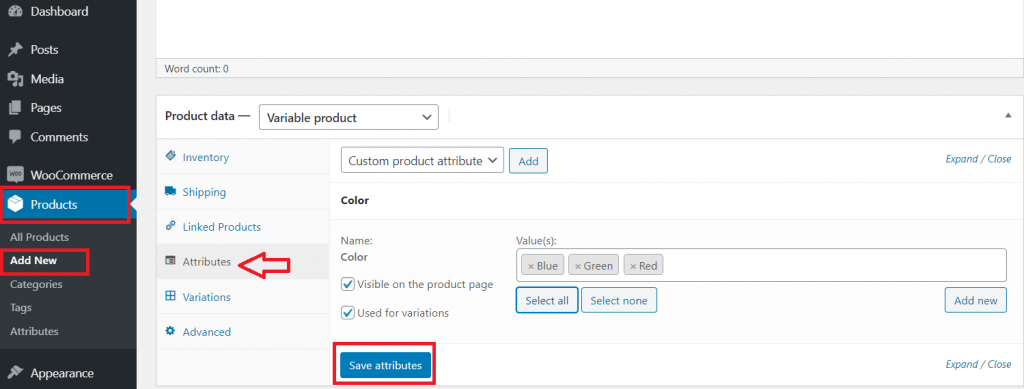
- Go to the ‘Attribute’ tab. A list of attributes that you have created for your products is visible here.
- Select one of the attributes from the list (Here, I have selected the ‘color’ attribute).
- You can select more than one option or click on the ‘Select all’ button.
- Don’t forget to check both ‘Visible on the product page’ and ‘Used for variations’.
- Then click on ‘Save attributes.
- Note: if you want, then more attributes can be added. (from the ‘Add new’ button).
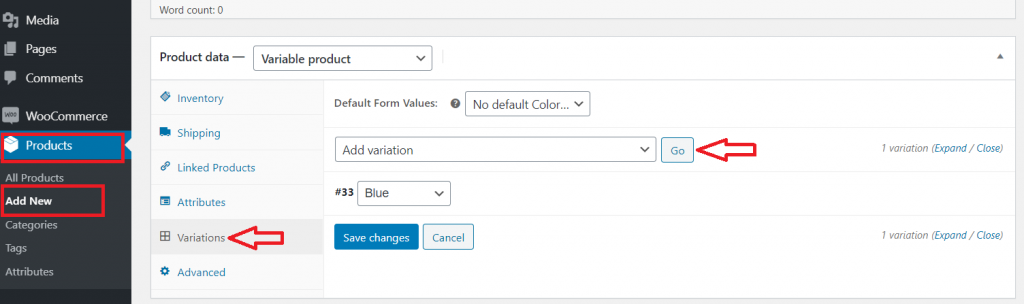
Step 4: Add variations to your product.
- Right below the Attributes, go to the ‘Variations’ section and select ‘Add variation’ from the drop-down.
- There will be a new drop-down menu after you hit the ‘Go’ button.
- Now it’s time to choose the attribute for your variations (such as a particular color).
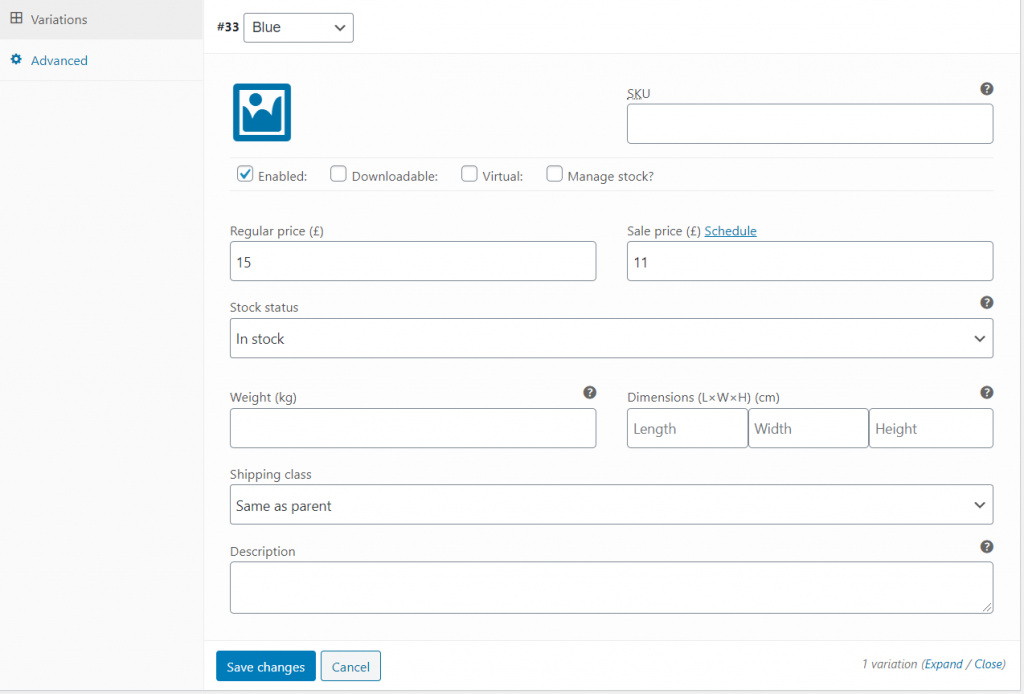
Step 5: Customize the rest of the settings.
- Expand the variations panel
- This allows you to add different information for each variation.
- There are options to upload an image, add the price, stock status, dimensions, and more.
- But it’s mandatory to set a price for variation.
- To finalize the changes, click on ‘Save changes.’
You are almost done. Just press the ‘Publish’ button after picking up the appropriate category for your variable product and see your result.
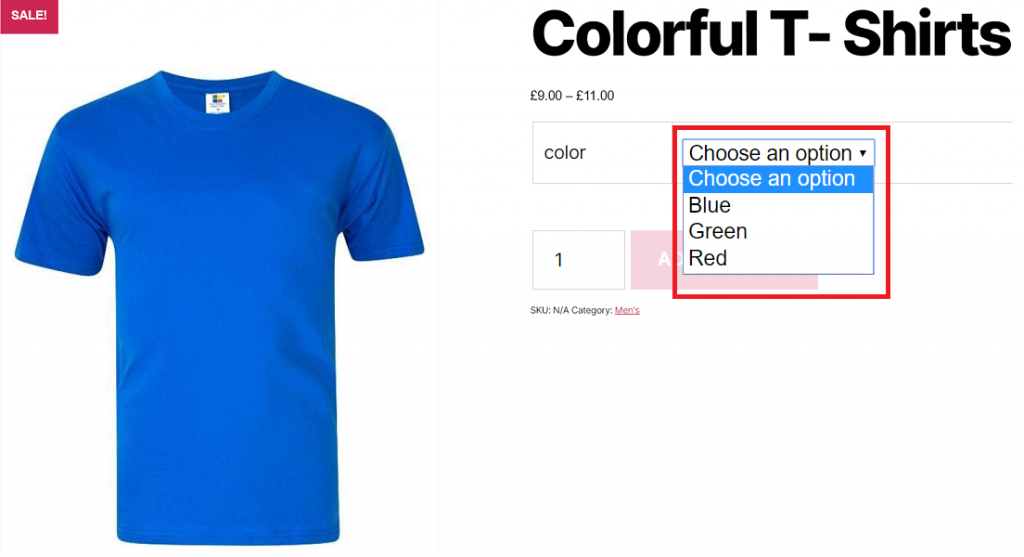
Now you can see the live results. This is how your variable product options appear.
Extend with a powerful WooCommerce plugin
The standard WooCommerce settings for variable products are covered. Still, these things don’t meet your exact requirements? Then, I think you are looking for ways to make your variable product extend with a more powerful and rich feature.
You need a plugin to create a new experience for WooCommerce product variations.
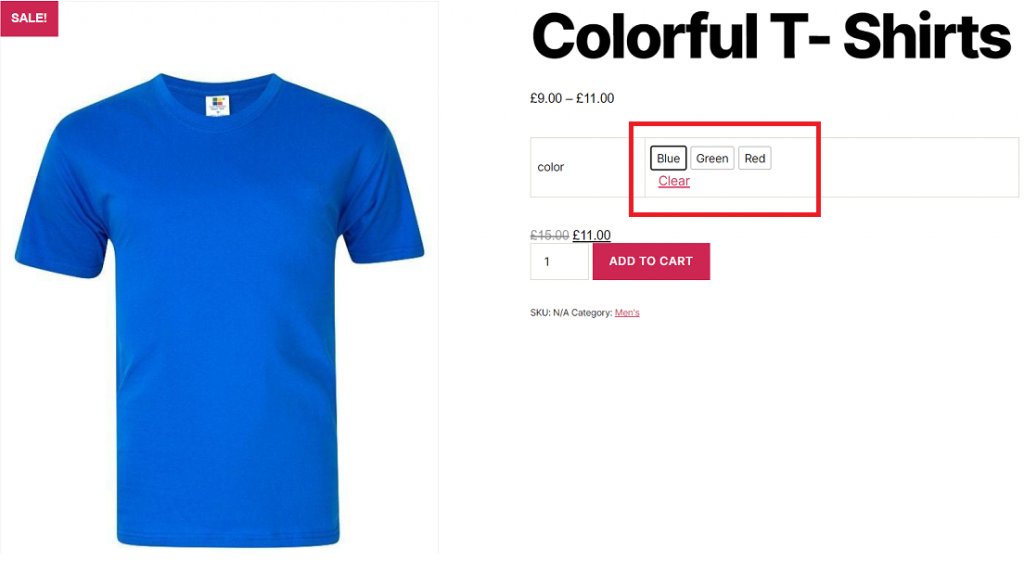
Here is an example of a single feature of “WooCommerce Variation Swatches Plugin.” You can download it free or purchase a license from the main site.
All you need to do is, Install and activate the plugin. Now see, it turns the product attribute select drop-down into beautiful swatches.
In this article, you have learned the basics of WooCommerce variable products and step-by-step instructions to improve your store’s customer experience.
I hope you can create a major impact on your online store by opting to use WooCommerce variable products. If you require any further information, feel free to ask in the comment section.