Table of Contents
1. Installation
Automatic install from WordPress dashboard
- Login to your WordPress admin dashboard.
- Go to Plugins → Add New.
- Search for “Variation Swatches for WooCommerce” and install the plugin developed by Emran Ahmed, then activate it.

- Click install and activate.
2. Installation (Advanced)
To unlock the advanced features of WooCommerce Variation Swatches, you’ll need to install and activate the premium extension alongside the free version of the plugin.
While upgrading the premium version, you should have got a username and password. Keep it safe for further guidance.
To upgrade the WooCommerce variation swatches Pro plugin, click on Buy Now button.

After clicking the Buy Now button, you will be redirected to the checkout page where you need to just fill up your name and email address. Then select any payment system suitable for you.
After completing the simple buying process, an email will be delivered to your inbox. Just check it out. You will be given a username and an automatically generated password to login your StorePress account.

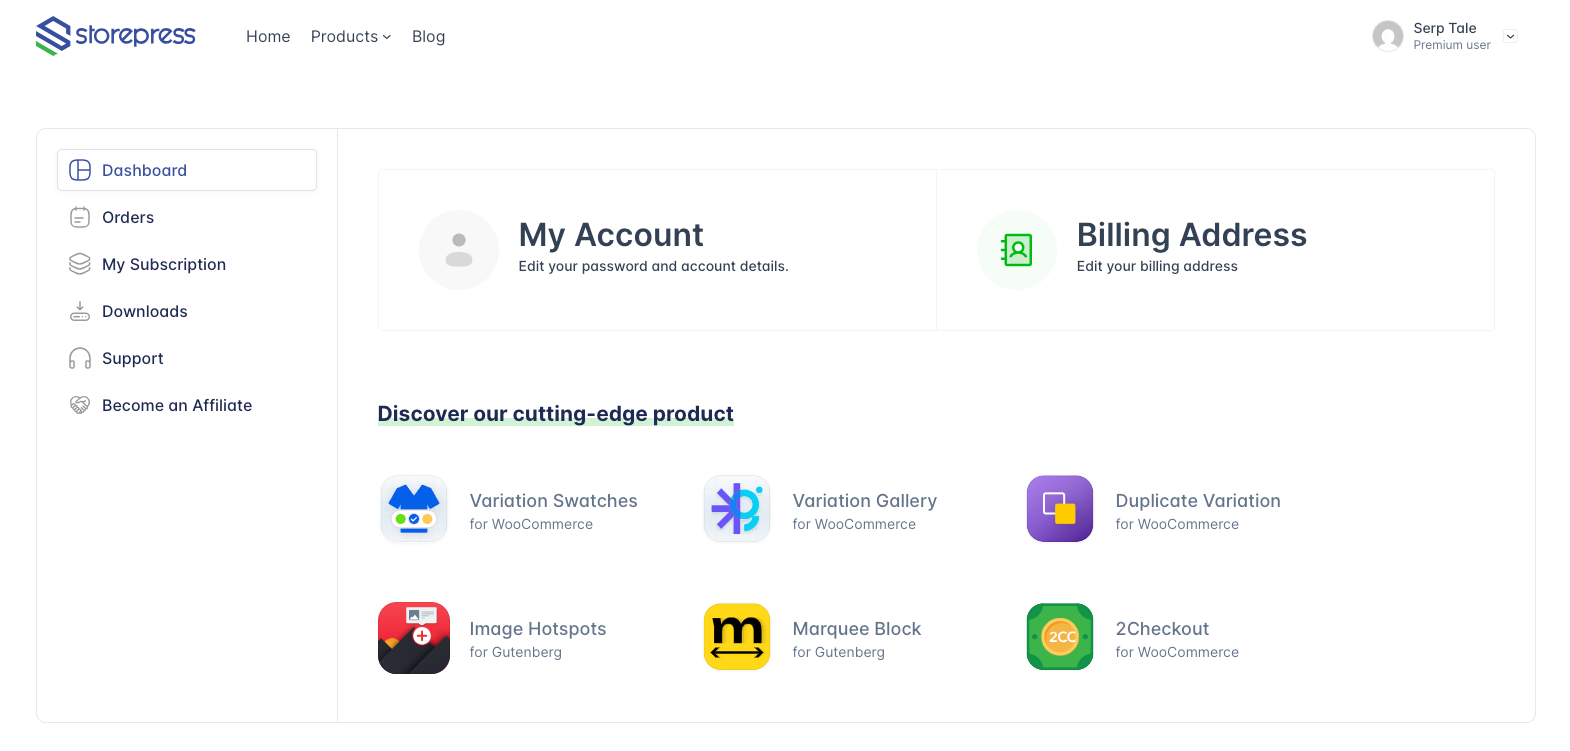
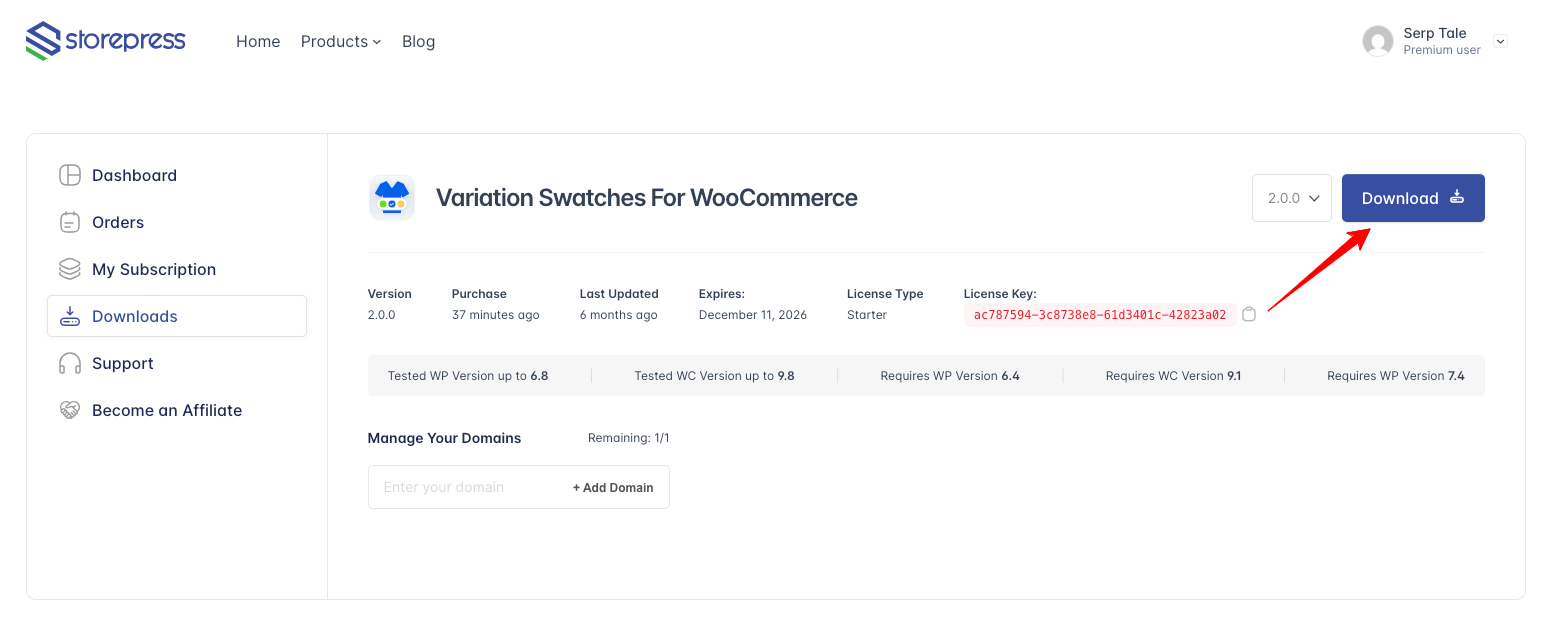
1. Login to StorePress.com website. To login you must enter your username and password that you have been sent through an email earlier.
2. After login to your account, you will see an interface as the screenshot attached below.
3. Click the Download button to get your WooCommerce Variation Swatches Pro plugin.
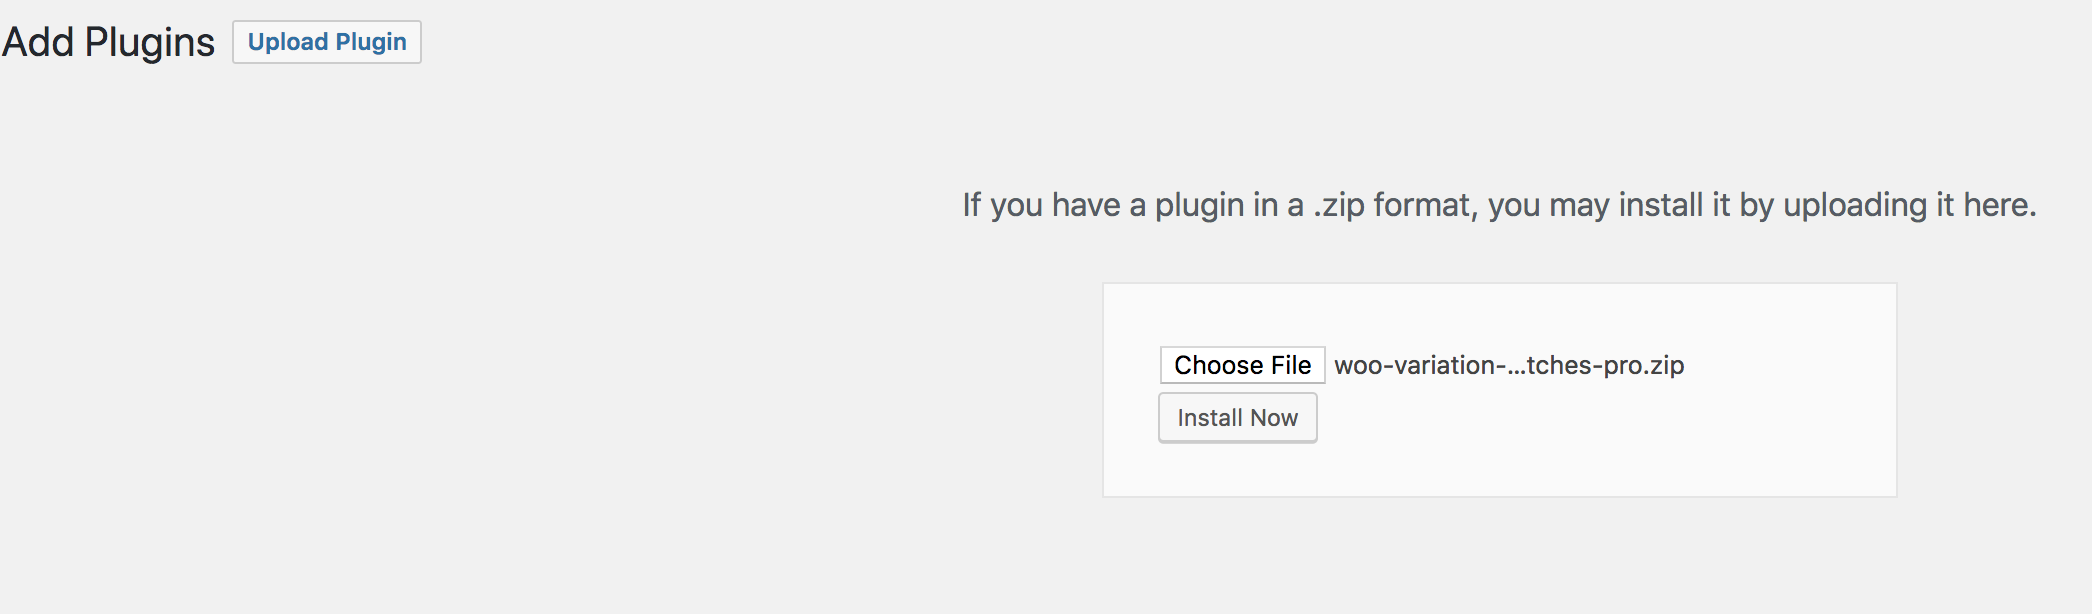
4. Now return to your WordPress dashboard, go to Plugins → Add New, and click on Upload Plugin to upload the WooCommerce Variation Swatches Pro file.
Now select the downloaded woocommerce-variation-swatches-pro ZIP file, click Install Now, and then press Activate Plugin to complete the installation.
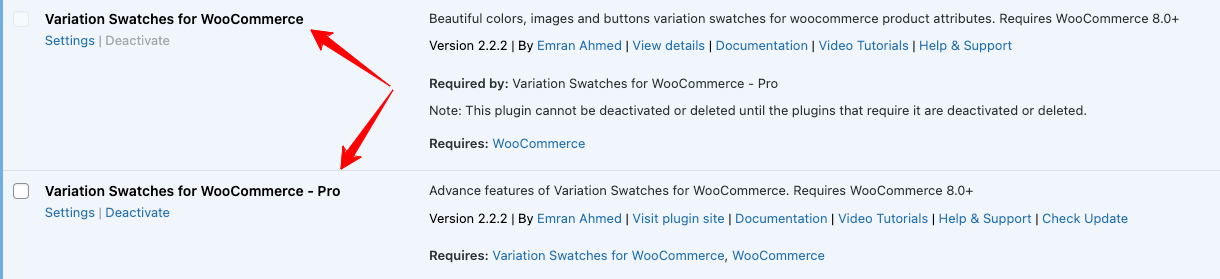
5. After Installing Premium version of WooCommerce Variation Swatches plugin, it would appear after free version.
3. Automatic Update For Premium Version
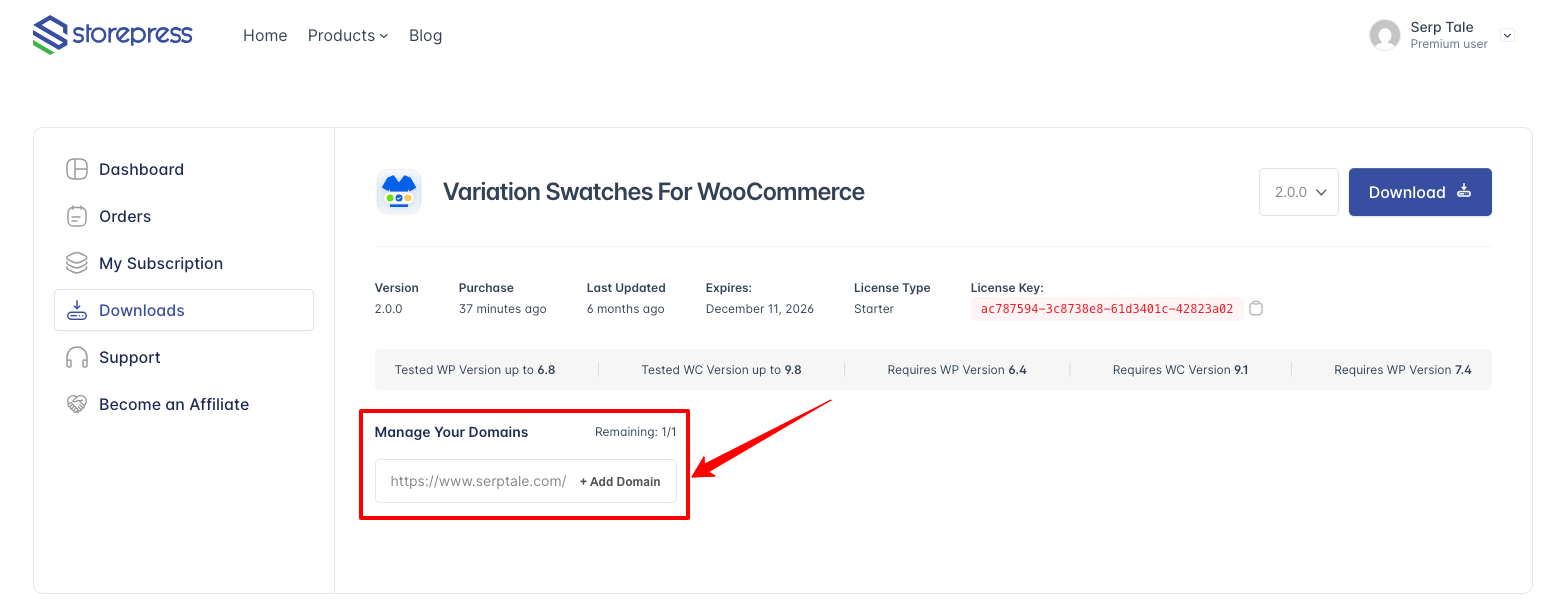
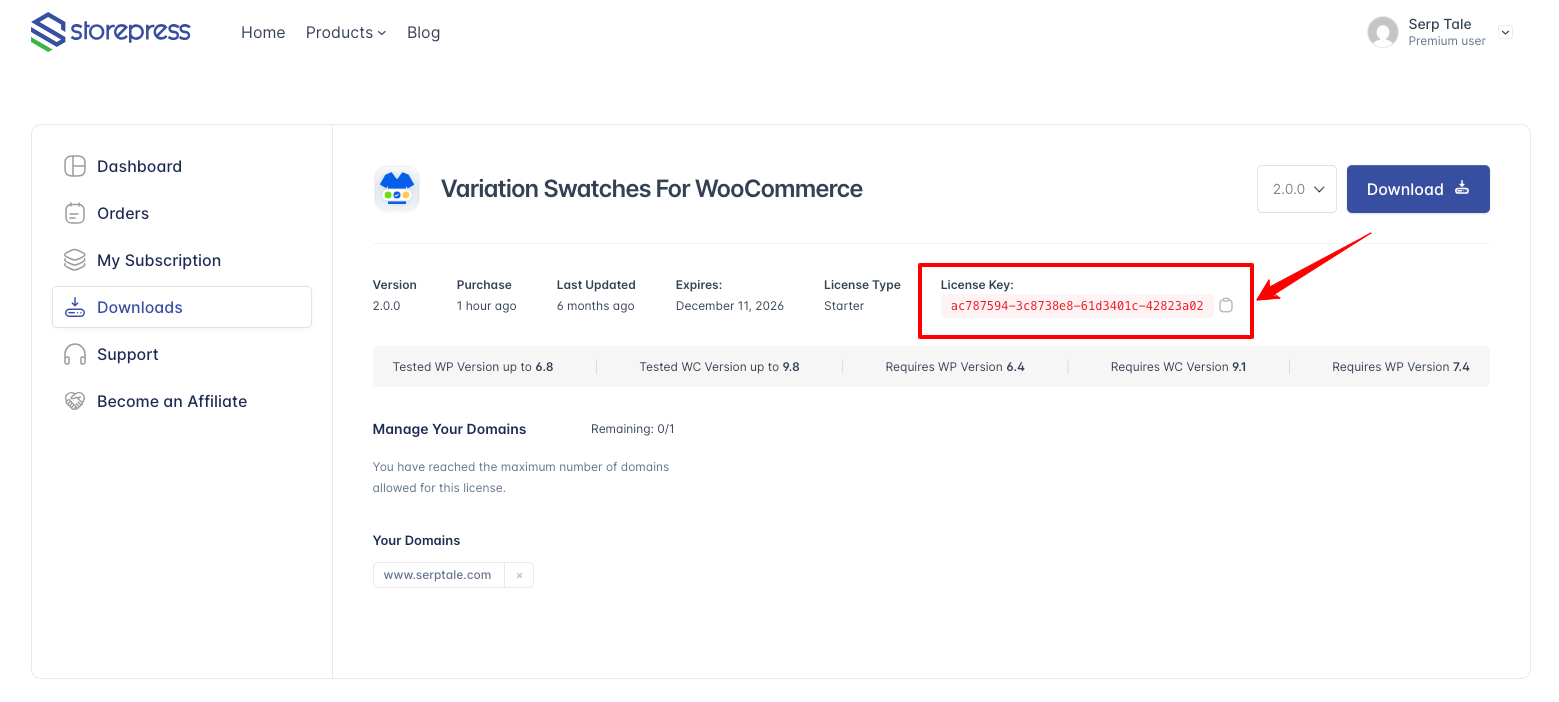
Go to My Account → My Downloads on StorePress.com.
First, register the domain where you want automatic updates for the WooCommerce Variation Swatches Pro plugin.
Enter your domain name (with proper url) in the domain field and click Add Domain.
Secondly, Each purchase of item comes with license key, Copy the license key from the Downloads section.
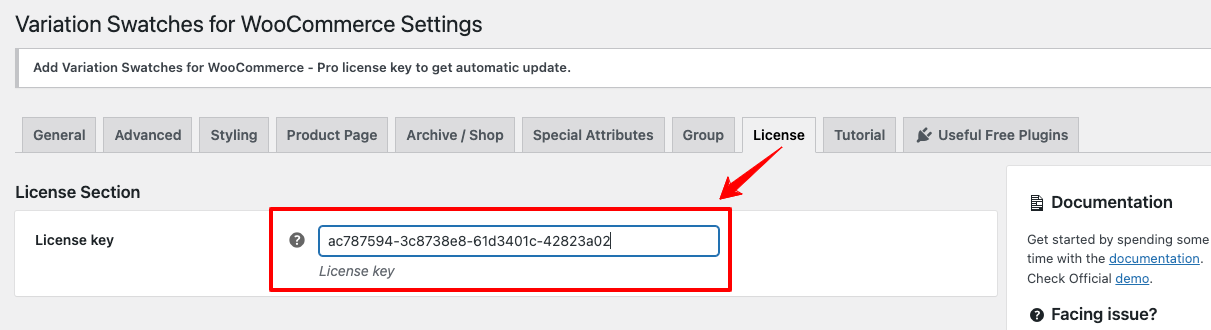
After copying the License Key, go to your site’s dashboard where you want to activate automatic updates. Navigate to Swatches Settings → License Key.
Paste the copied key into the License Key field. Once done, click the Save Changes button.
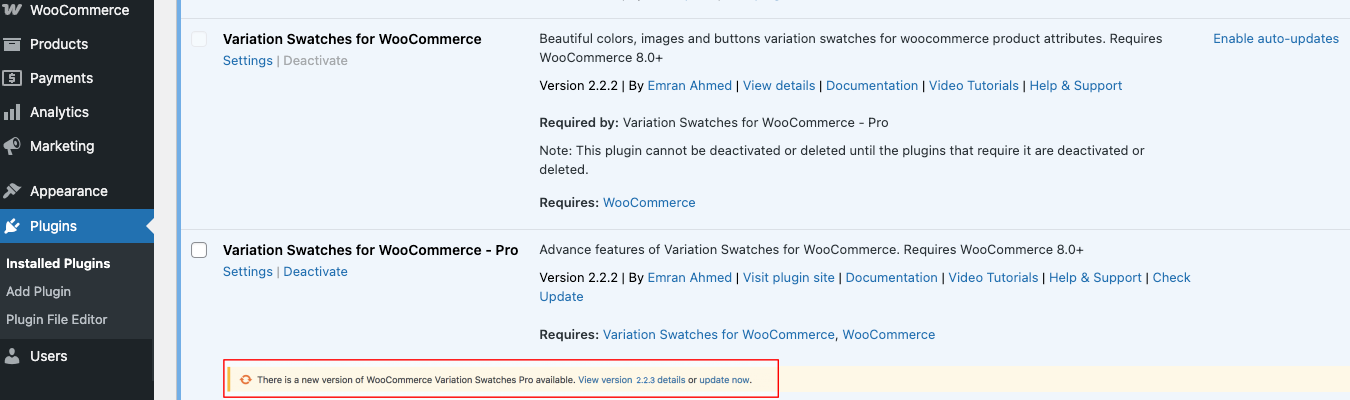
Once your domain is successfully registered in your StorePress dashboard and the purchase key is added in the plugin’s License Key section, you will start seeing update notifications in the Plugins page.
Manually Update For Premium Version
Sometimes you may not see the latest update notification for Variation Swatches for WooCommerce. In that situation, you’ll need to update the plugin manually.
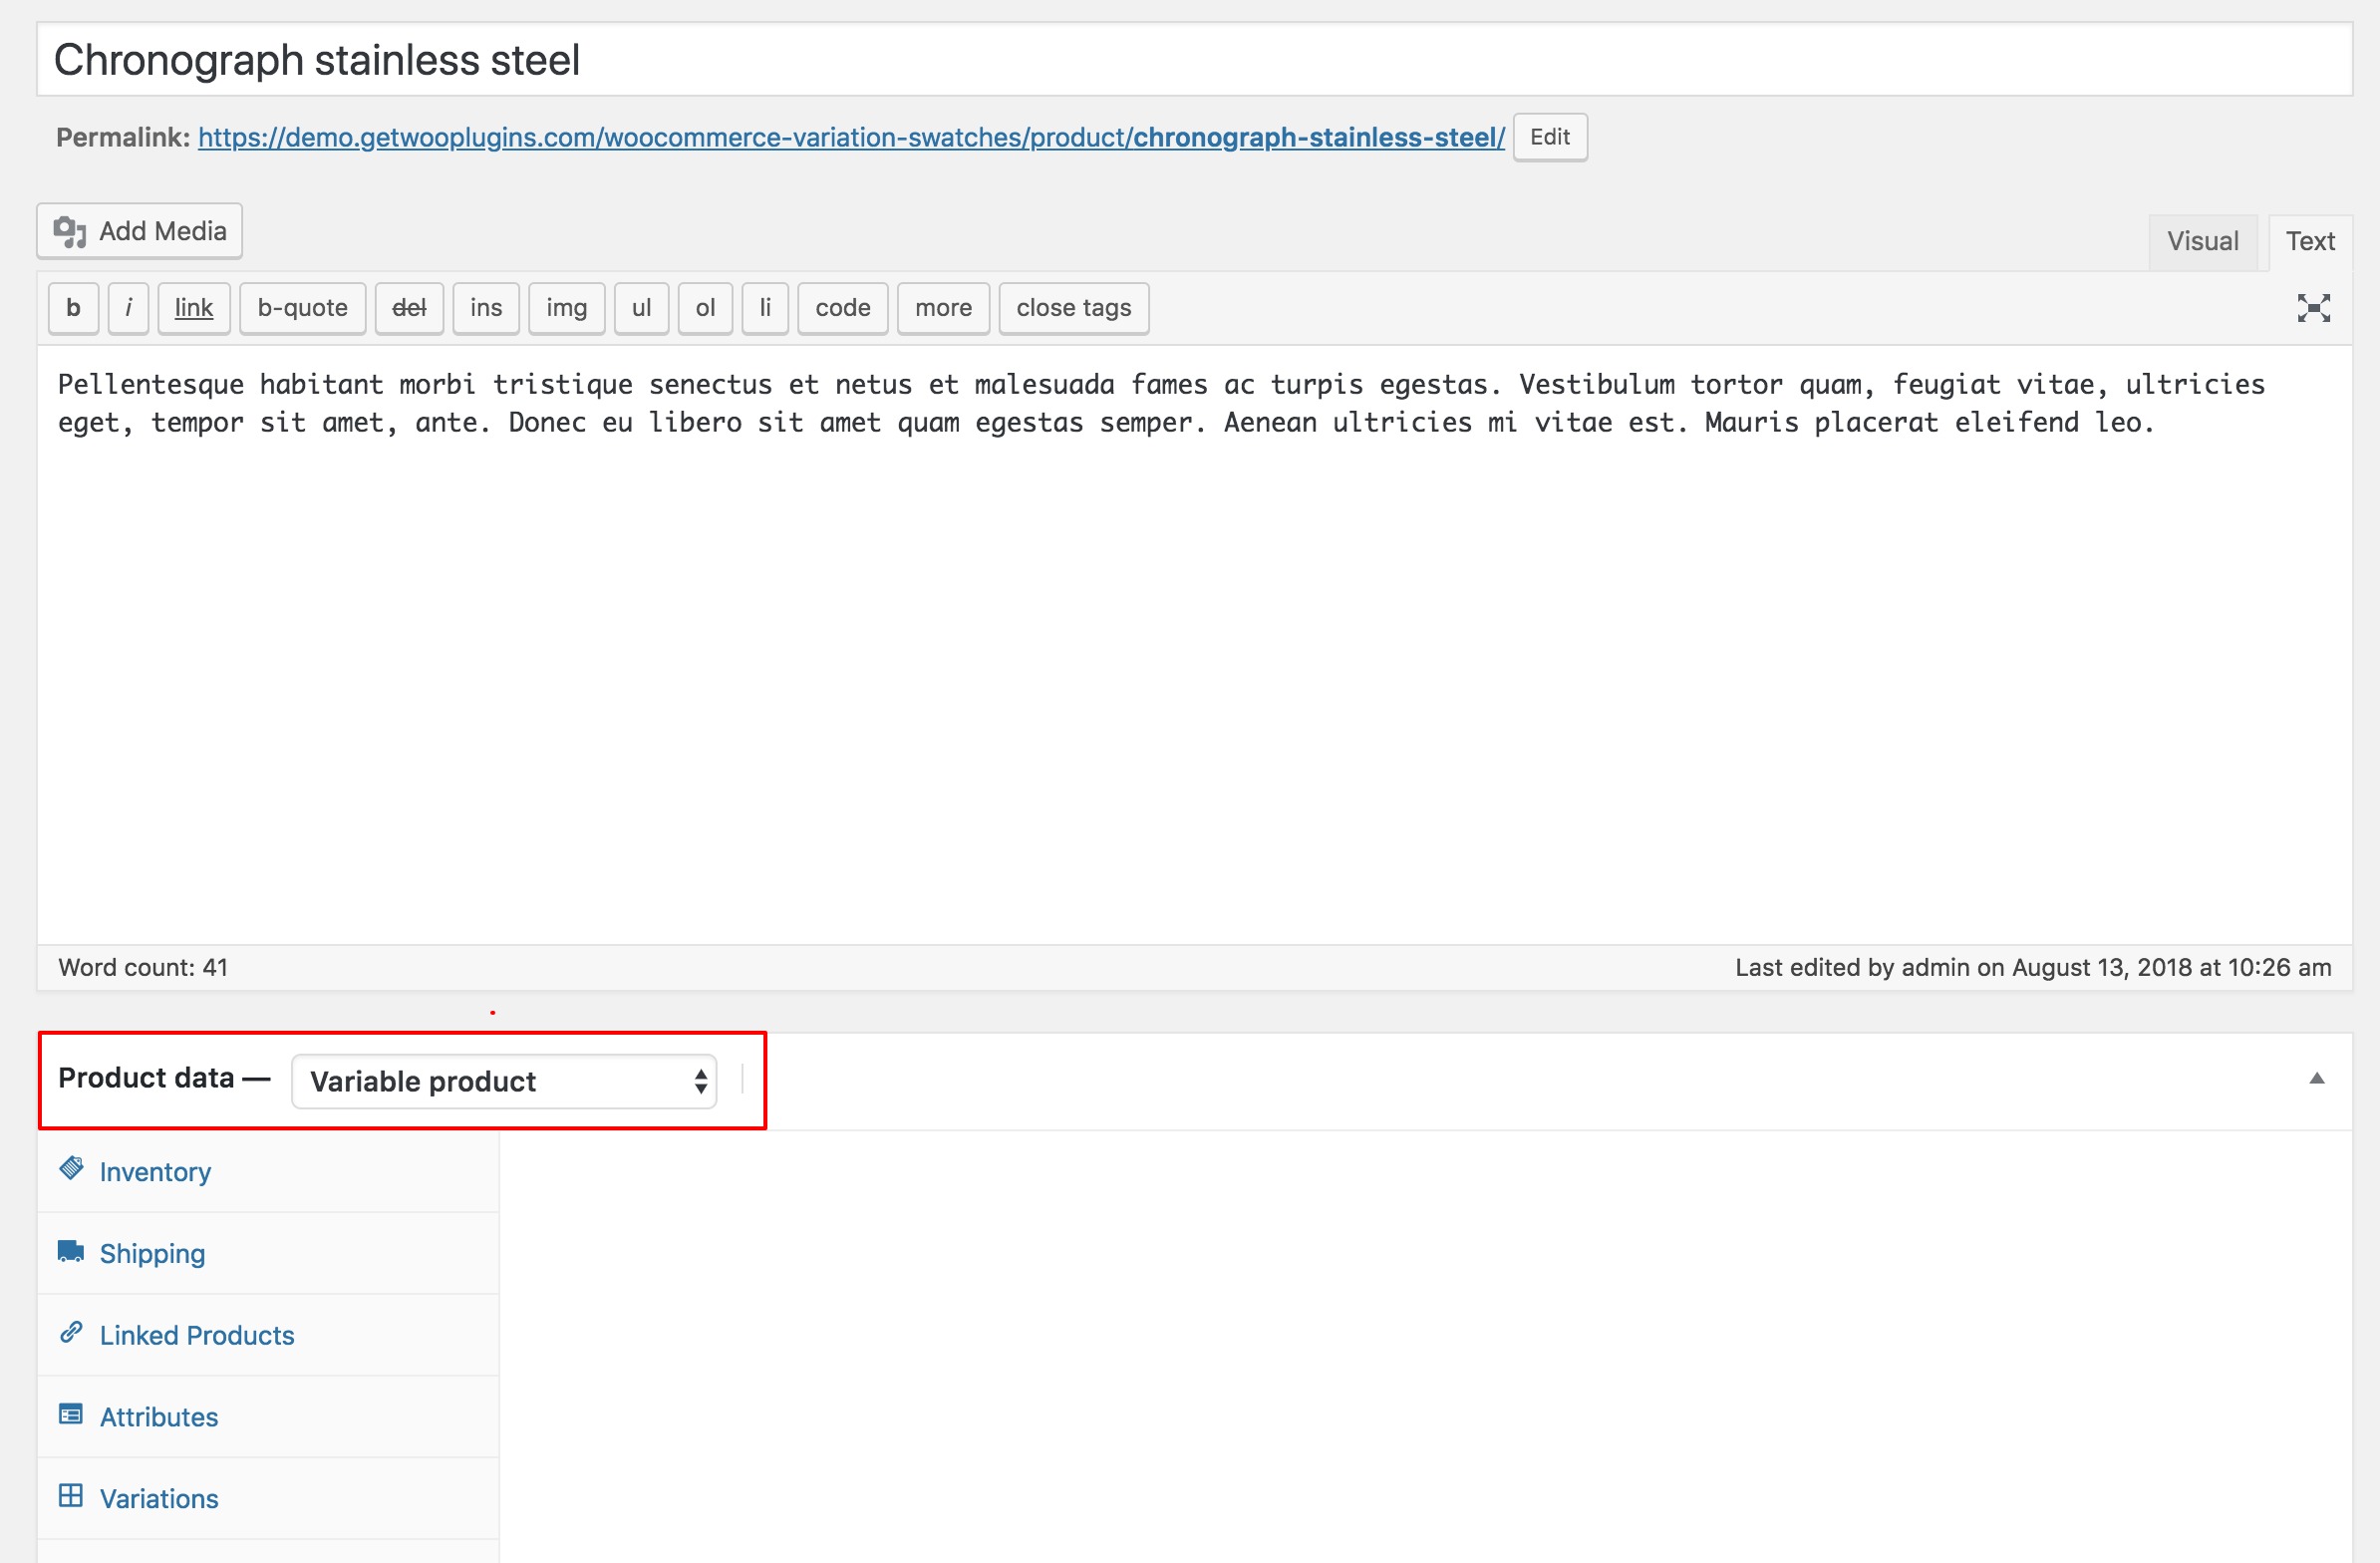
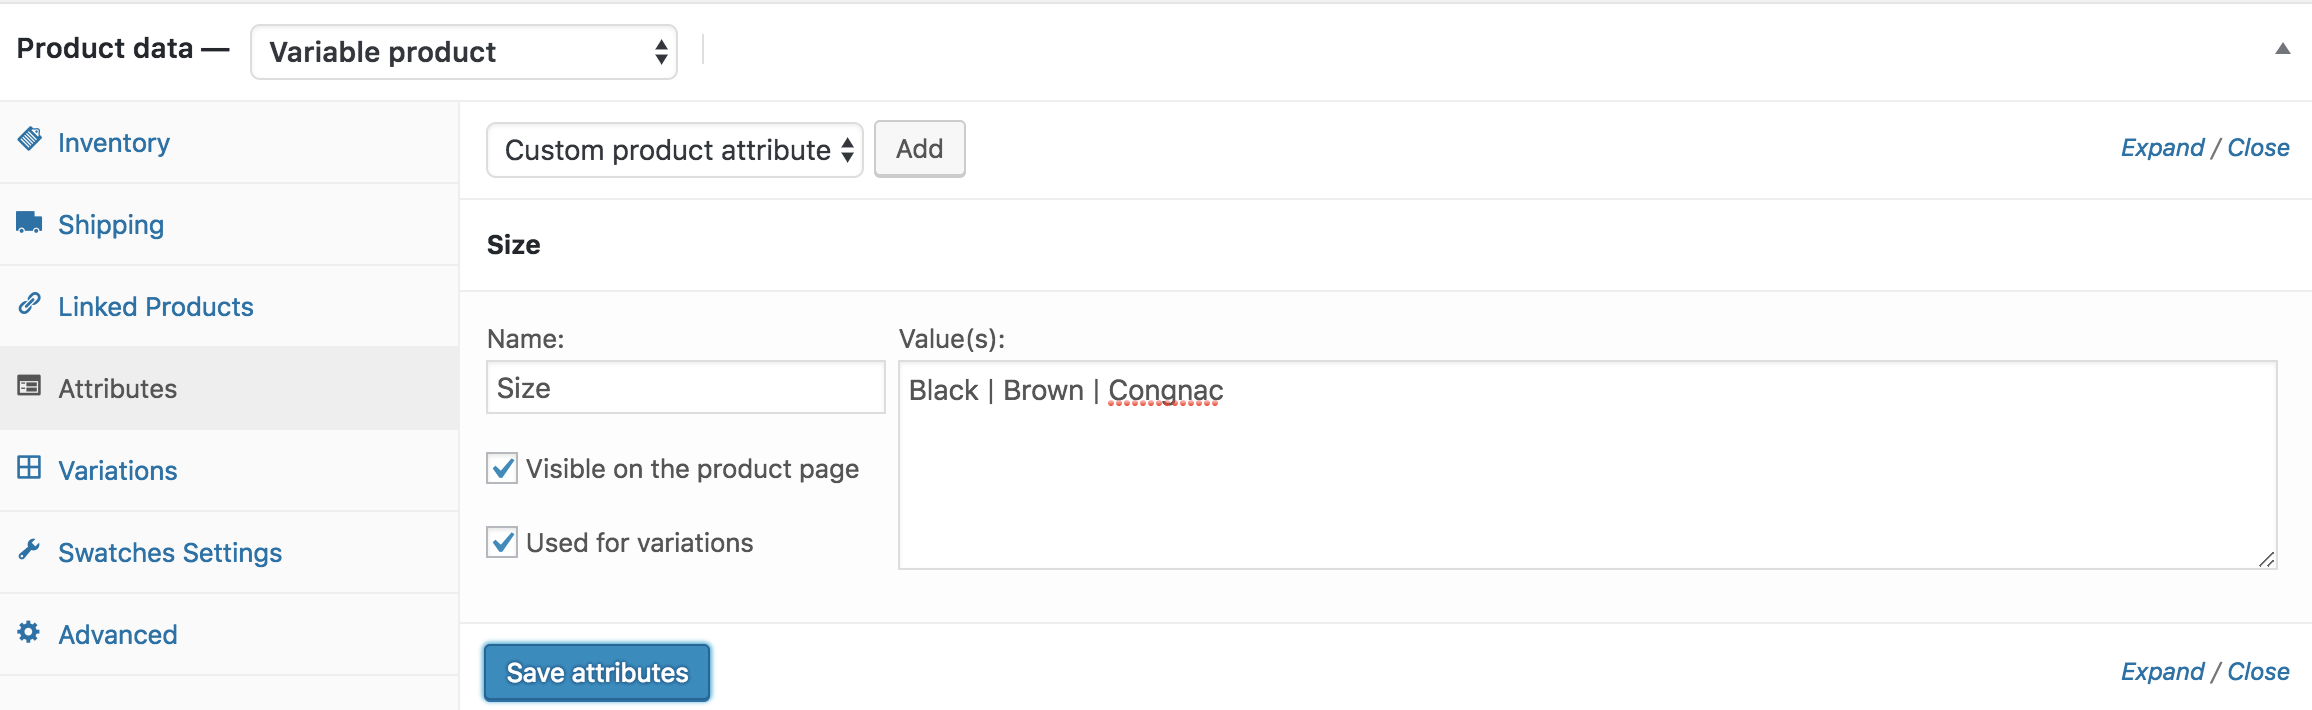
4. Configure Attributes
After installing and activating this plugin, the attributes of your variable products will automatically change from dropdowns to clickable button swatches.
Now, let’s configure the attributes:
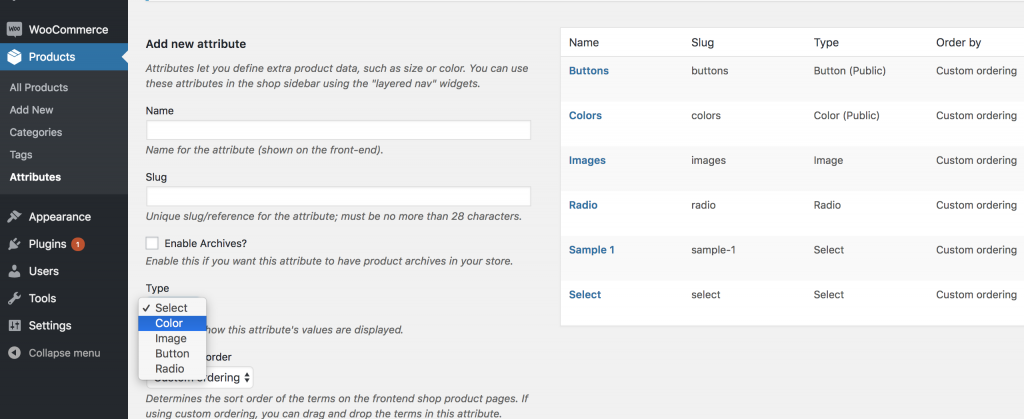
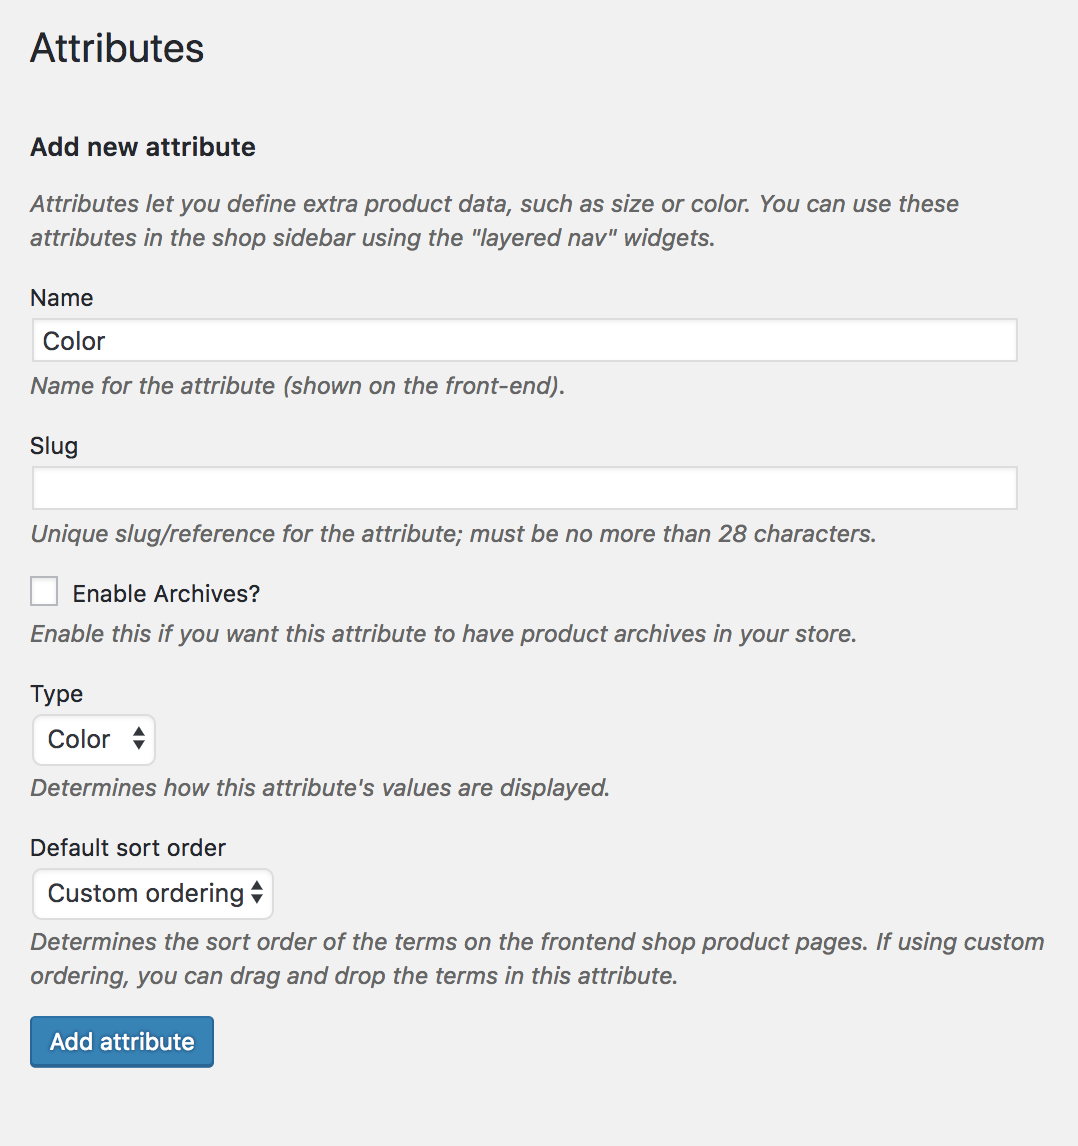
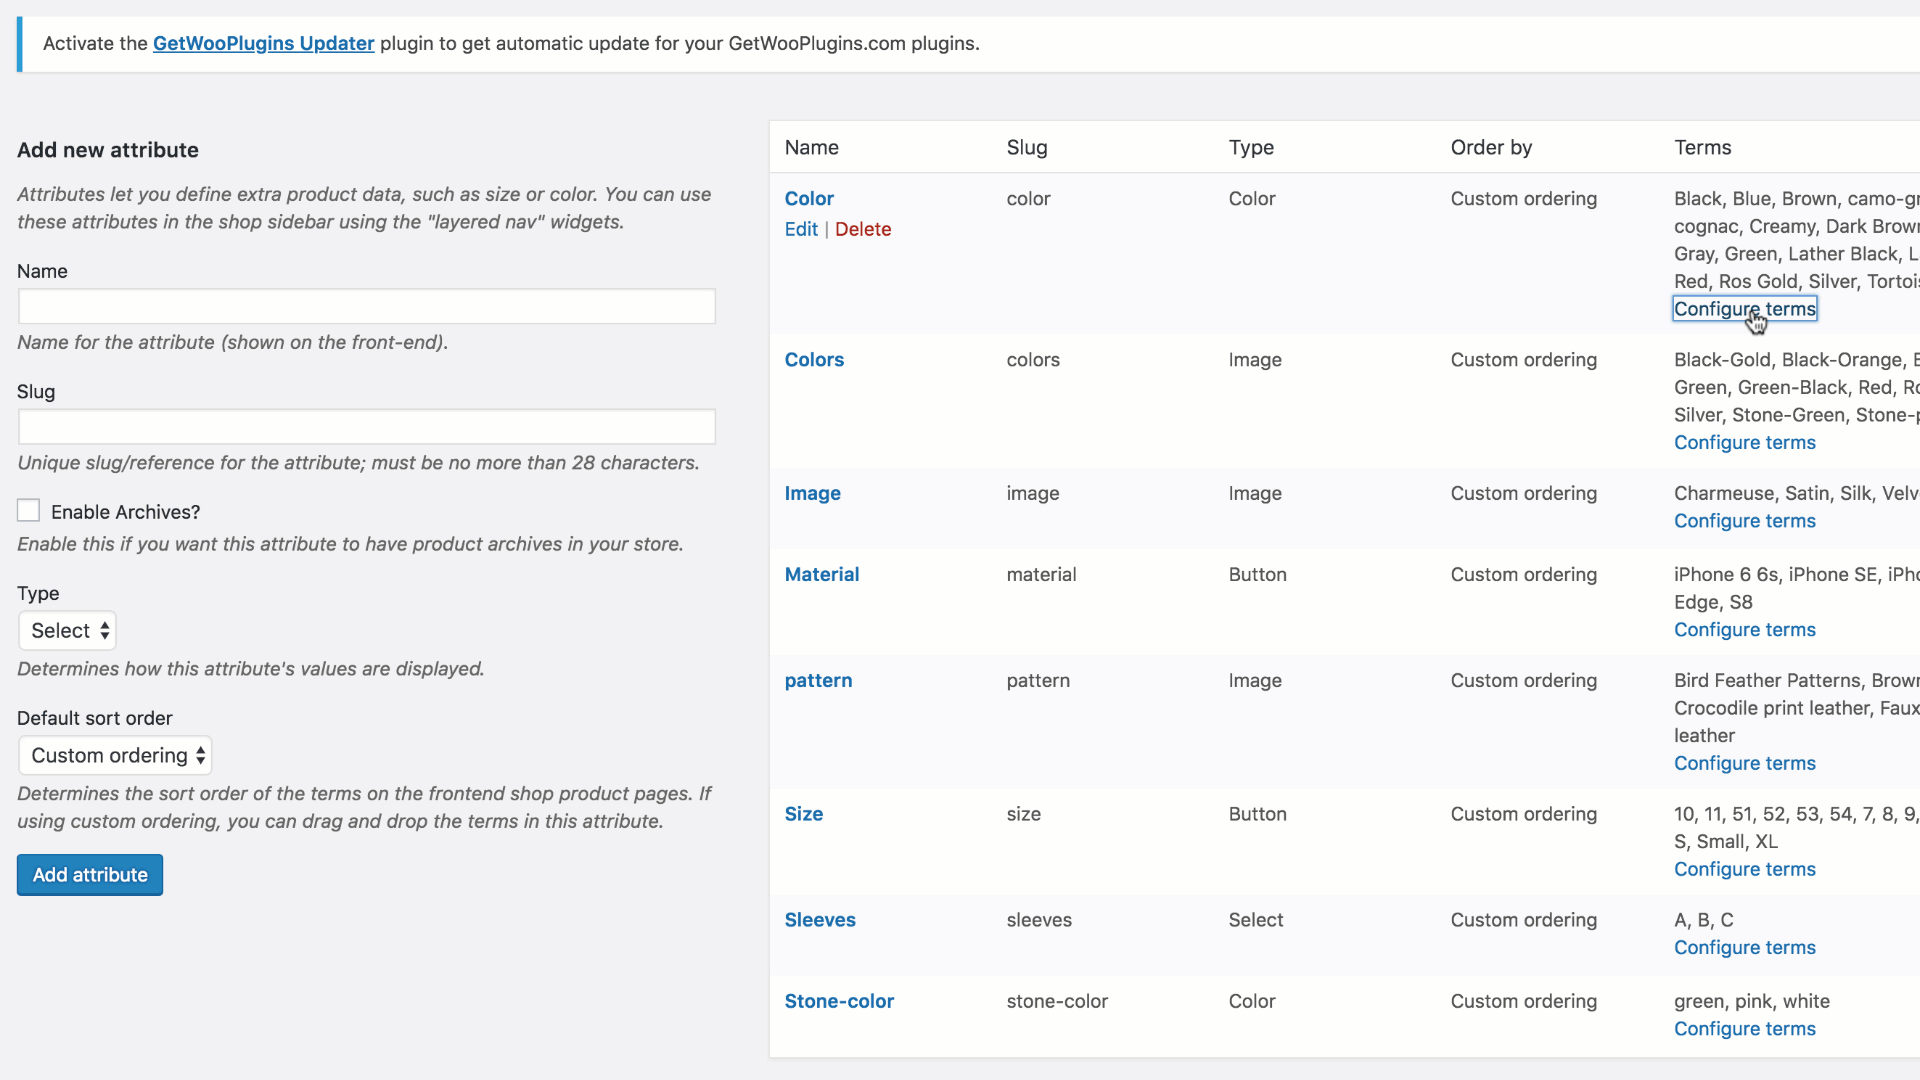
- Log in to your WordPress dashboard, navigate to the Products menu and click Attributes.
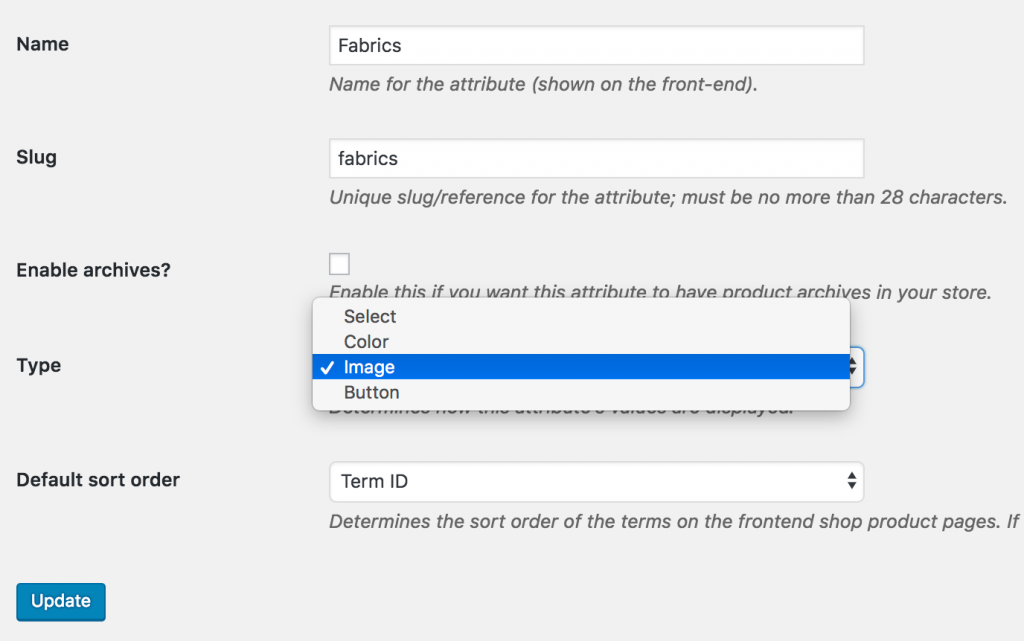
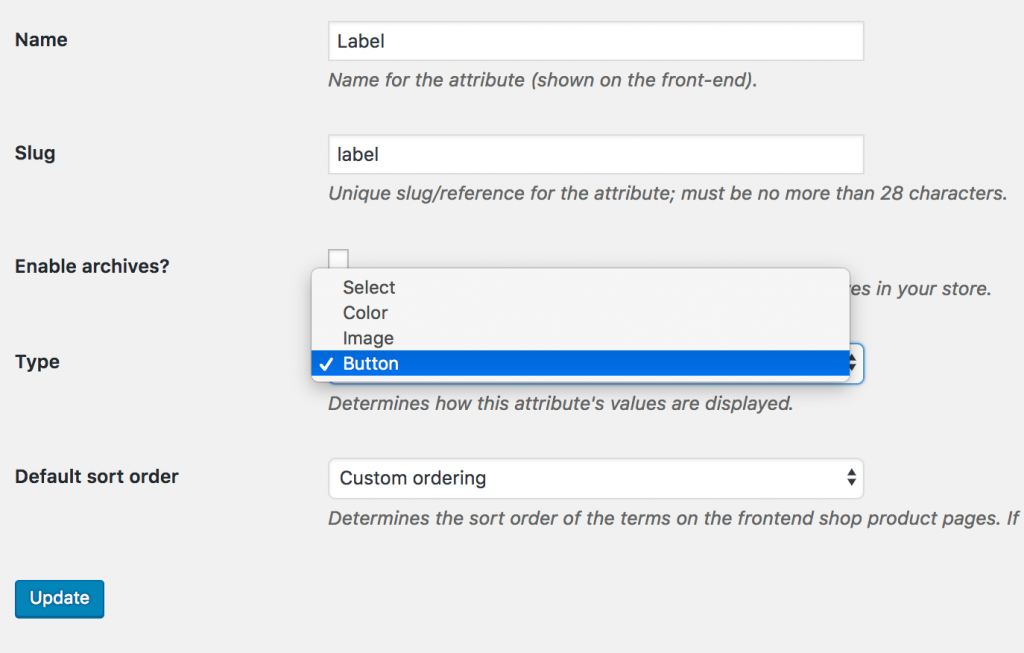
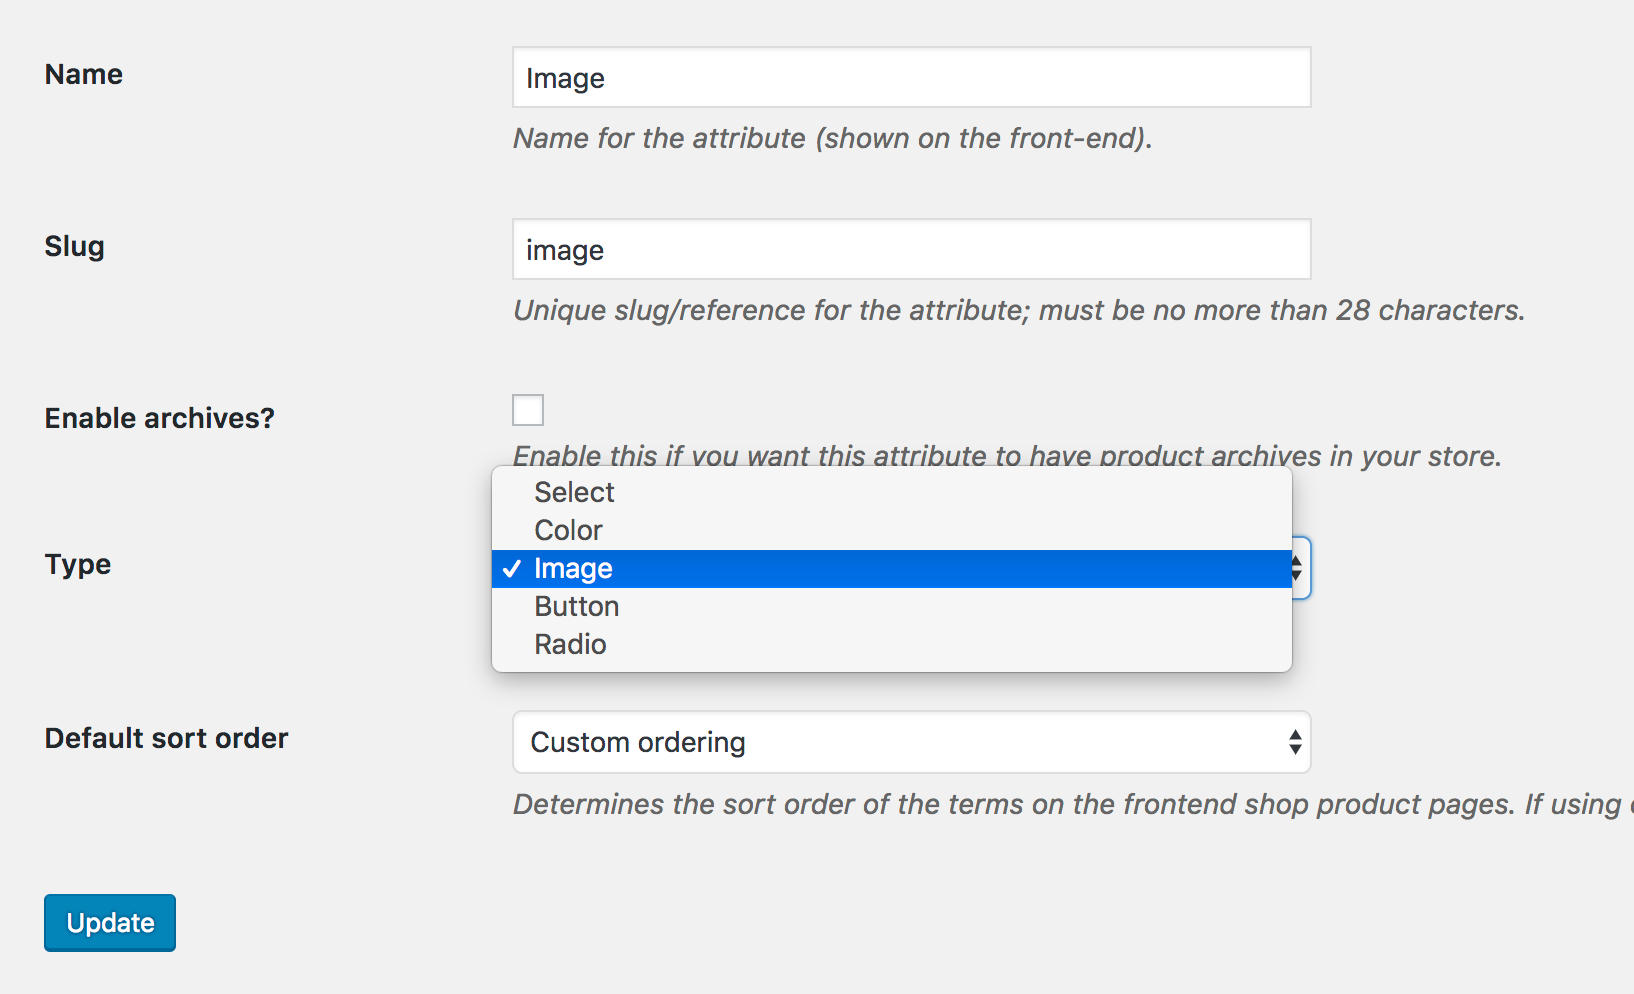
- Click to attribute name to edit an exists attribute or in the Add New Attribute form you will see the default Type selector.
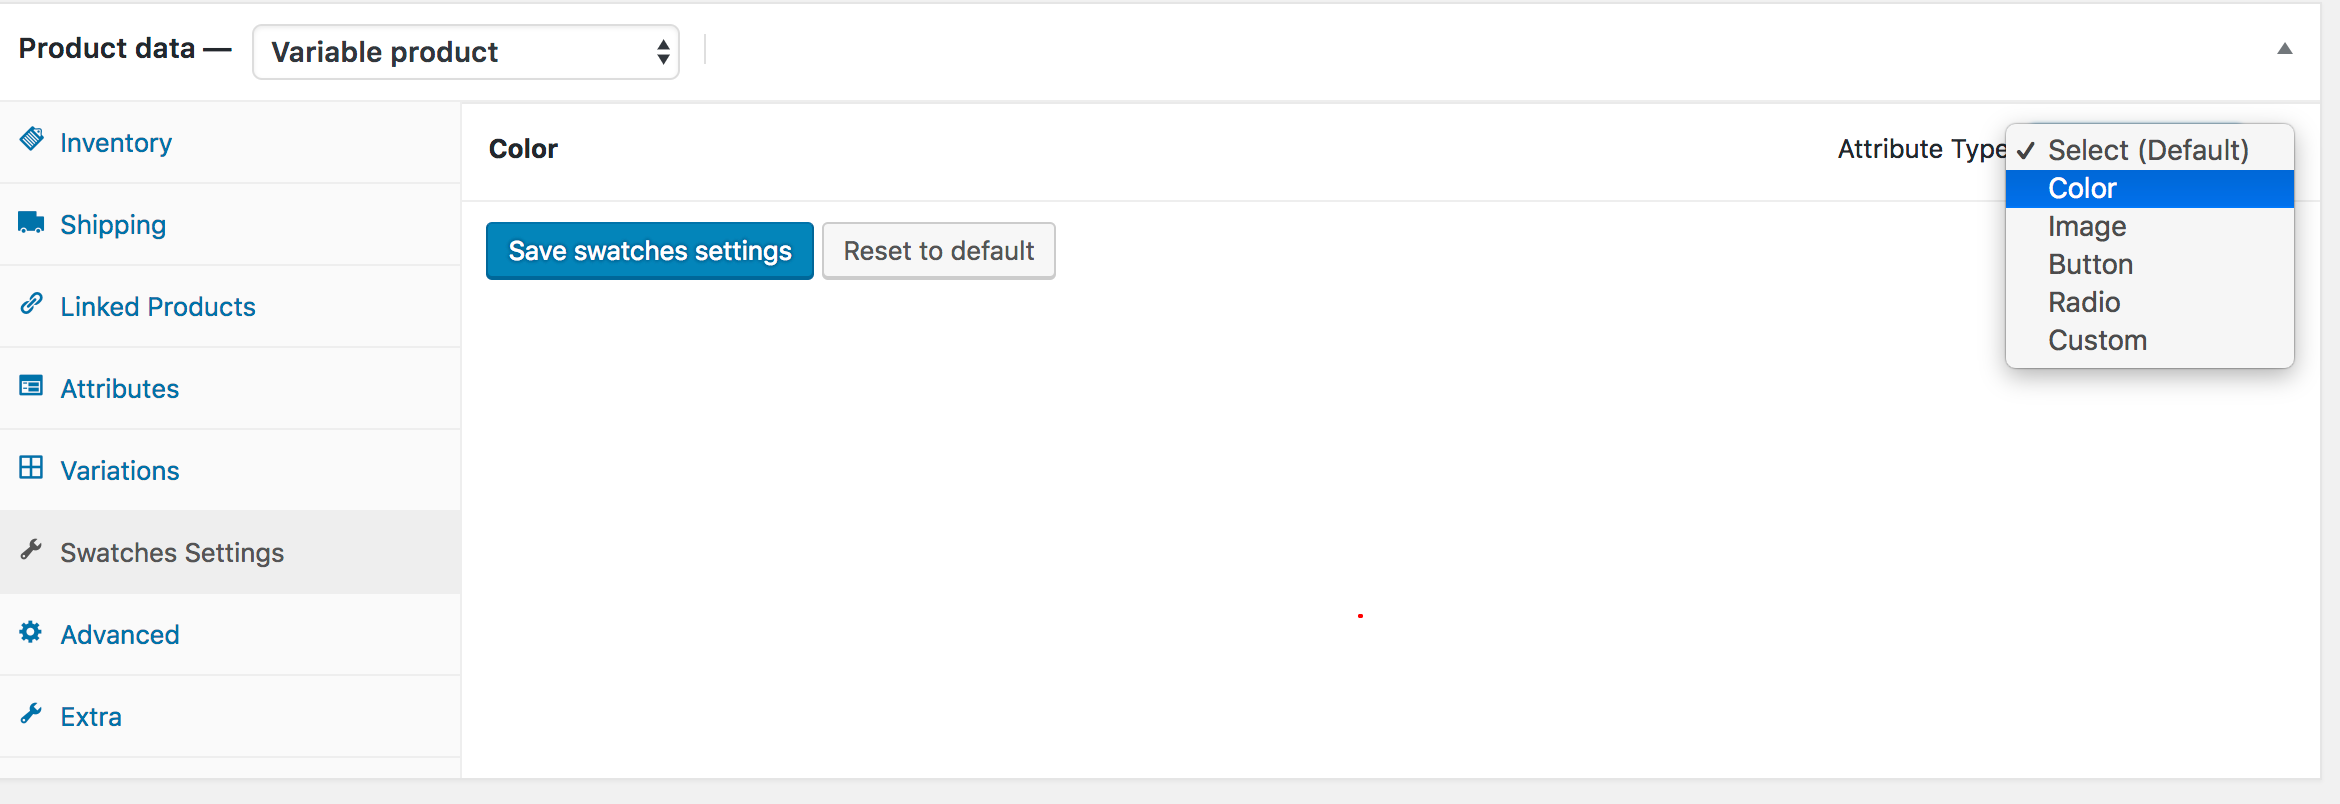
- Click to that Type selector to change attribute’s type. Besides default options Select and Text, there are more 3 options Color, Image, Button/Label to choose.
- Select the suitable type for your attribute and click Save Change/Add attribute
- Go back to manage attributes screen. Click the cog icon on the right side of attribute to start editing terms.
- Start adding new terms or editing exists terms. There will be a new option at the end of form that let you choose the color, image or choose as a button for those terms.
5. How To Import Swatches on Existing Website
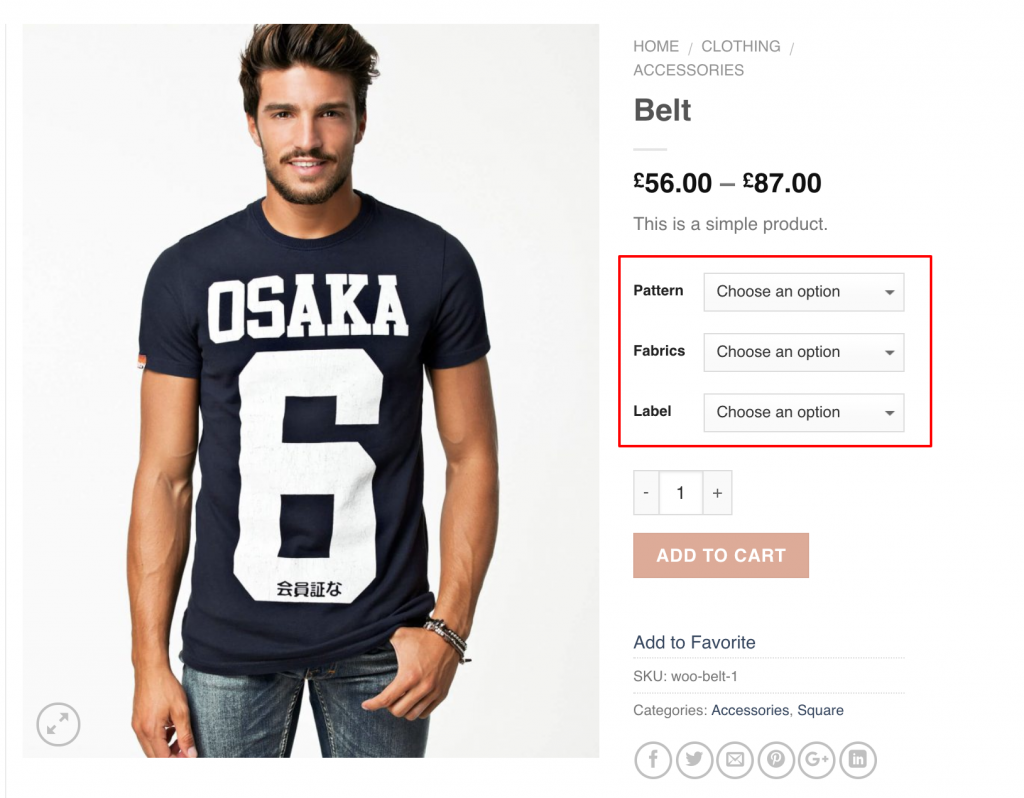
If you want to enable image, color, or label swatches on your existing variable products, you can activate them from this section.
Refer to the screenshot below. Once enabled, the default variation dropdowns will automatically turn into swatches.
Step 1 Editing Attribute:
Go to Products → Attributes. All your existing global attributes will appear in this section. After installing the WooCommerce Variation Swatches plugin, a new Type field is added to each attribute. By default, the Type will be set to Select.
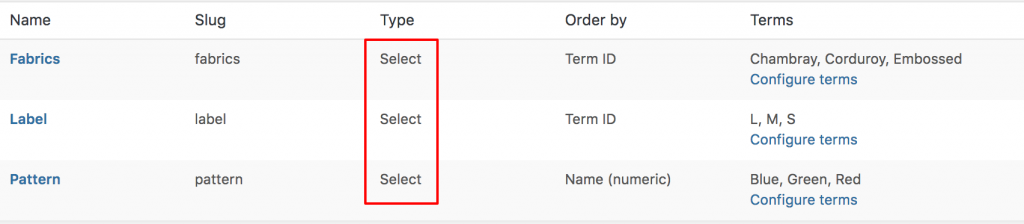
As the WooCommerce Variation Swatches plugin offers three attribute types—Color, Image, and Button—you can assign any type to your desired attribute.
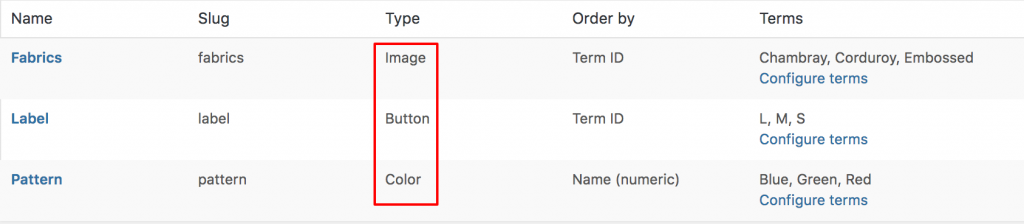
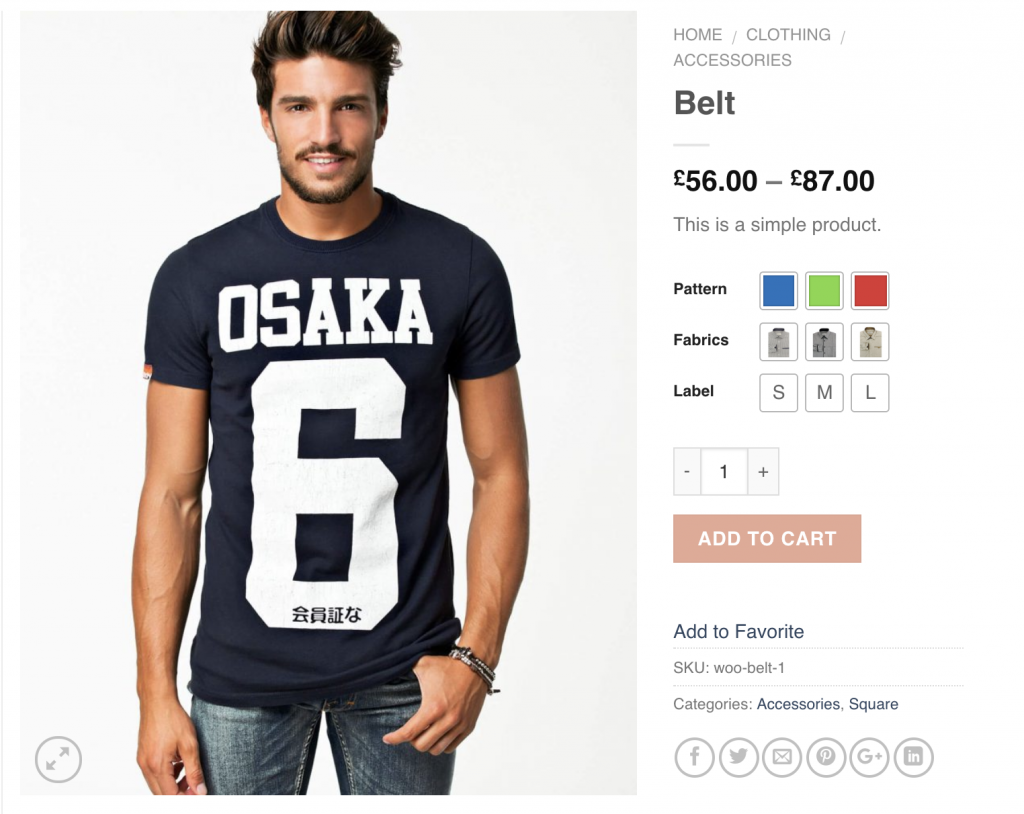
For this demonstration, we have created three attributes: Fabrics, Pattern, and Label.
We will set:
- Color type for the Pattern attribute
- Image type for the Fabrics attribute
- Button type for the Label attribute
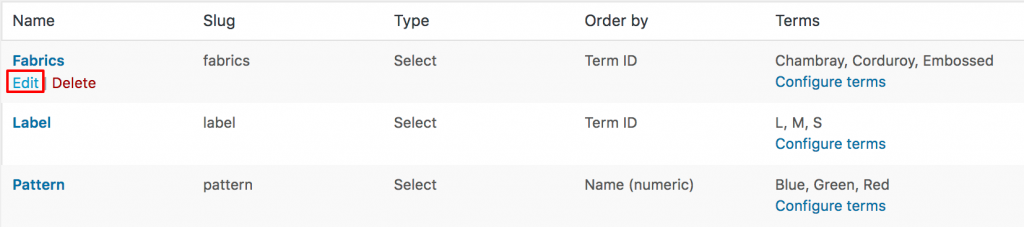
To assign the Color attribute type to the Pattern attribute, click the Edit link.
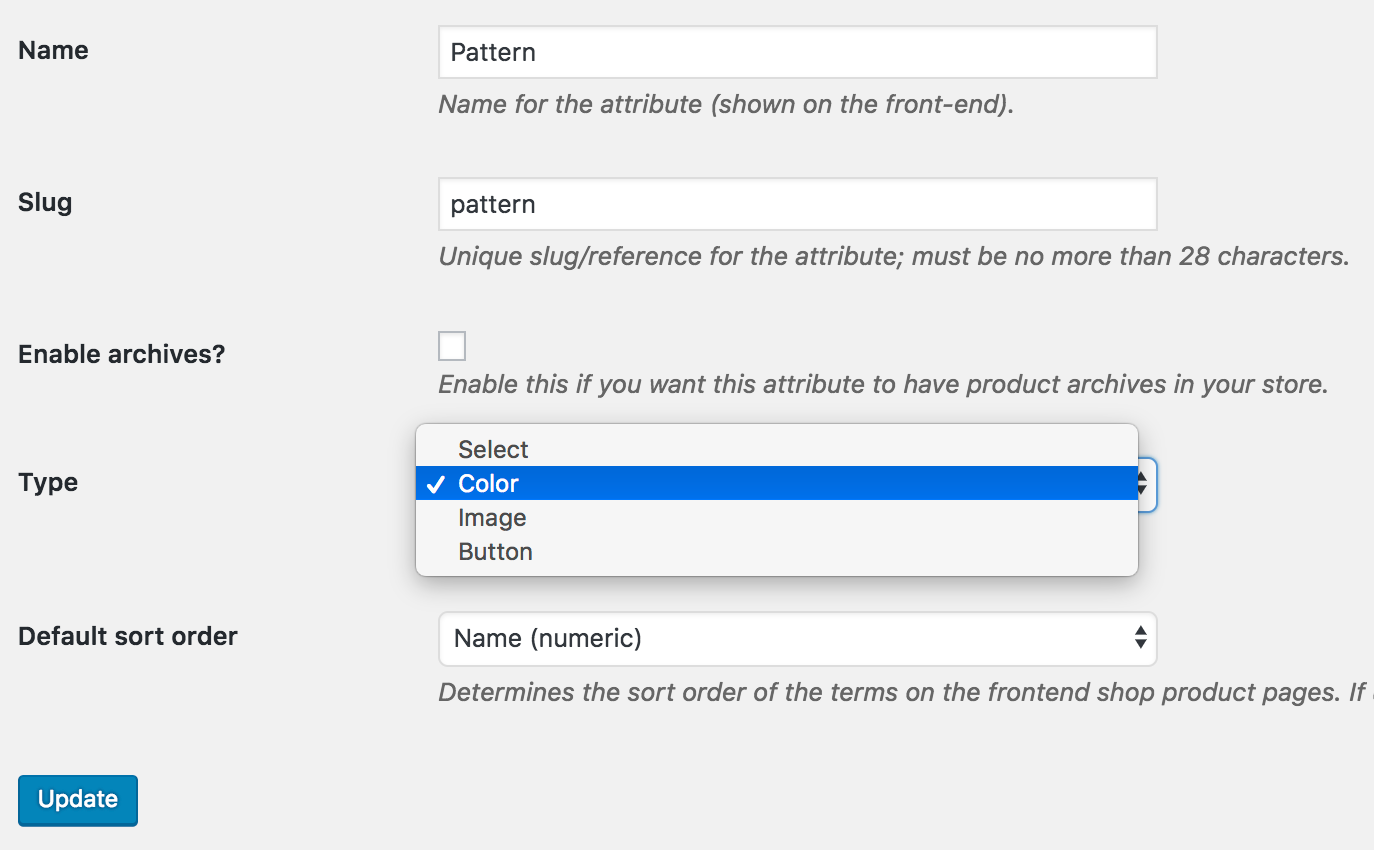
Select Color Type from the type dropdown.
Get back Products >> Attributes. Edit Image attribute like Color attribute.
Get back Products >> Attributes again. Edit Label attribute like Color and image attribute.
Once you’ve selected the attribute type, return to the Attributes list. The table will now display the updated type beside each attribute, similar to the example shown in the image.
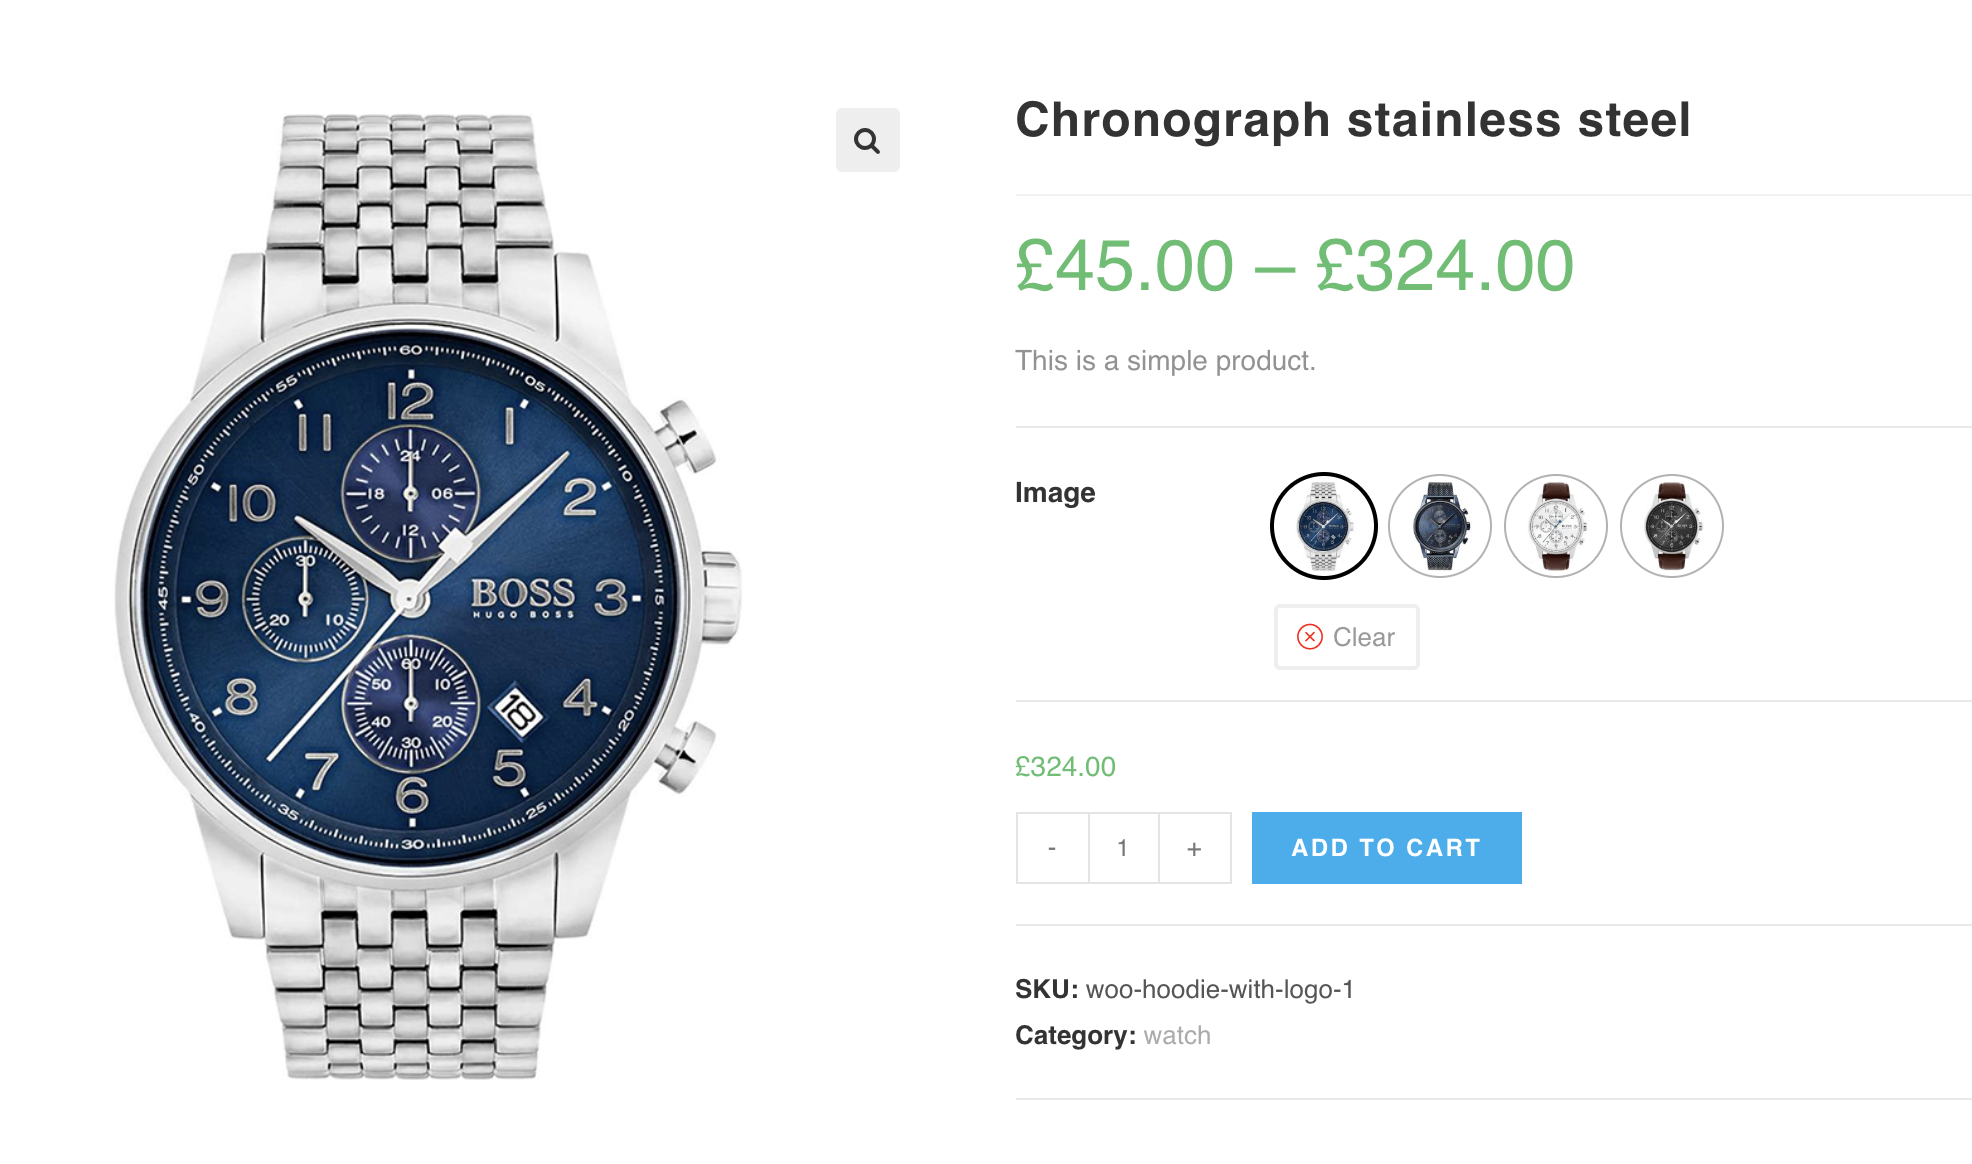
The front of the first product image would look like the following screenshot.
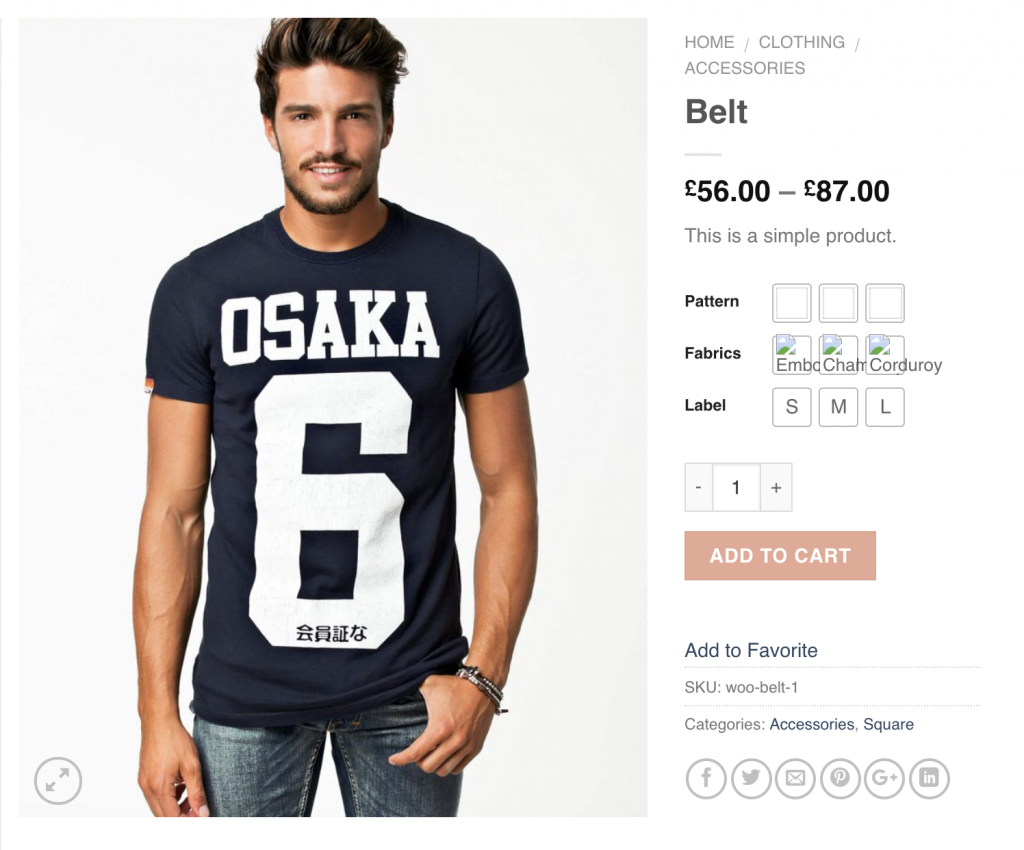
The Label attribute is already set up correctly, but the Pattern attribute still needs its colors assigned, and the Fabrics attribute requires swatch images to be added.
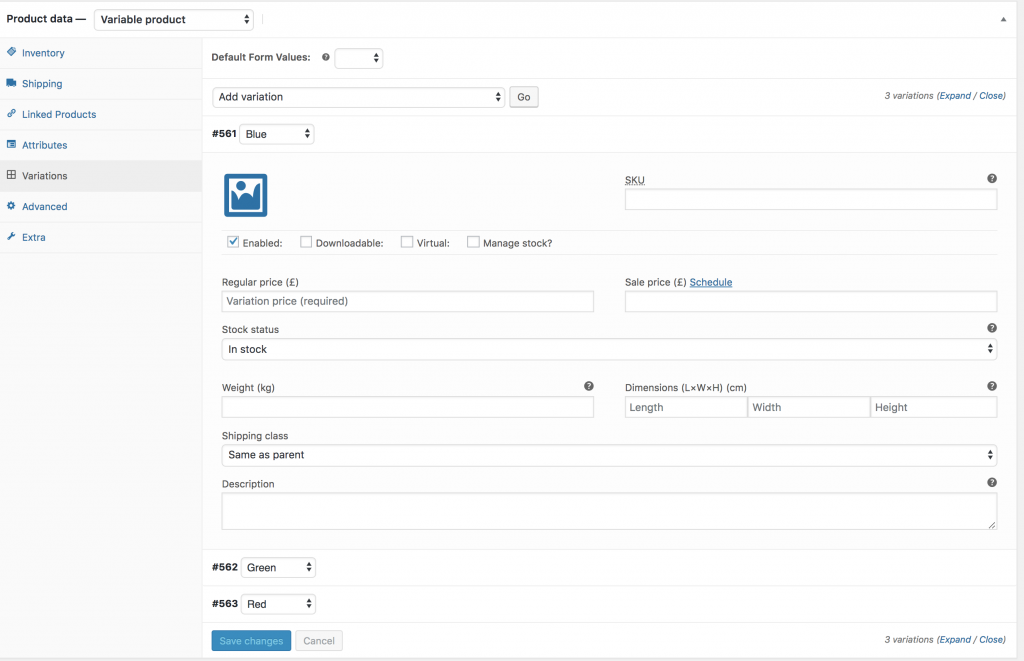
Step 2 Editing Variations:
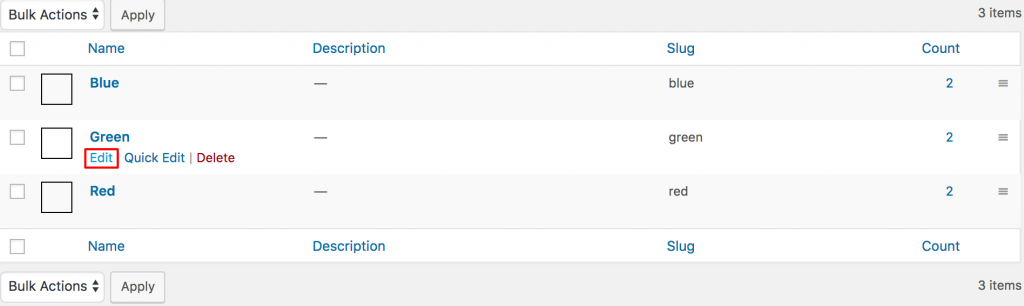
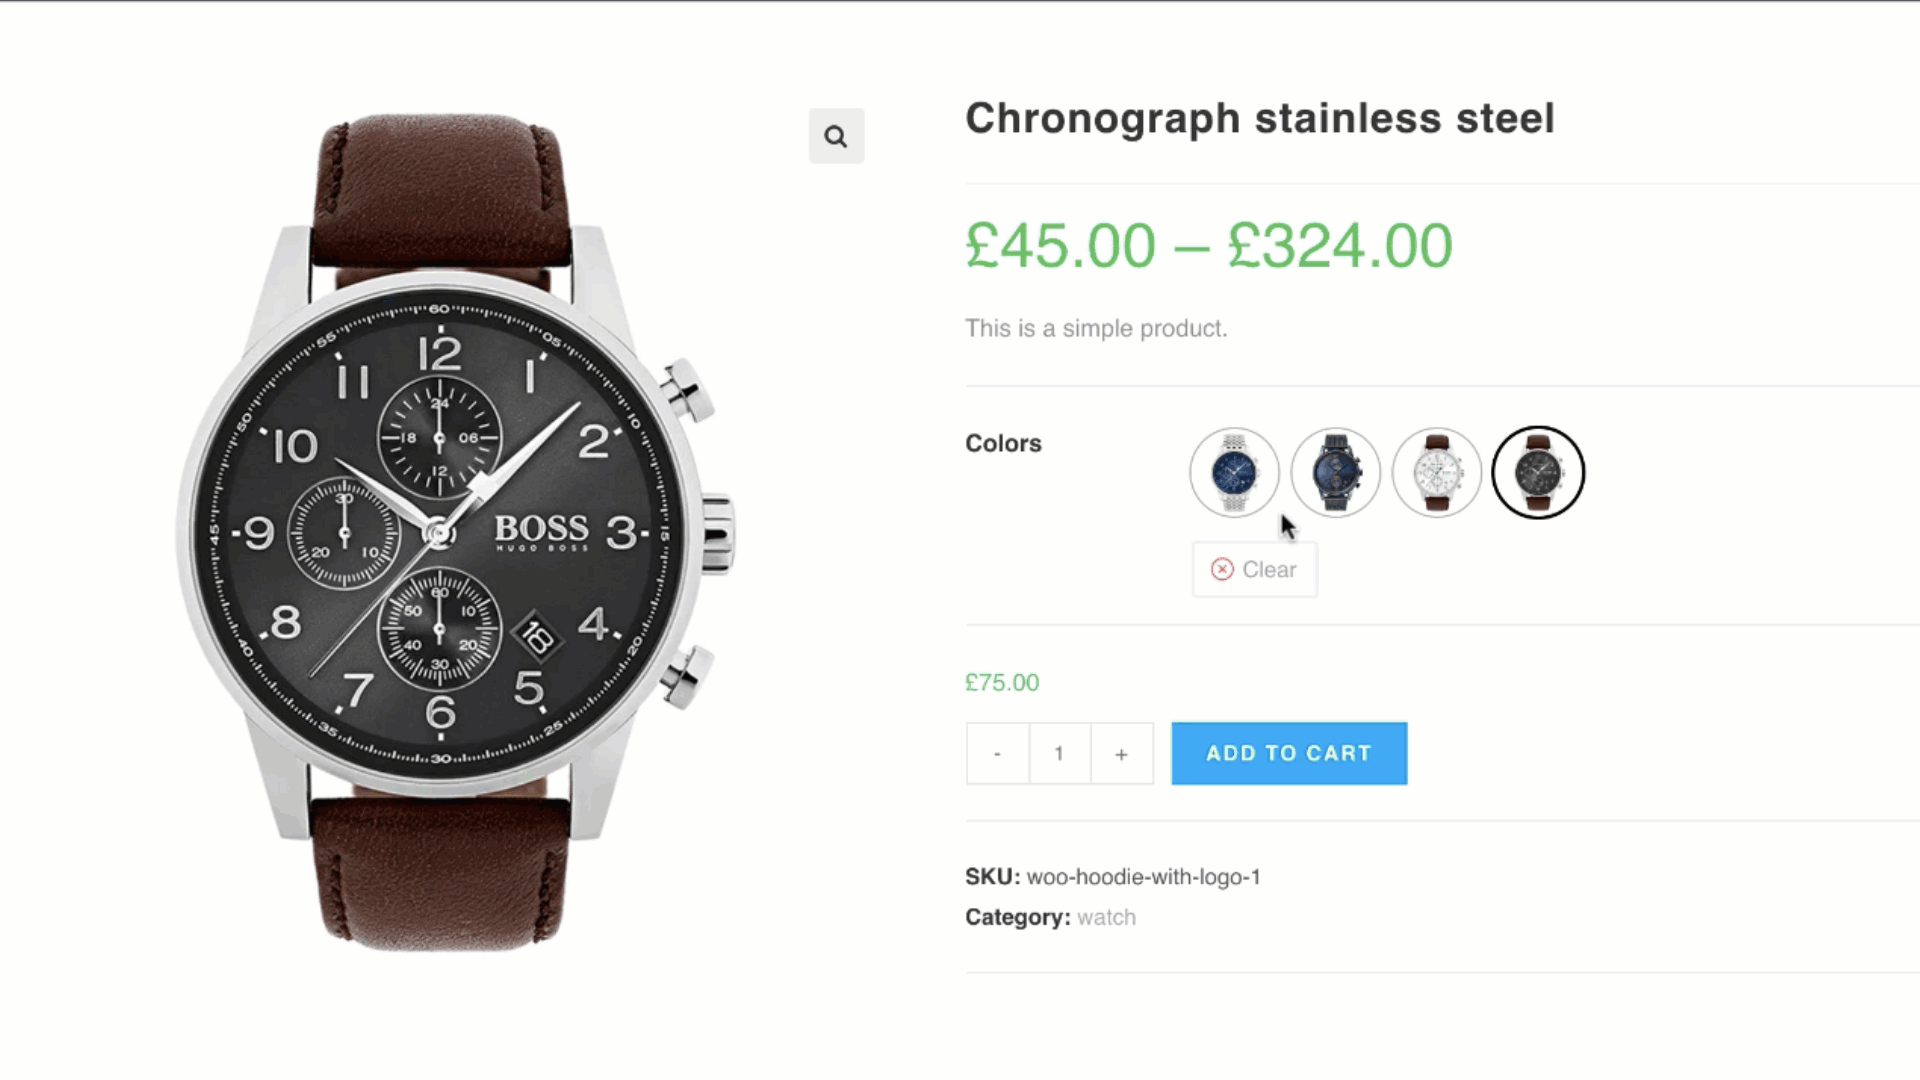
To assign colors as variation terms under the Pattern attribute, go to Products → Attributes and click Configure terms for the Pattern attribute.

After clicking Configure terms, you will see a list of all existing attribute variations.
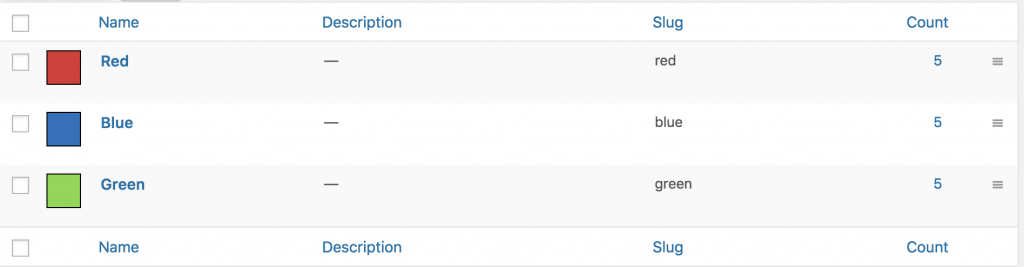
For the Pattern attribute, the variations Blue, Green, and Red are already listed.
To assign a color swatch to each variation, edit them one by one.
For demonstration, click the Edit link on the Green variation.
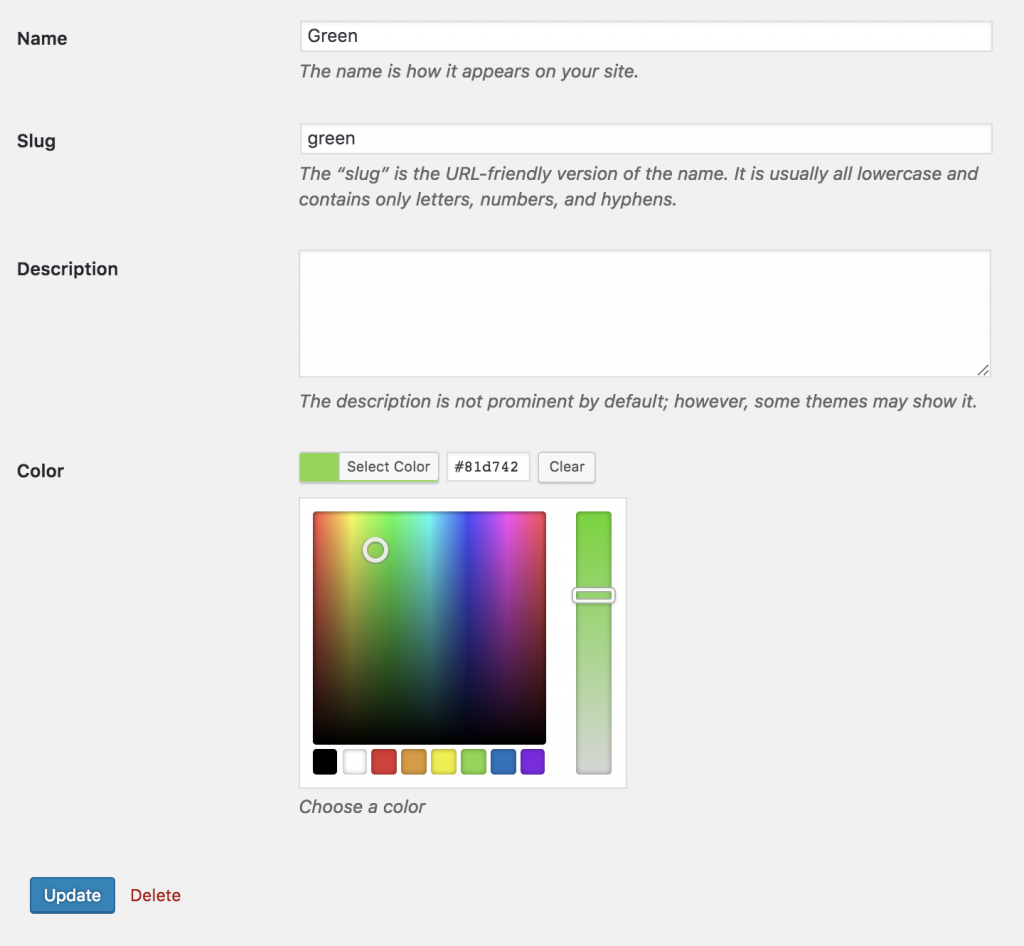
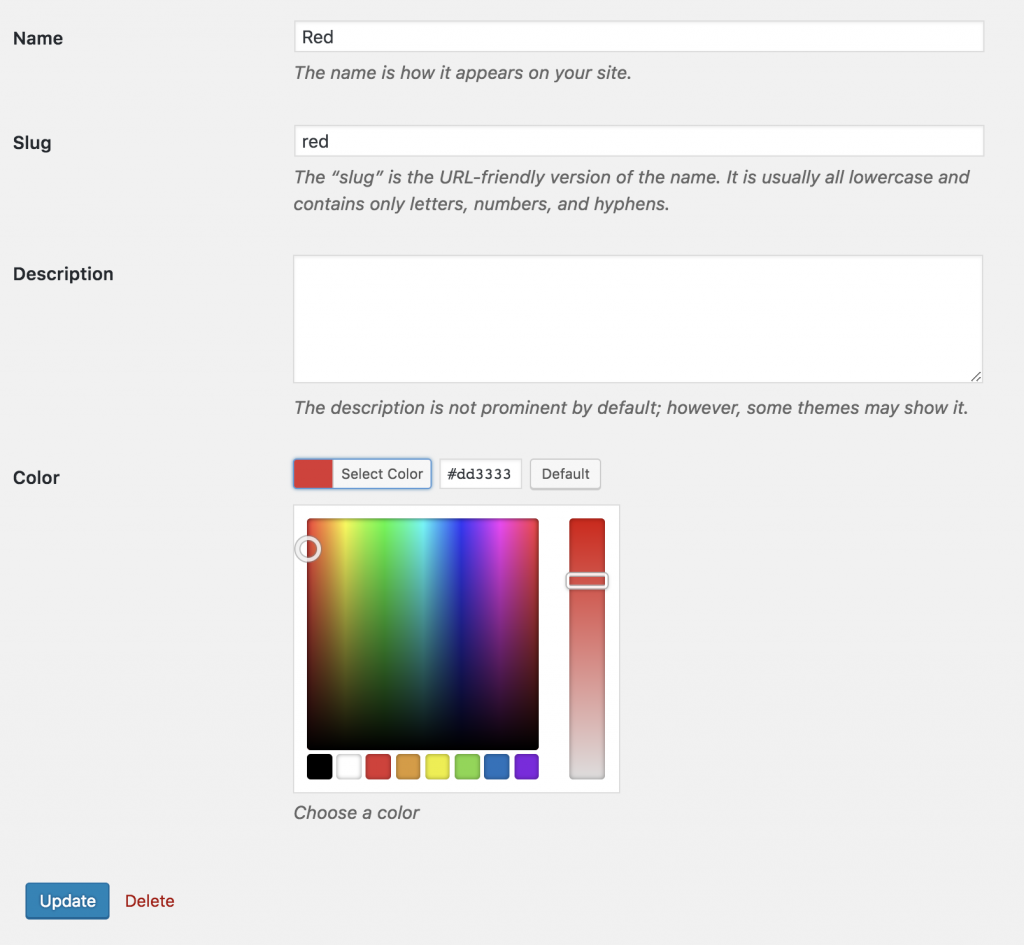
From variation edit panel. Select desired color from Colorpicker and update the changes pressing Update button.
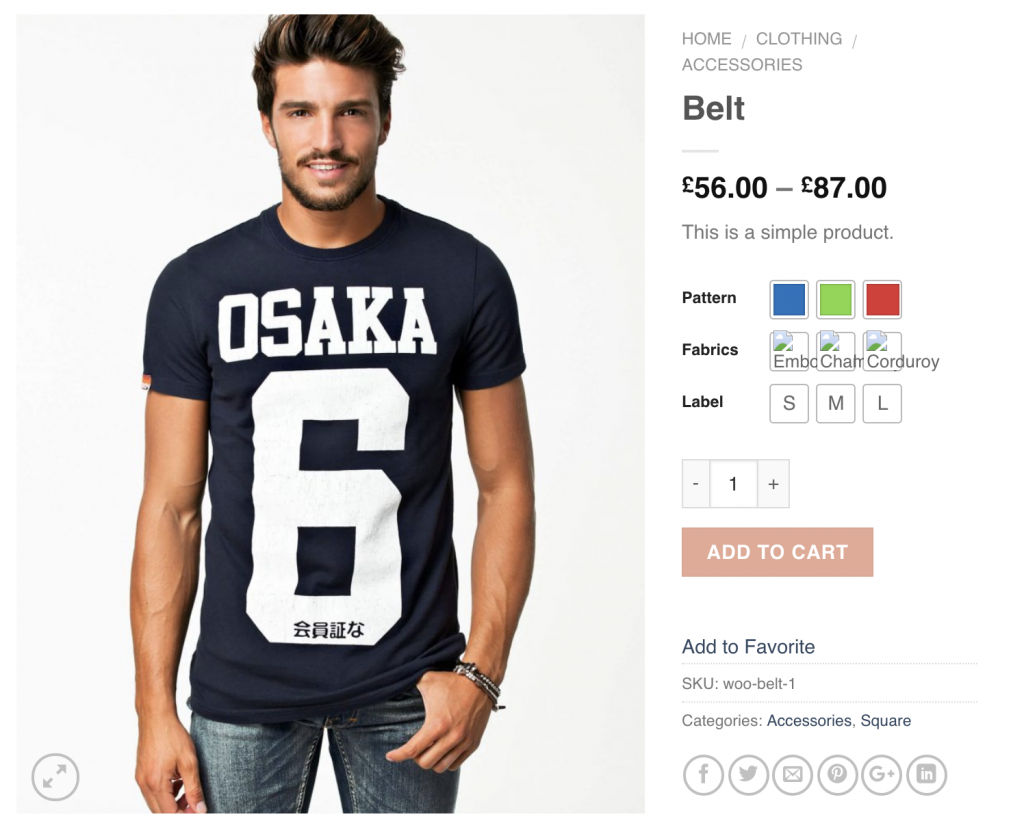
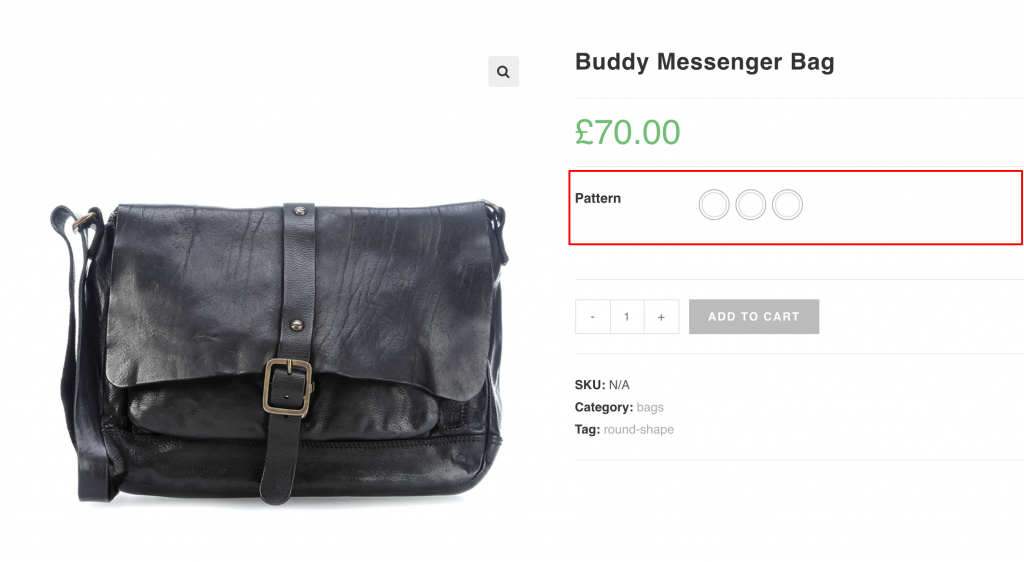
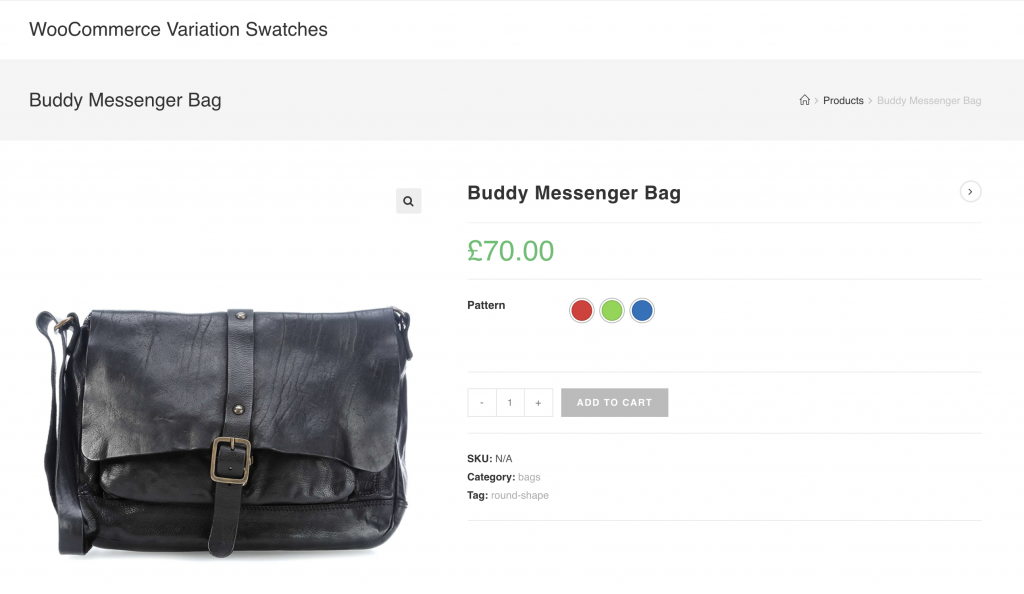
When all variations colors are updated successfully, the frontend look likes the following.
After updating pattern attribute variations, edit Fabrics attribute selecting Configure terms like pattern attribute.
To add swatch images to the Fabrics attribute, go to Products → Attributes and click Configure terms under the Fabrics attribute. A list of all Fabric terms will appear, similar to the Pattern attribute.
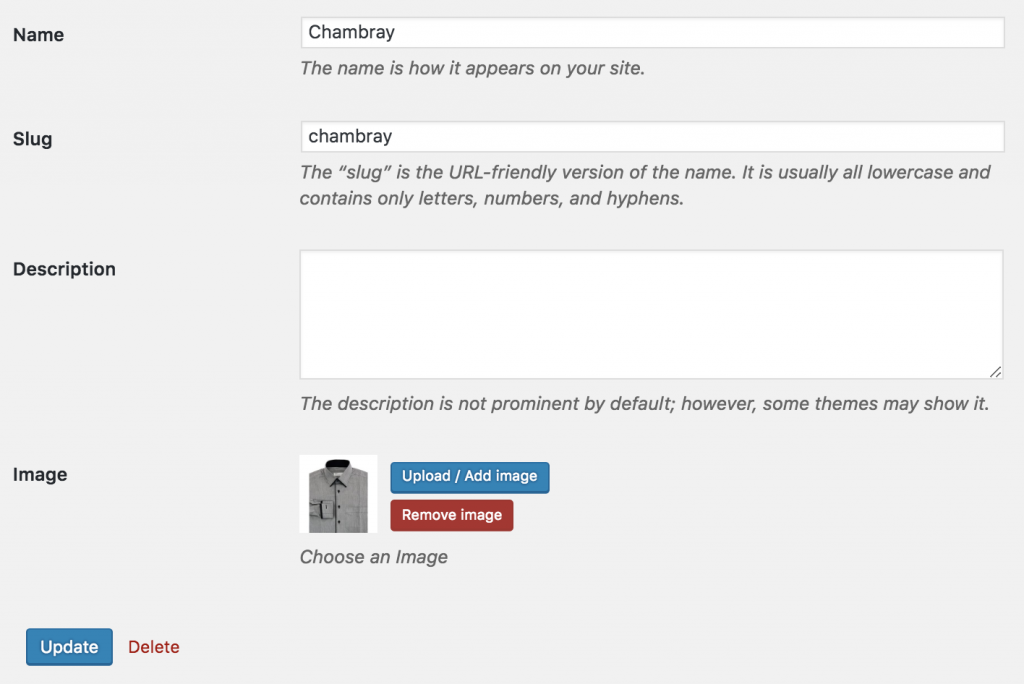
Edit each term individually to upload its swatch image. For example, click the Edit link for the Chambray term. In the term edit panel, upload your desired swatch image in the Image field, then click Update to save your changes.
After updating images for all variations, the frontend would like this the following screenshot.
How To Enable Image Swatches
Frontend Preview
- How To Create To Image Variation Swatches For Global Attributes
- How To Create To Image Variation Swatches For Manual Attributes
- How To Create To Image Variation Swatches From Scratch
How To Create Image Variation Swatches For Globally Created Attributes
Video Tutorial
If your store contains variable products and you’ve already created attribute variations globally from Products → Attributes, then this tutorial is designed for you.
Step 1: Editing Attribute
Go to Products → Attributes. All of your globally created attributes will appear here. After installing the WooCommerce Variation Swatches plugin, a new ‘Type’ field will be added to this list. By default, each attribute will display ‘Select’ under the Type column.

As WooCommerce Variation Swatches Plugin comes with 4 attribute types: Color, Image, Button and Radio. You can set any of attribute type for your desired attribute.
For demonstration purpose, Image attribute has been created. We’ll add image attribute type for Image attribute.
To set image attribute type to Image attribute, click on Edit.

After selecting button, it will open attribute editing panel. Select Image Type from the type dropdown.
When attribute type selection is completed, get back to the attribute list page. The Attribute list would look like the following image. Now Image Attribute is showing Image type instead of default Select type.

After selecting the attribute type, the product frontend will look like the screenshot below. Don’t worry if the attribute variations appear odd — this happens because no images have been assigned to the variations yet.
Step 2: Editing Variations
To define image as variations inside the image attribute. Head over to Products >> Attributes. Select Configure terms from image attribute.

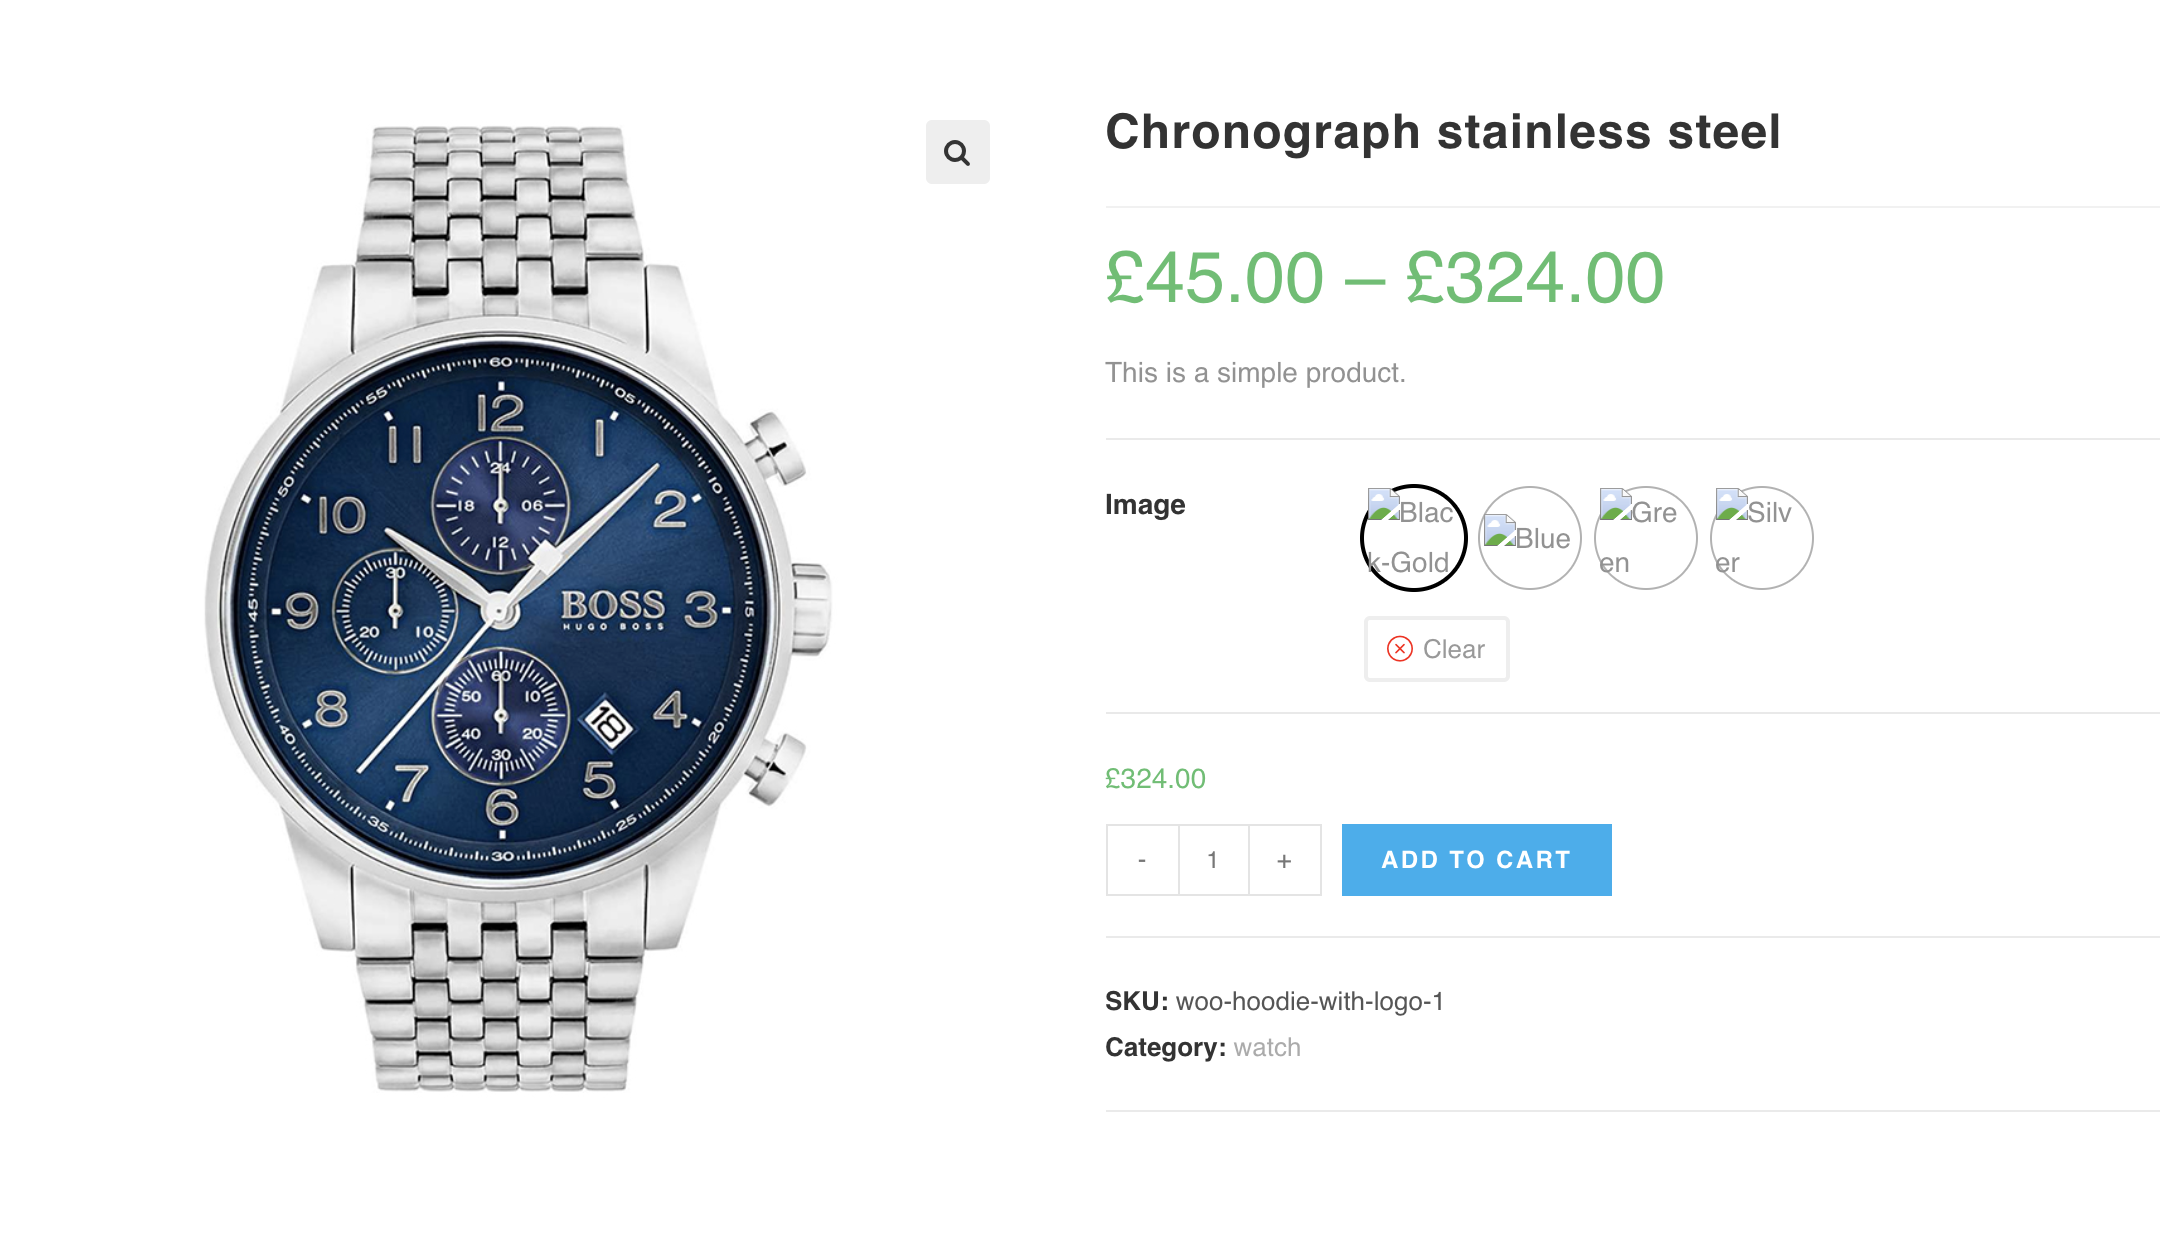
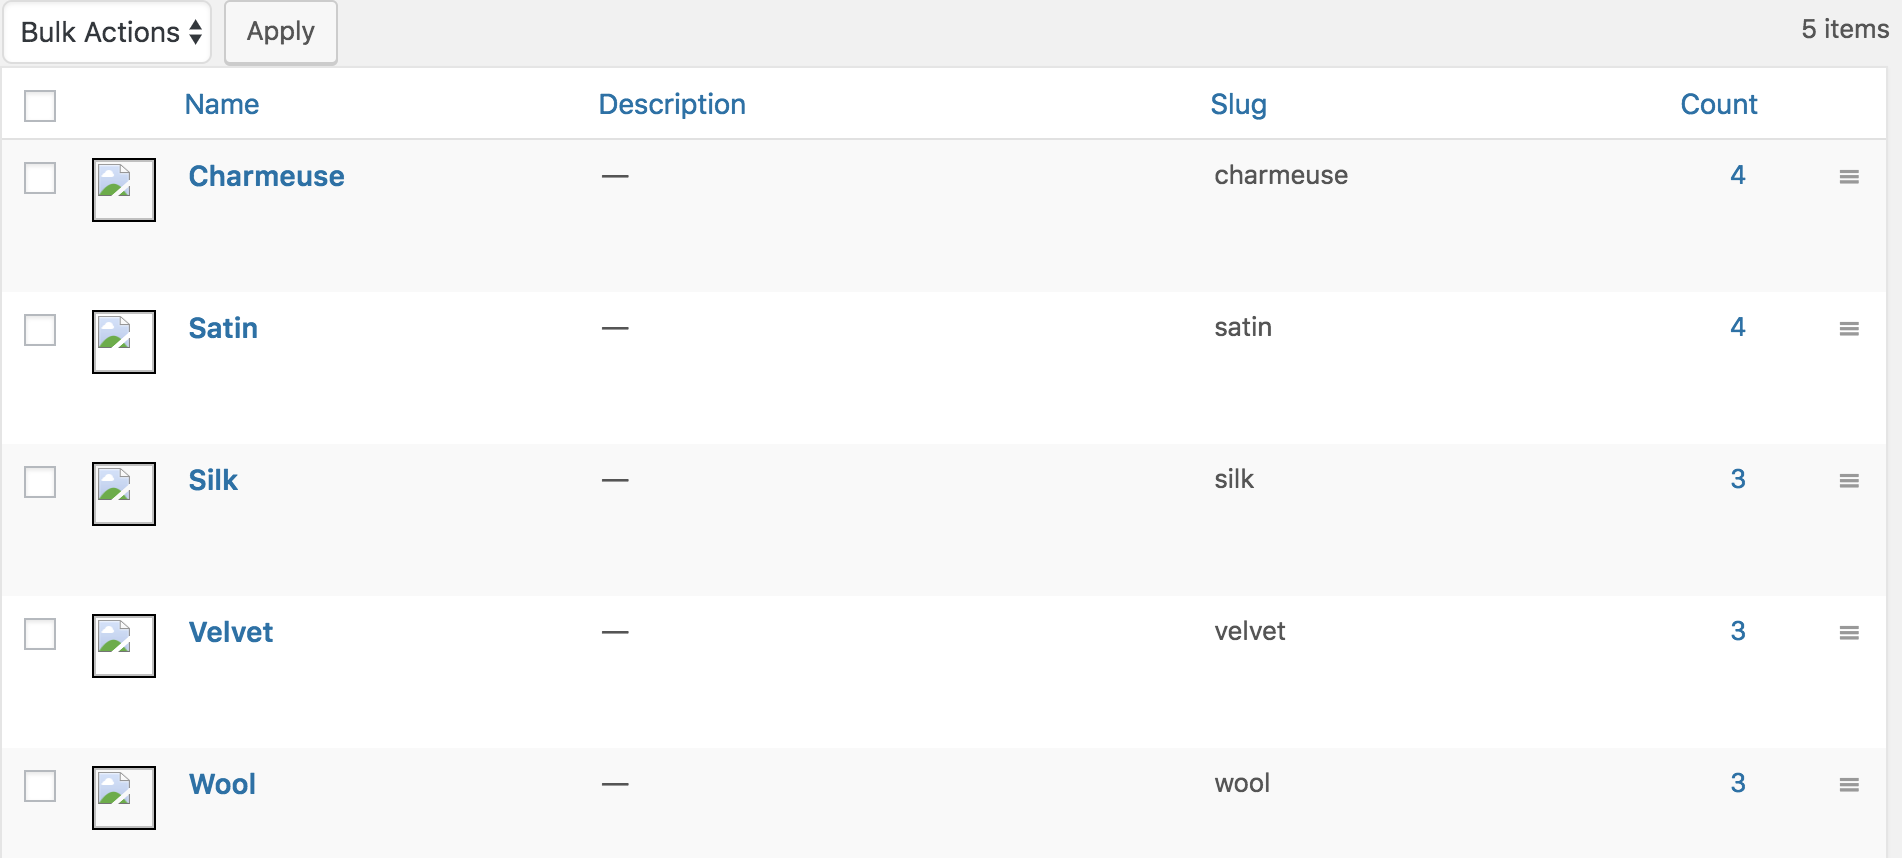
After selecting Configure terms, a list of attribute variations comes up. For Image attribute, three variations: Charmeuse, Satin, Silk, Velvet and Wool variations are listed for me. As those variation have no image defined, they look like the following screenshot.
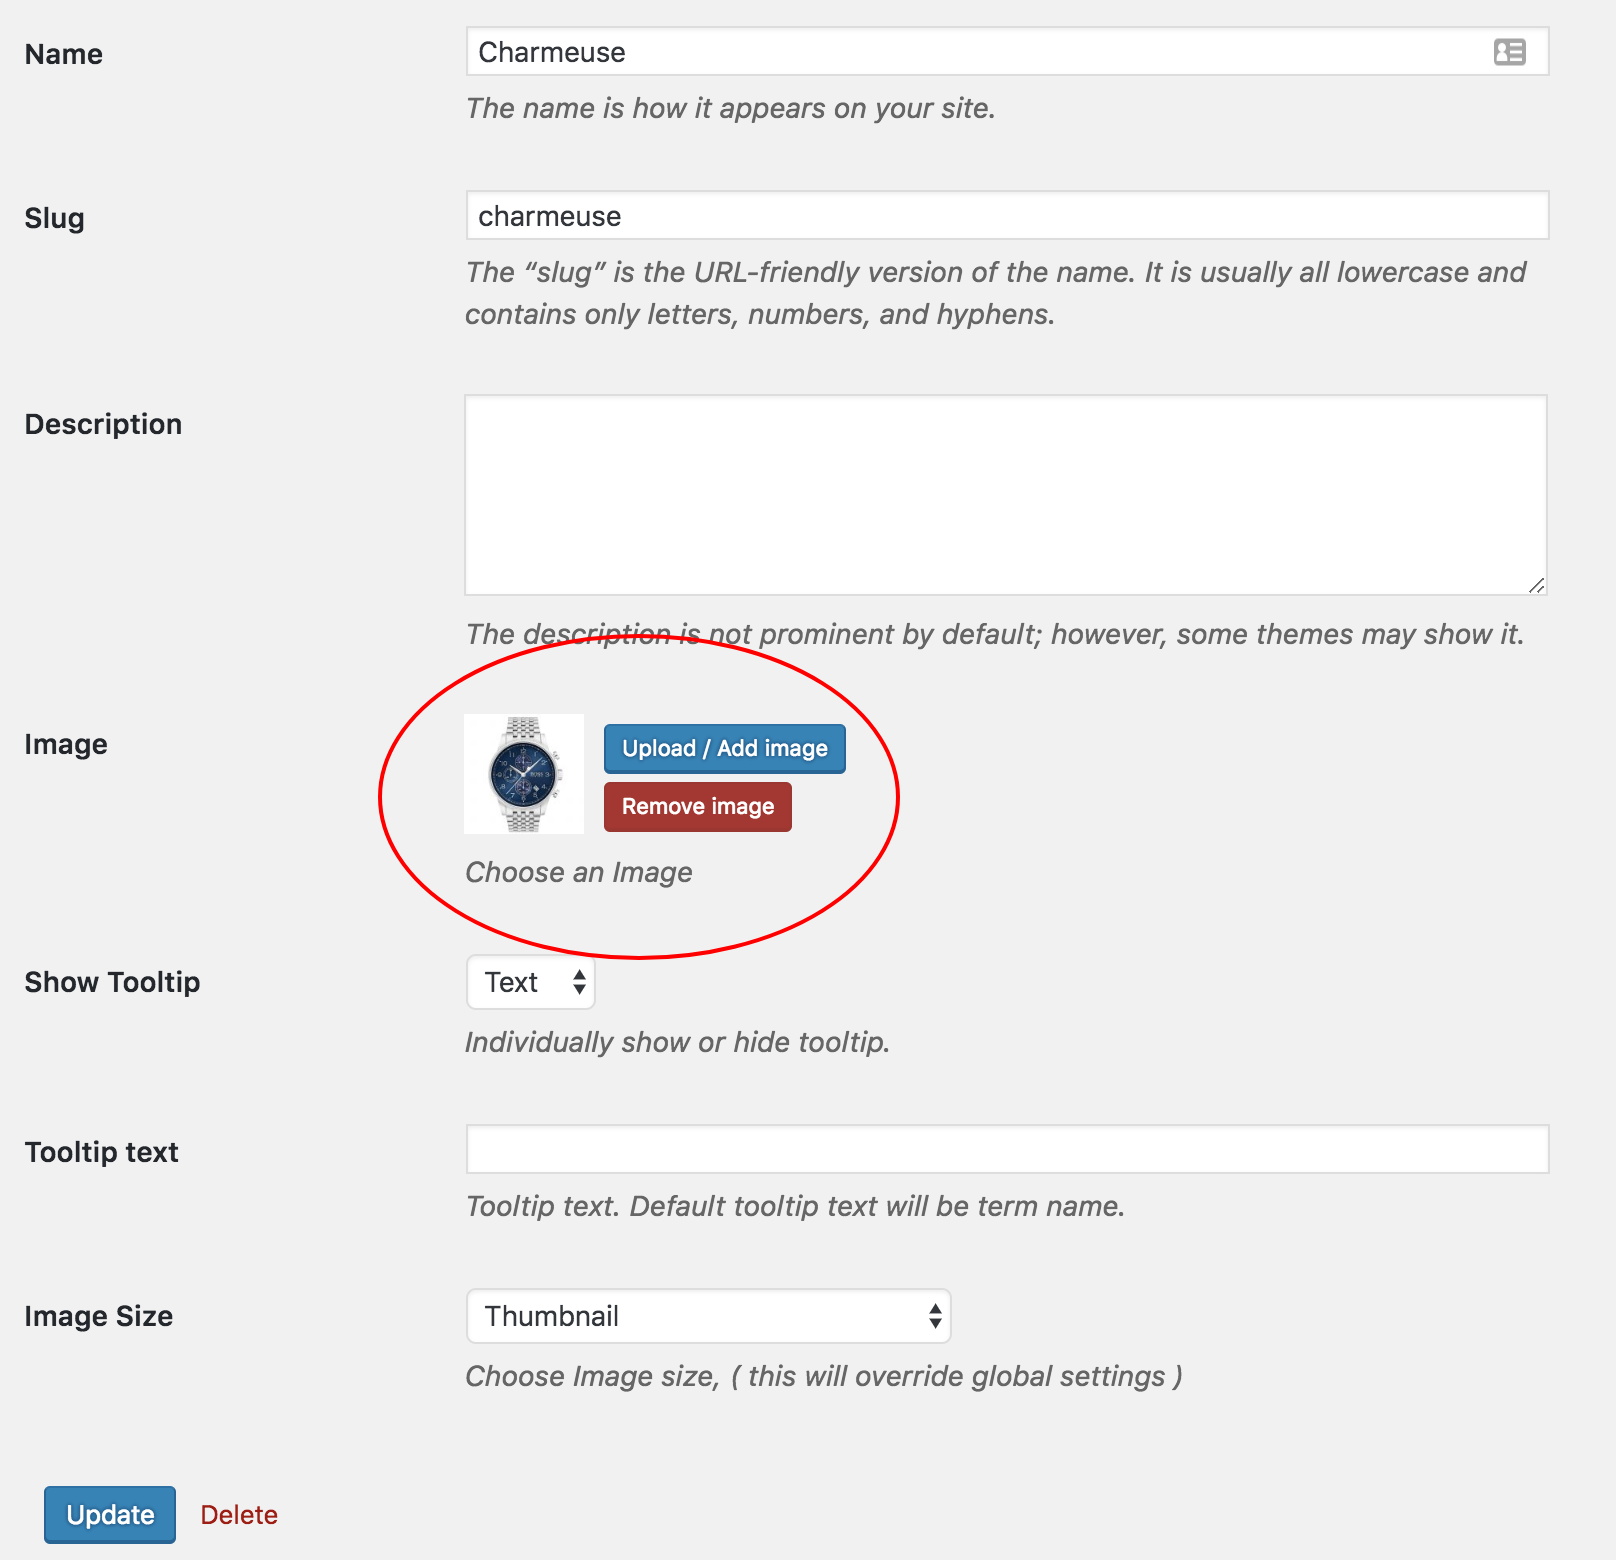
Edit each variation one by one to add variation image. For demonstration, I am going to select Edit link for Charmeuse variation.

In the variation edit panel, select the desired image by clicking Upload/Add Image, then save your changes by pressing the Update button. For example, this is done for my Red variation.
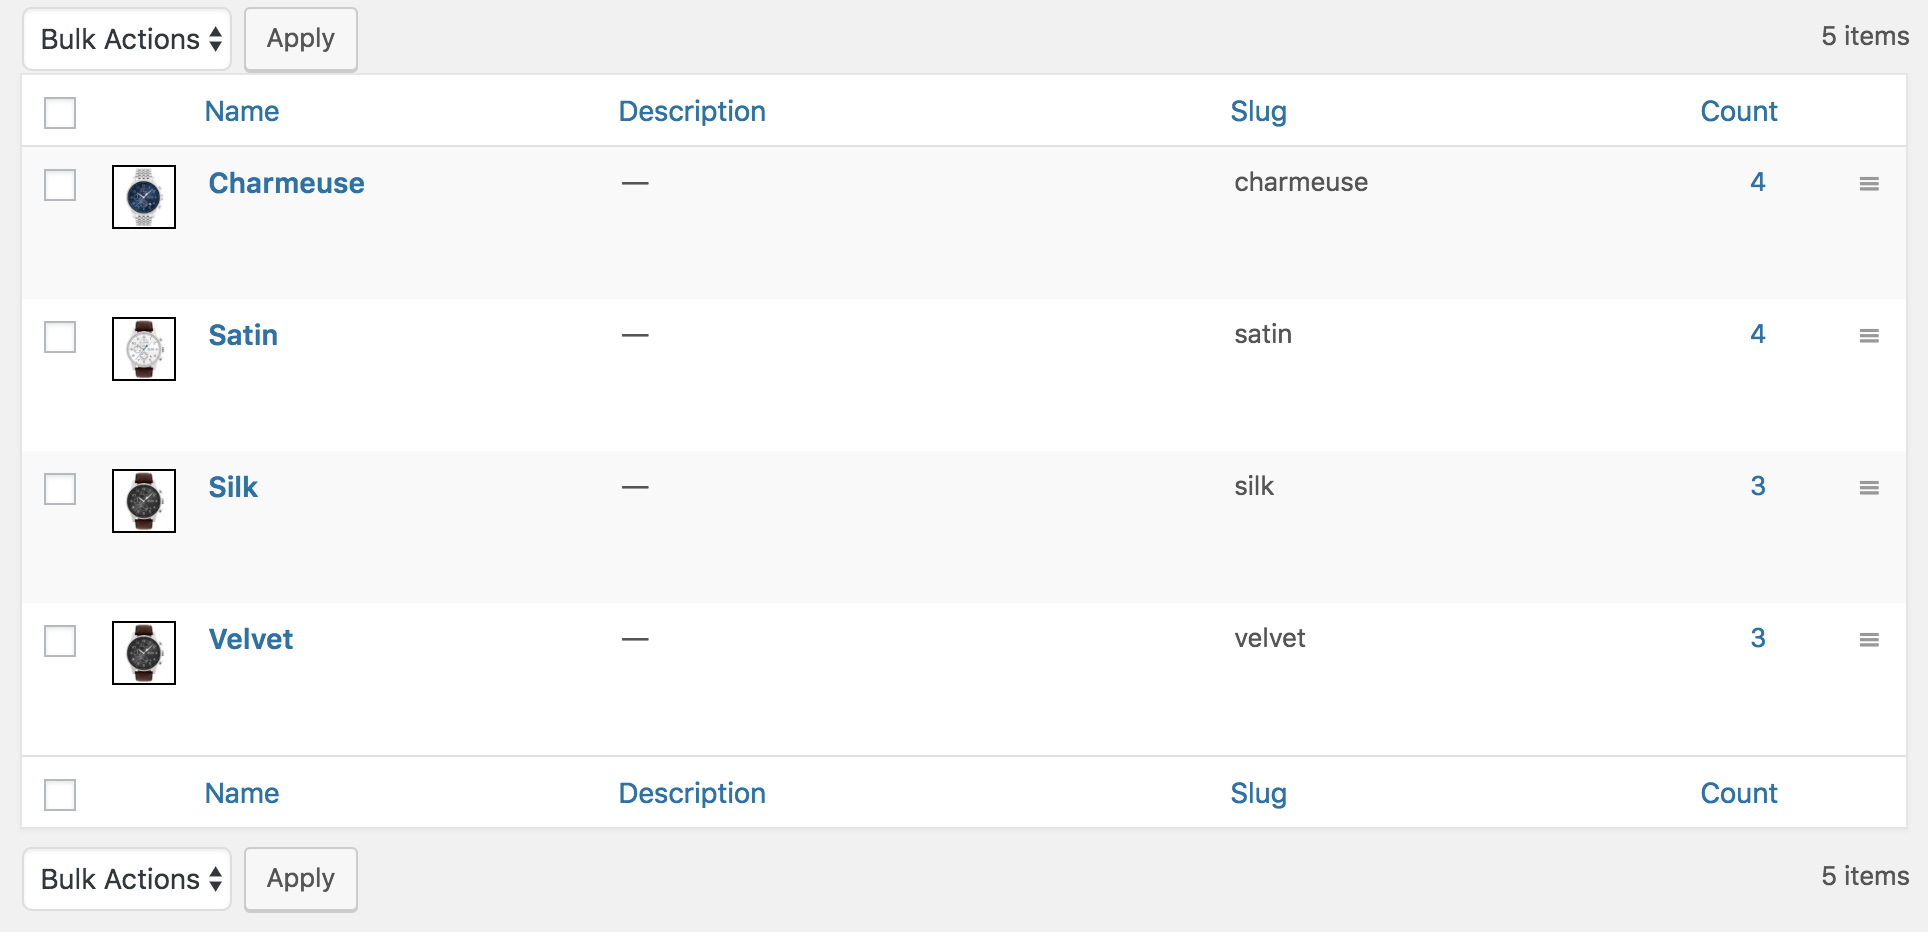
After adding image for entire variations, my variation list page looks like the following screenshot.
And the frontend of my variable product that is connected with global attribute would look like following image.

How To Create Image Variation Swatches From Manually Created Attributes
Video Tutorial
Step 1: Pro Plugin Setup
If your store has variable products but no global product attributes, it means the attributes and variations were created manually.
To convert these manually created variations into image swatches, ensure you have the premium version of WooCommerce Variation Swatches installed.
Step 2: Change Manual Attribute Type
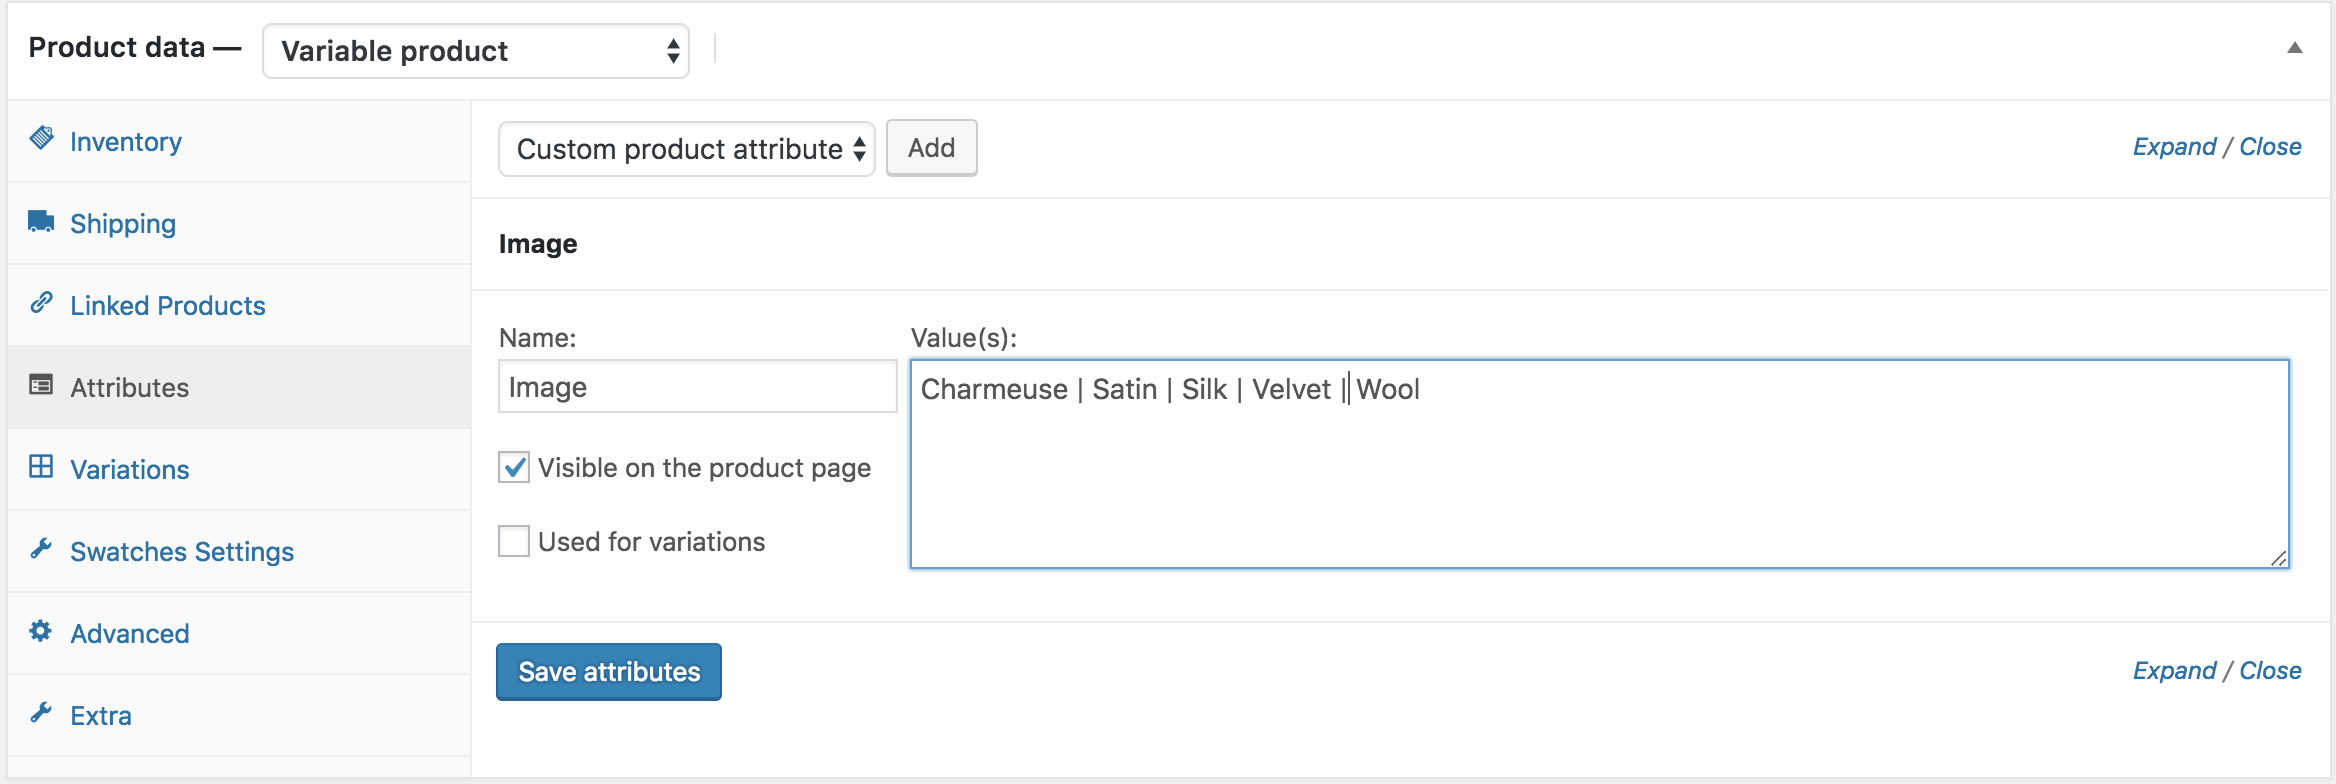
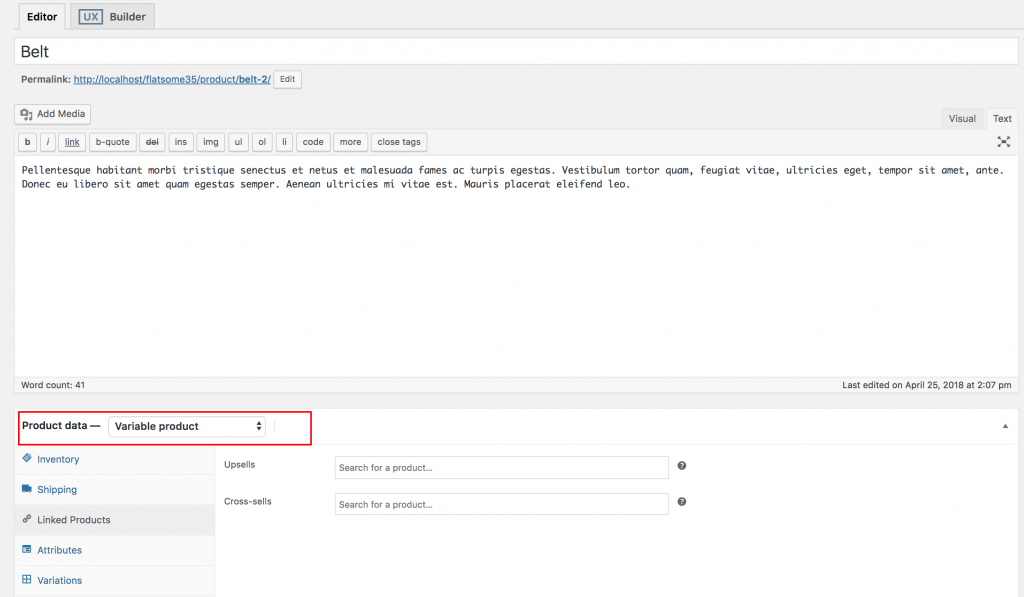
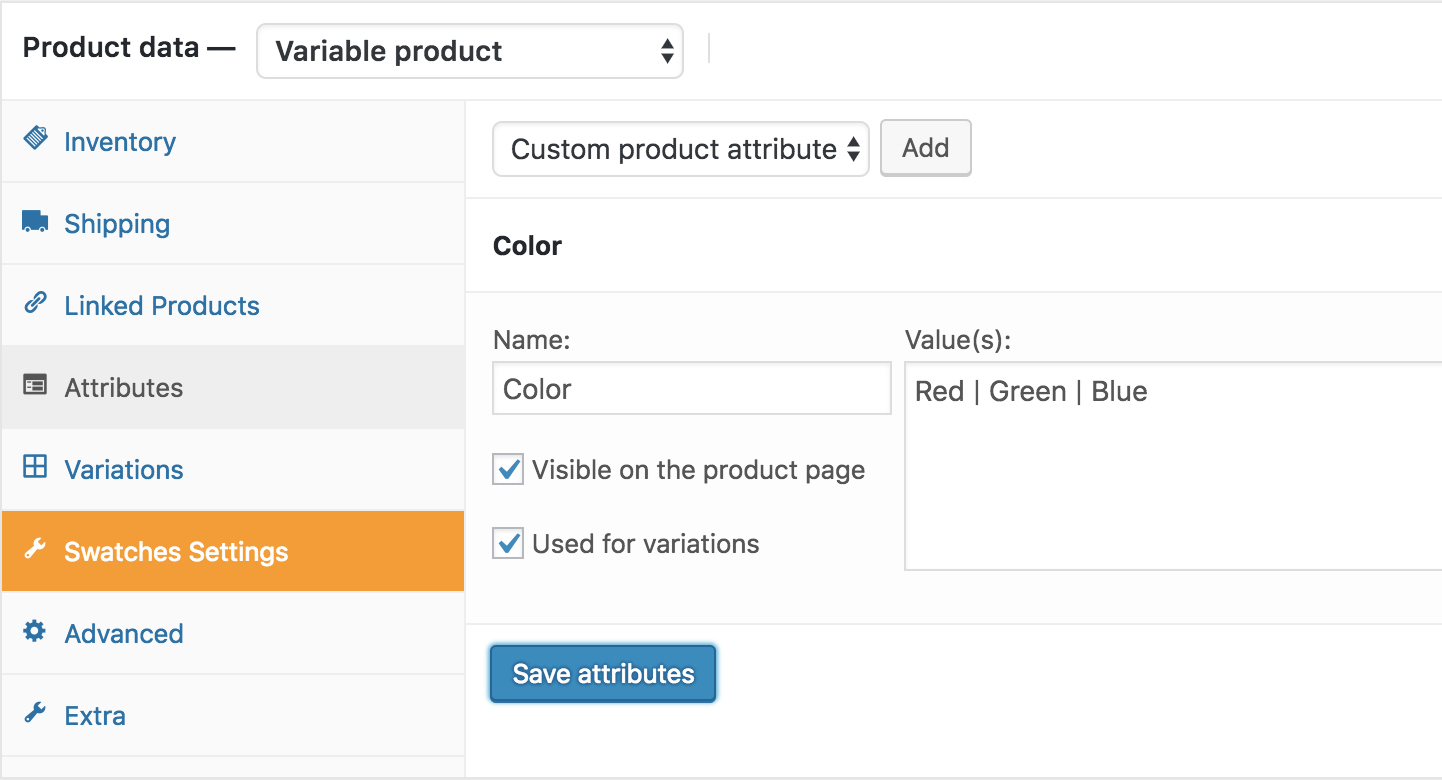
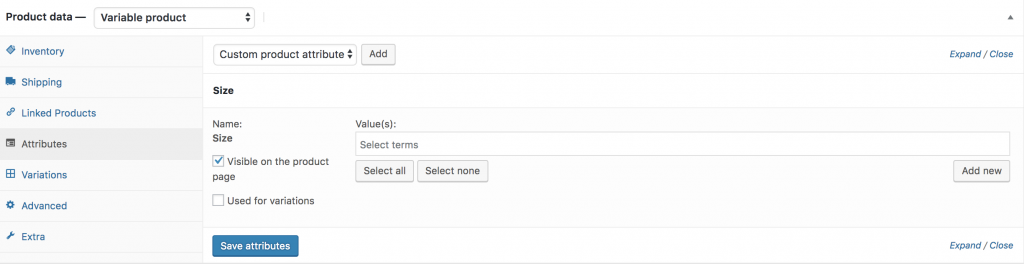
If you head to your Attributes tab from product data inside your product edit mode, and found variations are separated by pipe sign like the following screen. It means you have created variation manually.
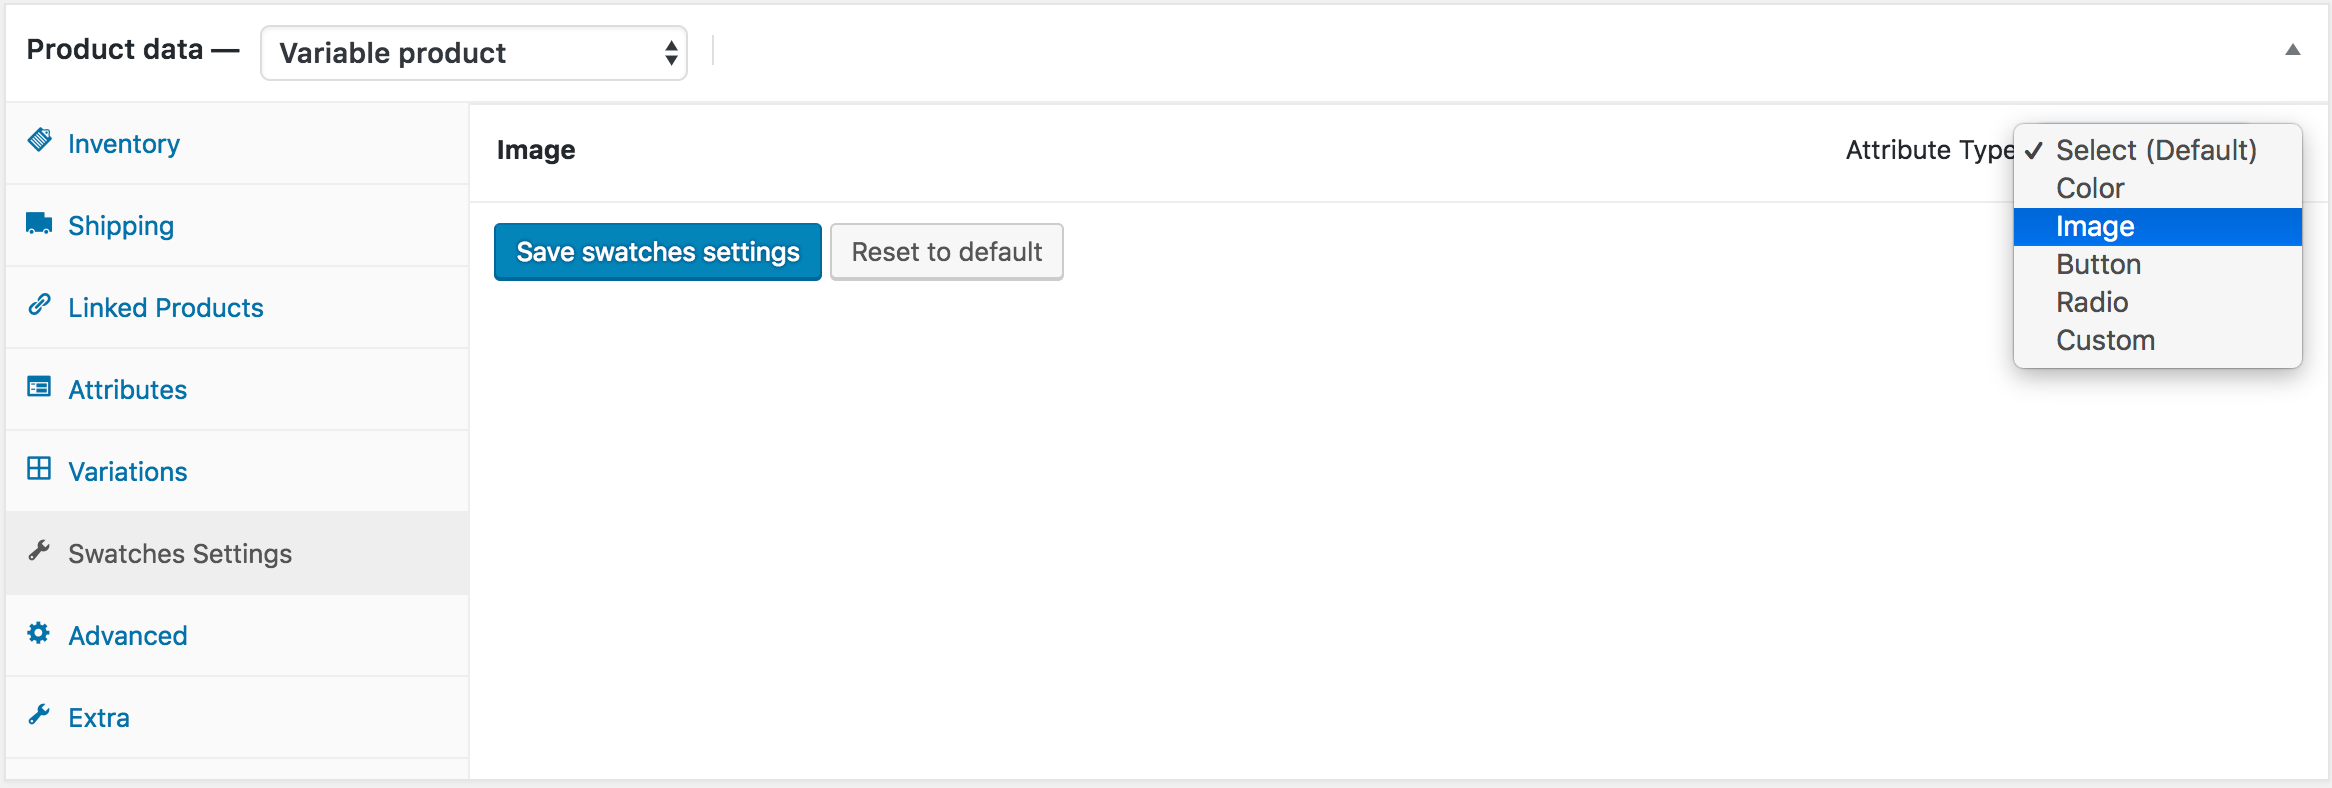
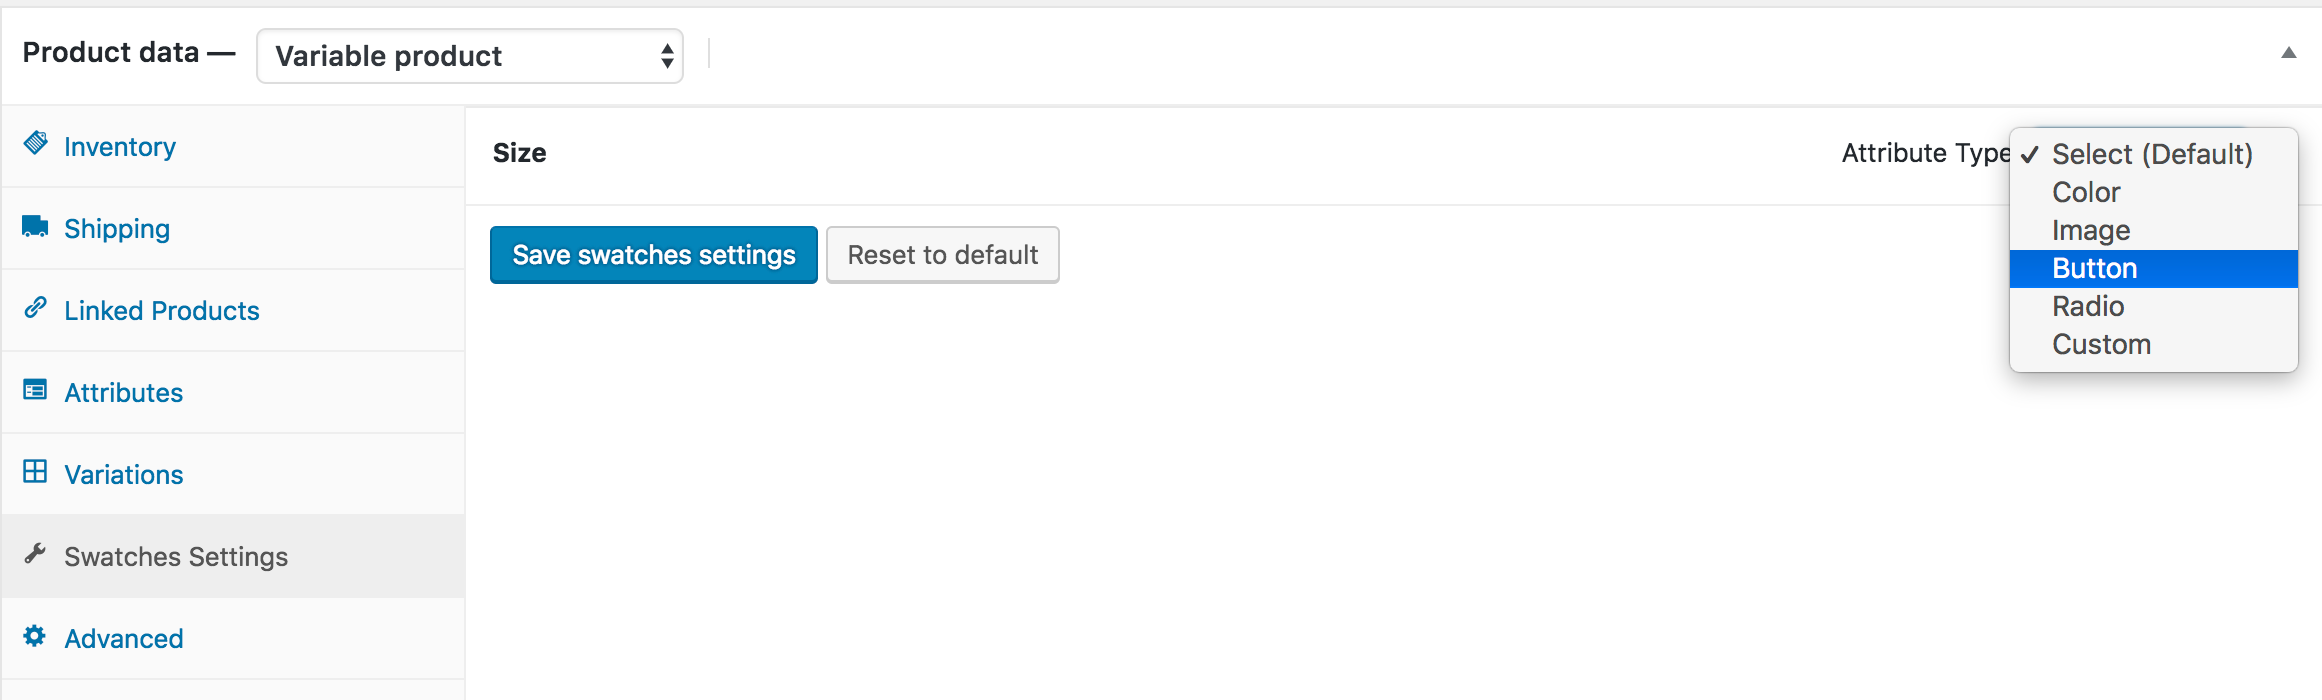
To Convert these manually created attribute variations, head to Swatches Settings tab, and select Image type from Select (Default) Dropdown.
After selecting attribute type, the frontend of the product would look like the following screenshot. Don’t be panic, if you find your attribute variations weird. It happens because you haven’t set any image for variations yet.

Step 3: Select Image For Variations
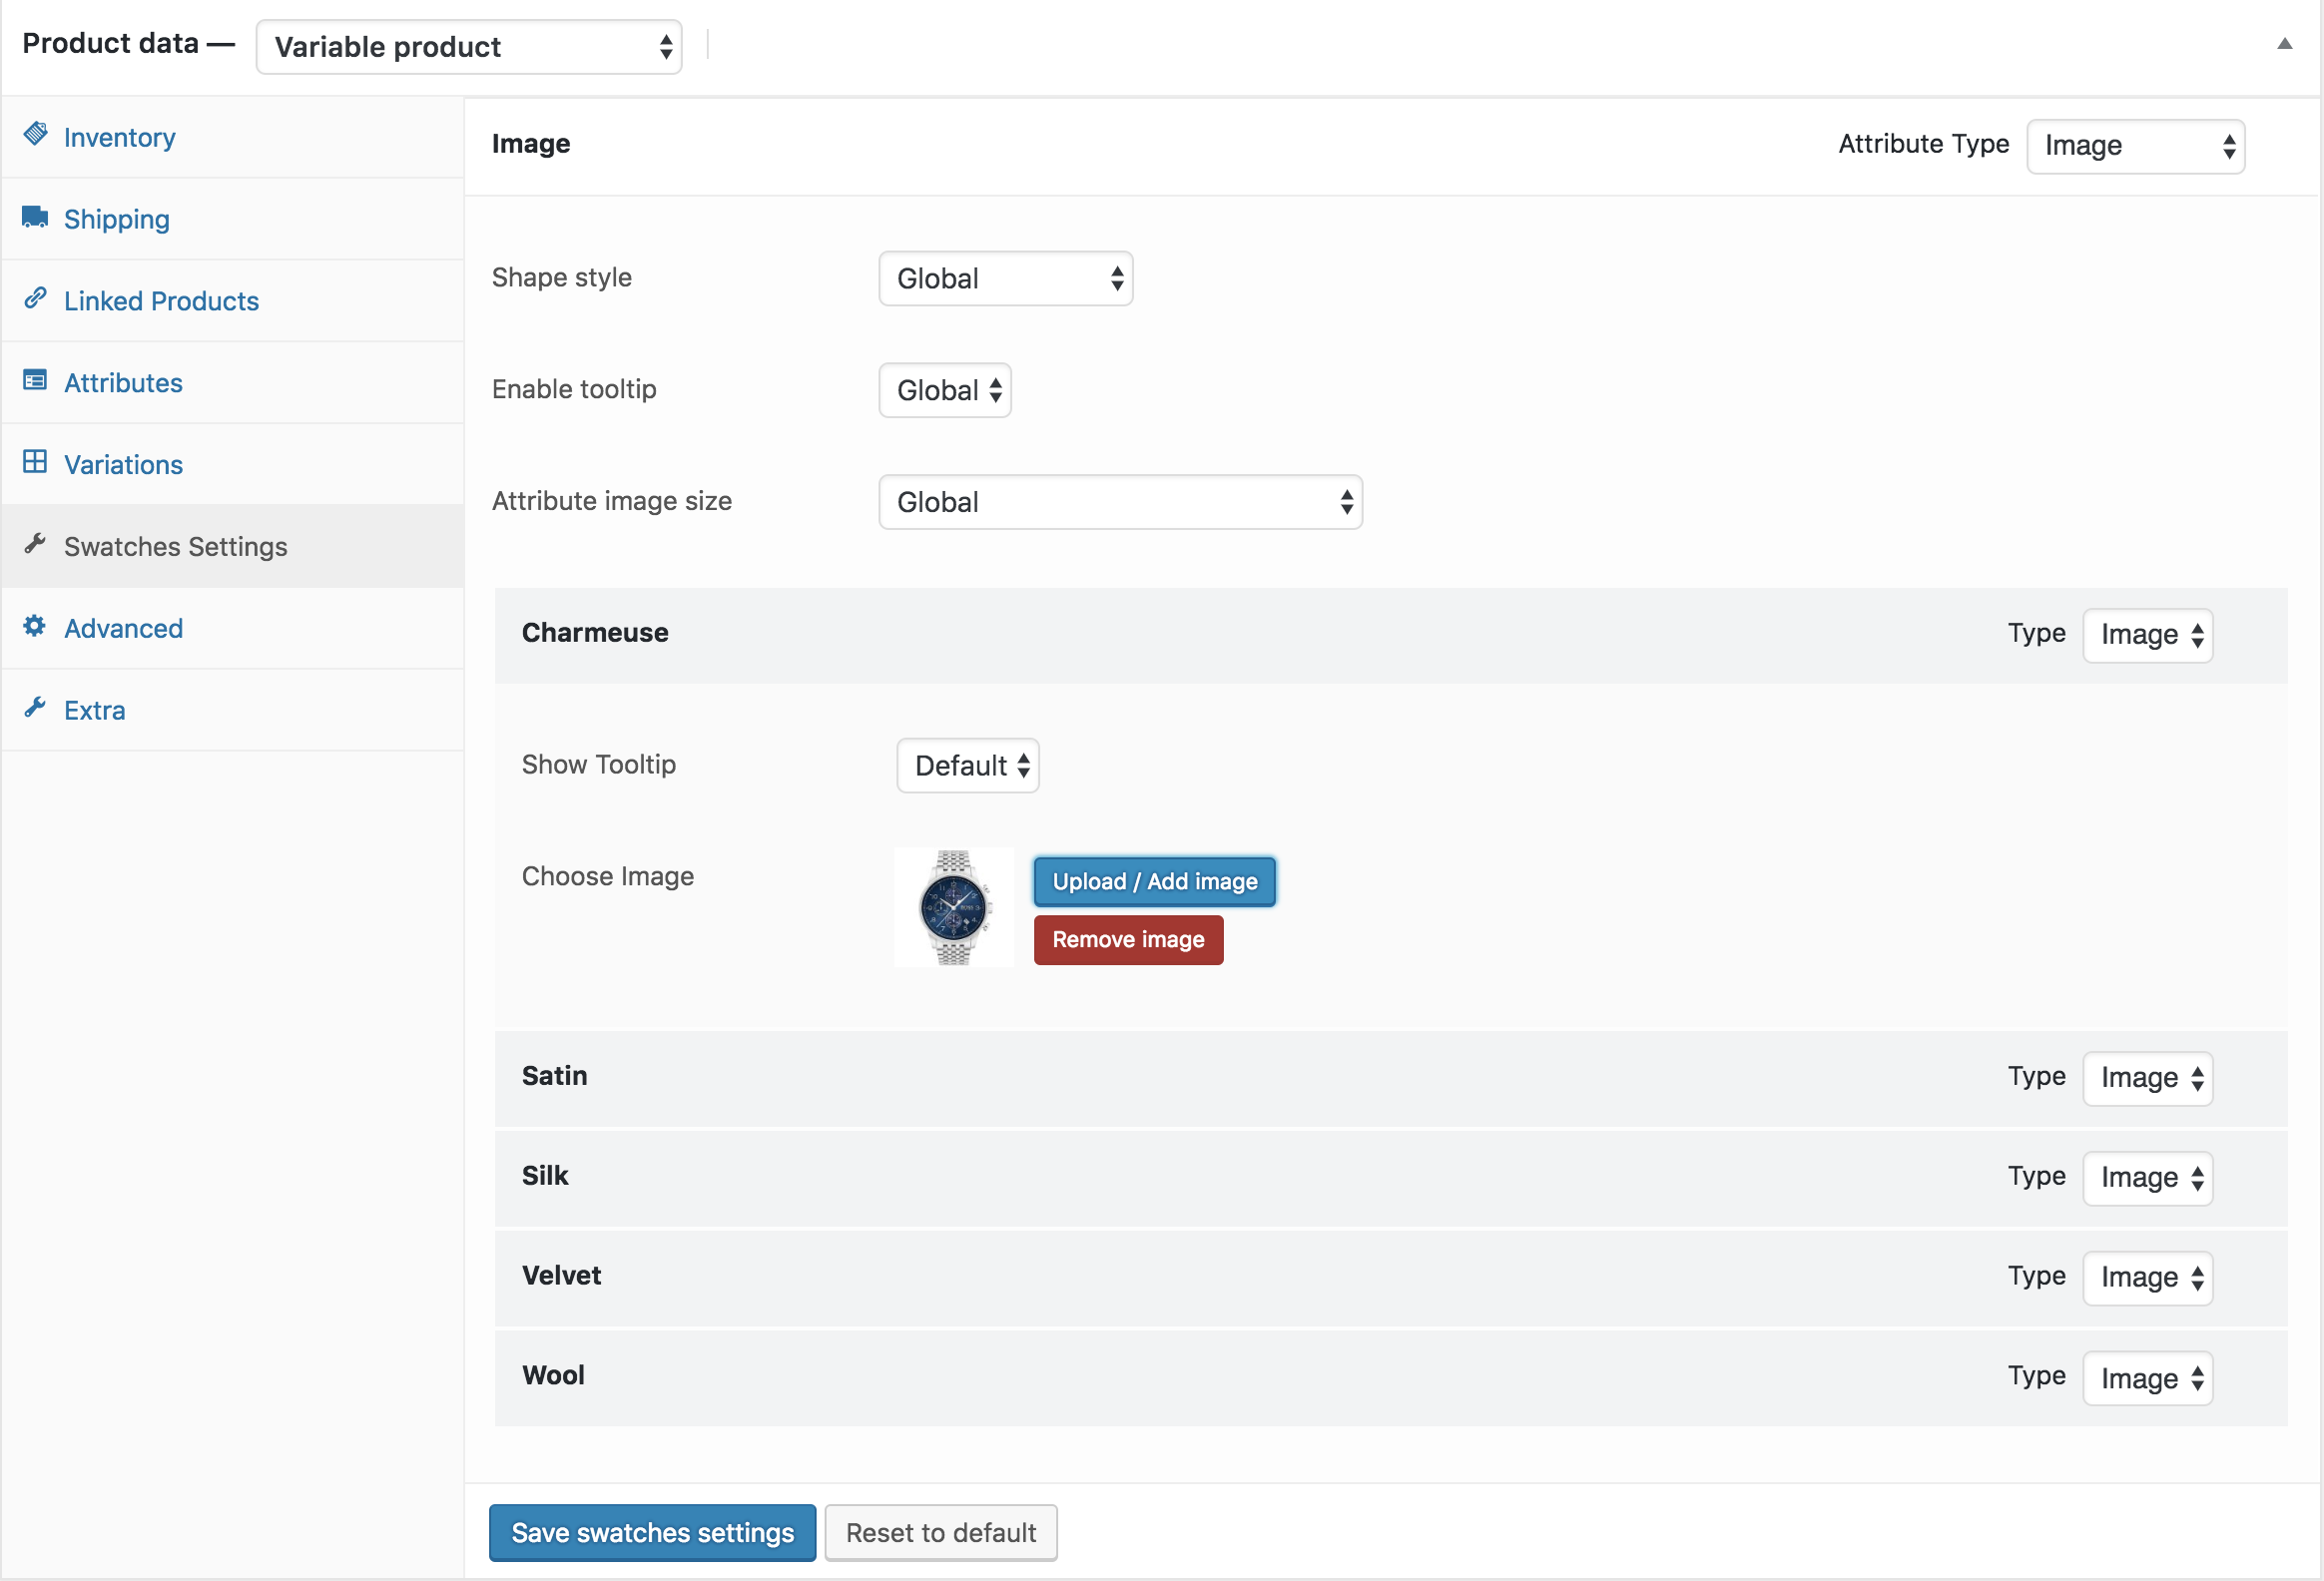
After selecting attribute type, press the Image attribute accordion, it will reveal setting to add images for its available variations.
After adding the above option the frontend would look like the following screenshot.

How To Create Image Variation Swatches From Scratch
Step 1: Create Attribute
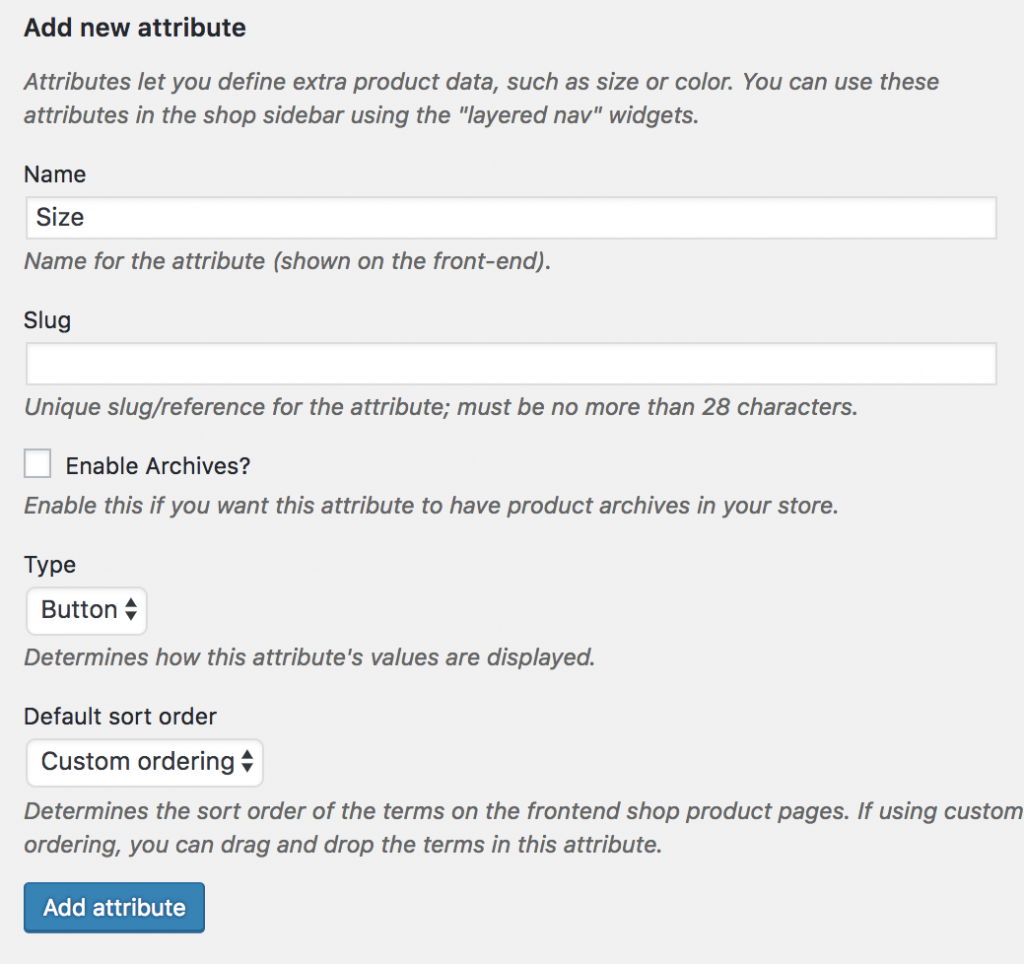
First, we need to create an Image attribute and its variations globally. To do this, go to Products → Attributes.
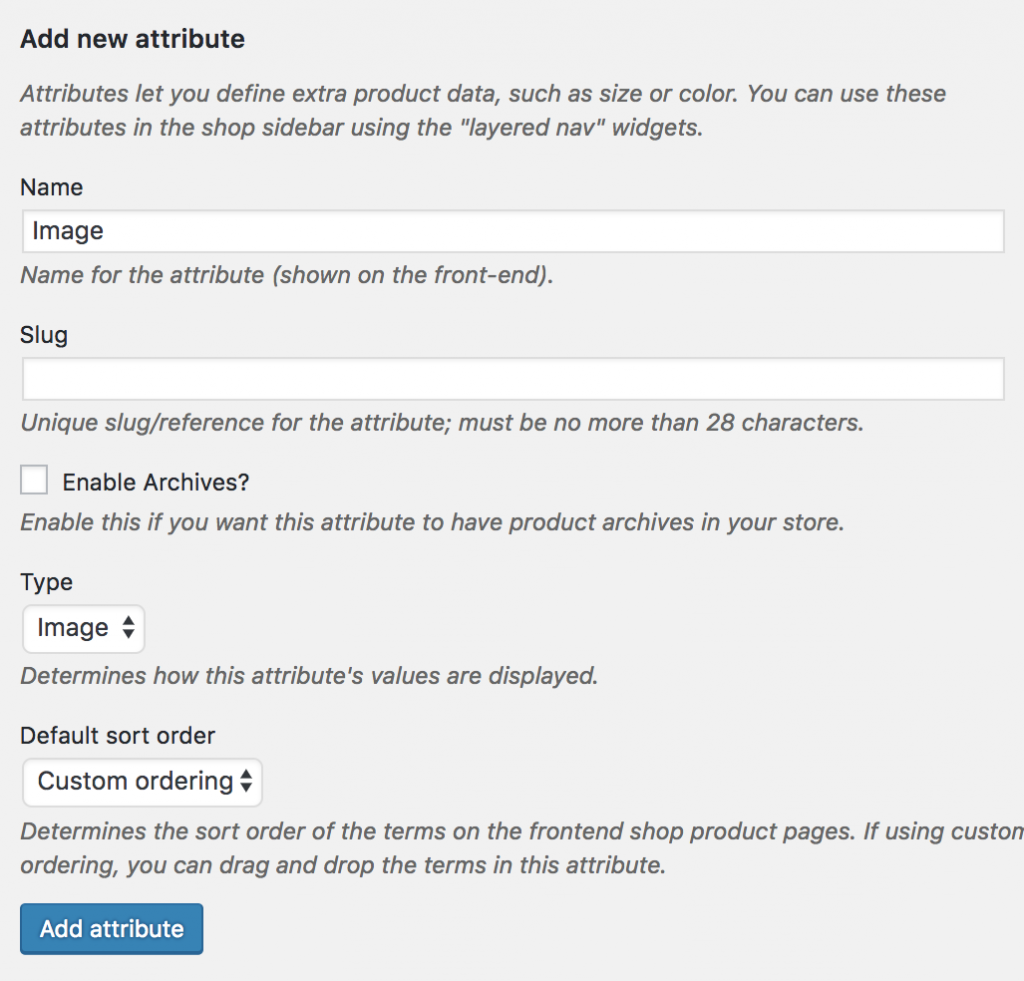
Fill in the Name field with your desired attribute name (in this tutorial, we’ll use Image). You can leave the Slug field empty, as it will be generated automatically. From the Type dropdown, select Image. Once all required fields are completed, click the Add Attribute button.
After creating attribute, you will notice a list is created in the right side. Check the following screenshot.

Step 2: Create Attribute Variations
The more variation you would add, they would get added to this list. When an attribute is created, we need to create attribute variations. To create product variations, click on the Configure terms from the attribute list.

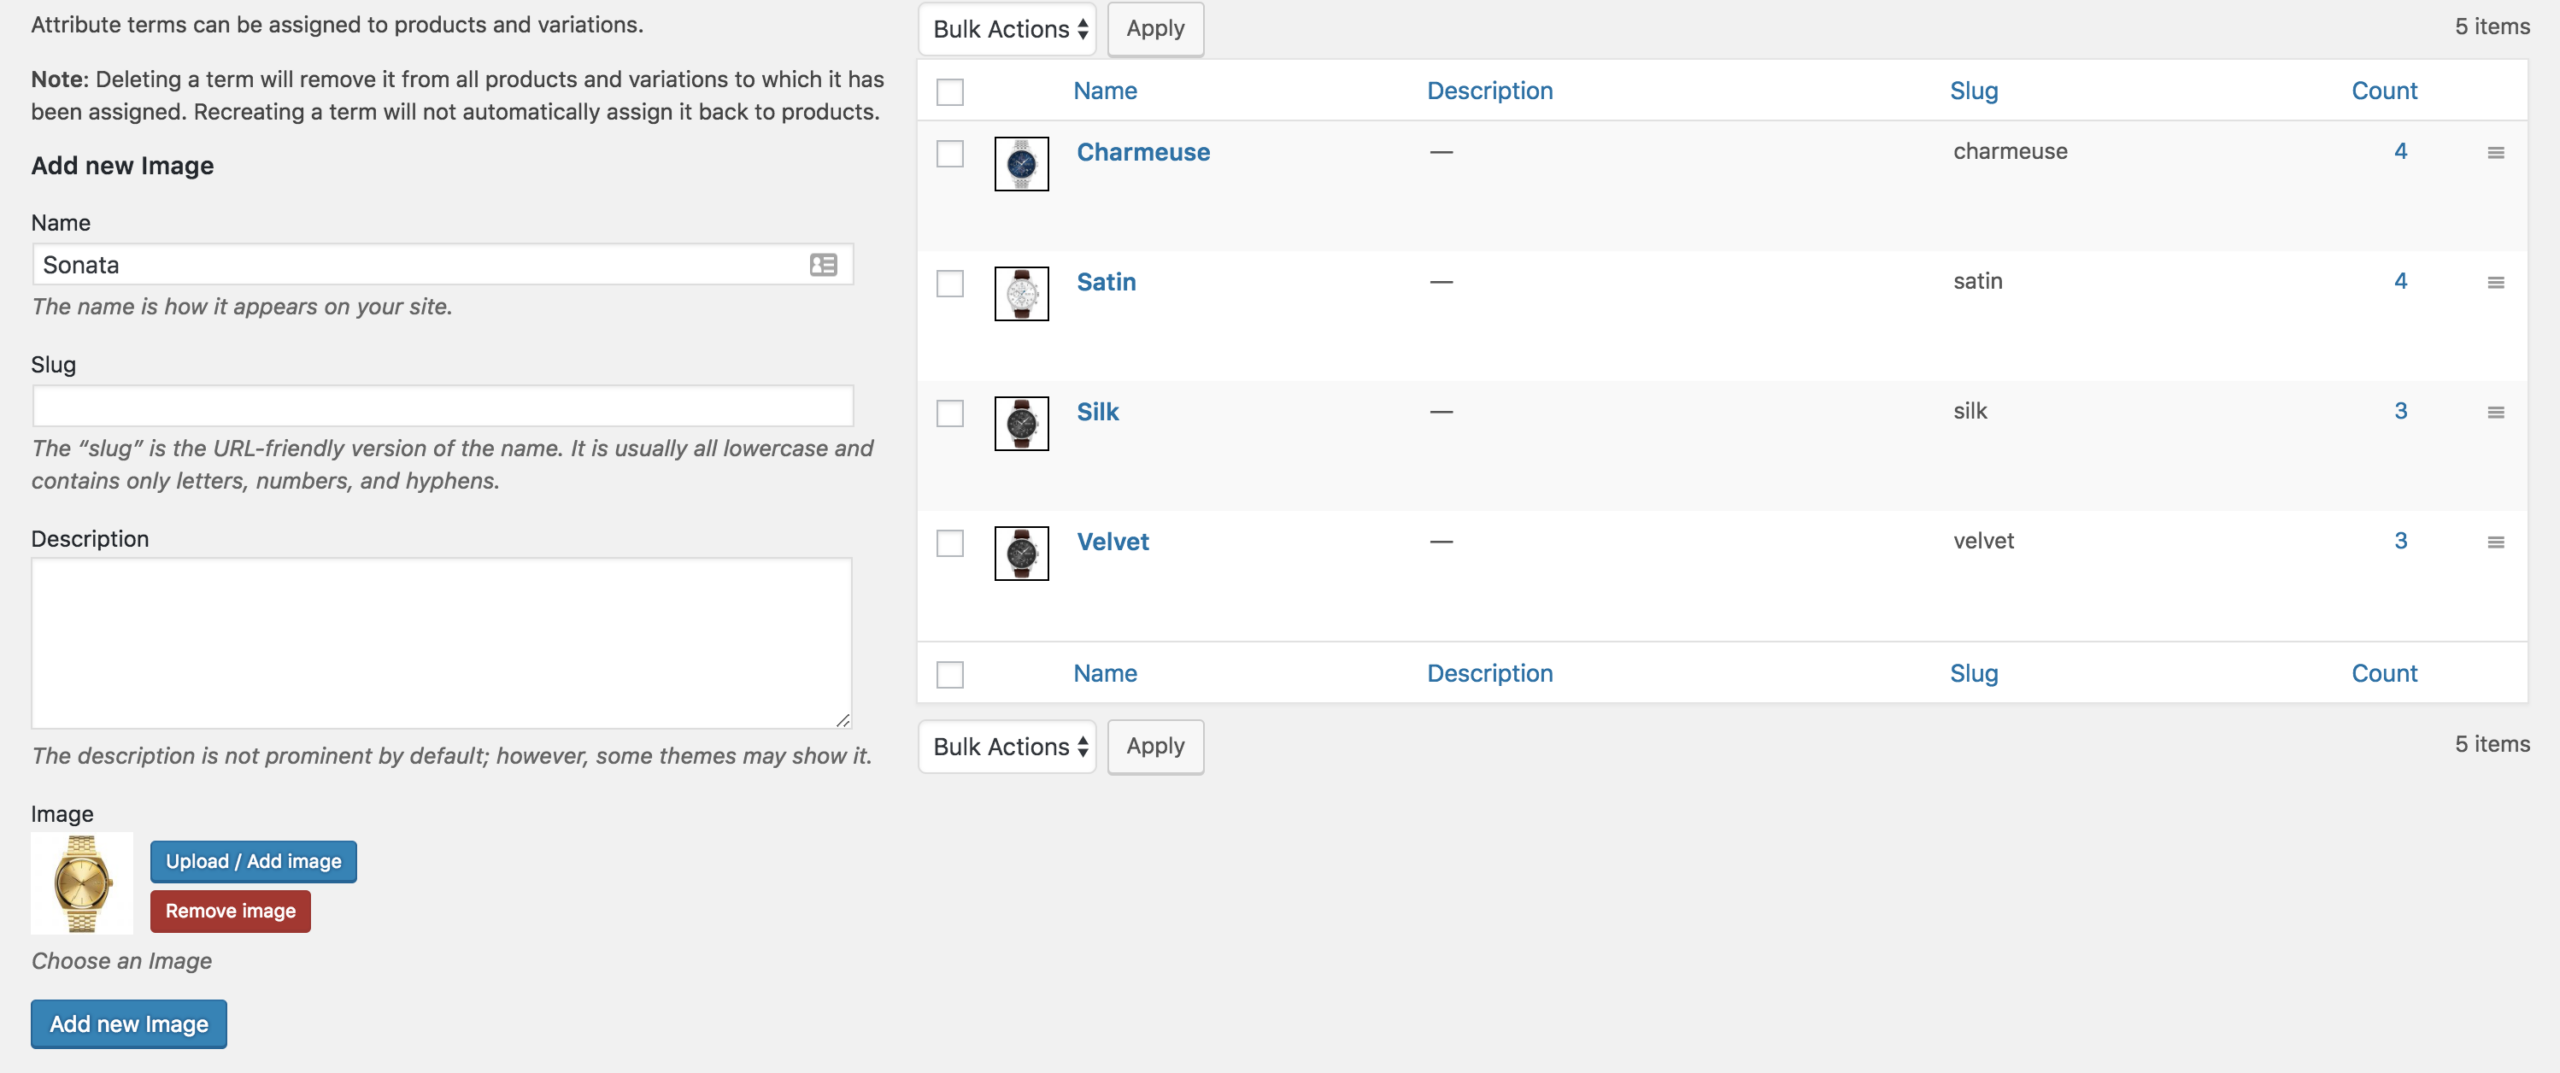
After creating the Image attribute, we’ll add image variations to it. In this tutorial, we’ll create Charmeuse, Satin, Silk, Velvet, and Wool variations.
To add a variation, fill in the Name field with your desired variation name, leave the Slug field empty, and select an image from the media library or upload one from your computer.
Step 3: Enable Attribute Variation in Variable Product
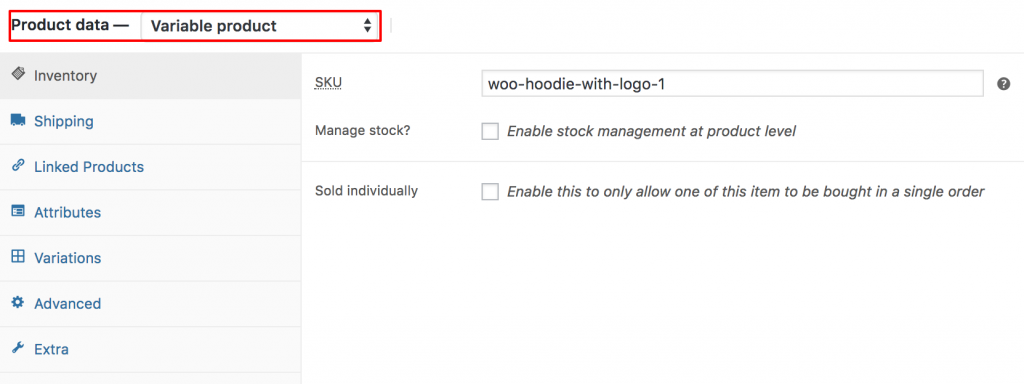
It’s time to enable image swatches inside a variable product. To enable image swatches in your desired product. Get into your desired product edit mode. Make sure you have variable product selected from Product Data.
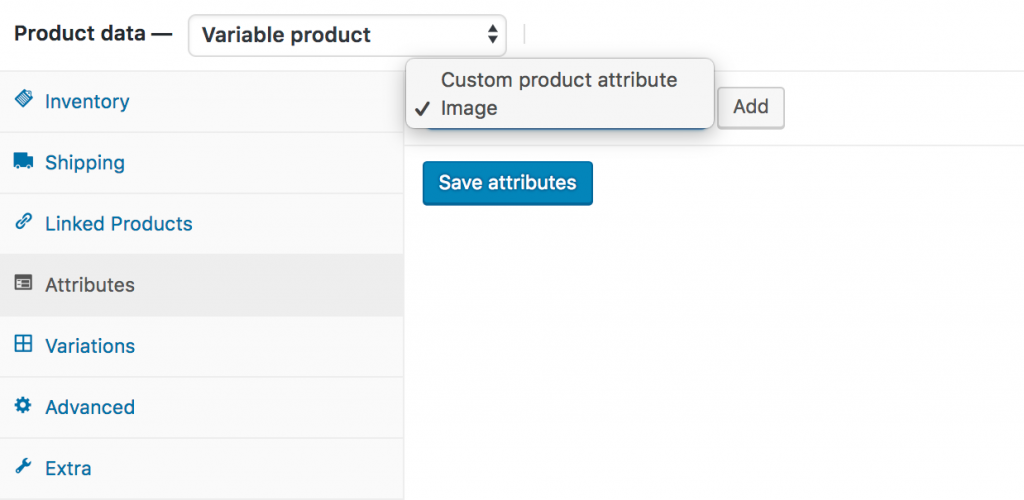
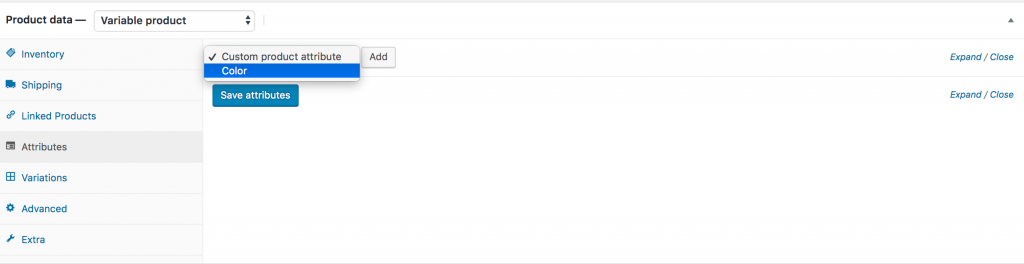
After selecting the Variable product from Product data dropdown, head to the Attributes Tab. Click on Custom product attribute dropdown. In this dropdown, you can see all your globally created attributes. As we’ve only created a Image attribute, it’s now showing Image attribute.
Now select the Image attribute and click on Add. You can see the following screens appears afterward.
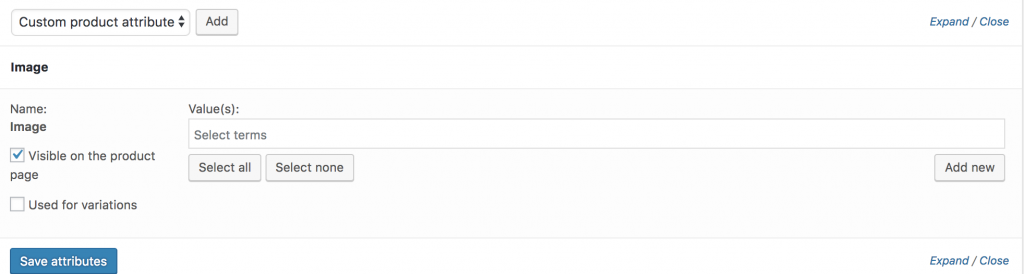
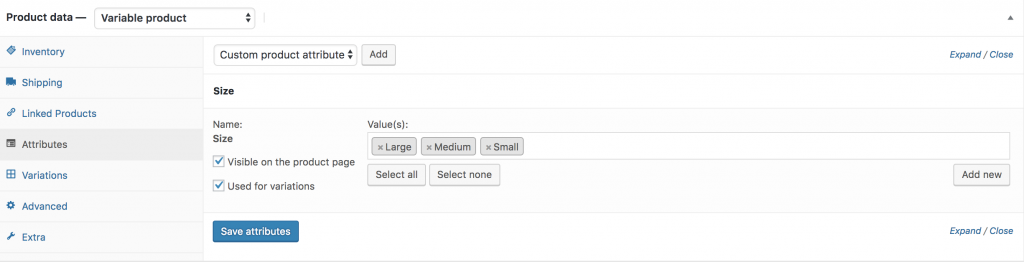
To select all available variations of the Color attribute, click the Select All button. To deselect all variations at once, click the Select None button.
After selecting all variations, ensure Used for Variations is checked, then click Save Attributes. Refer to the screenshot below for guidance.

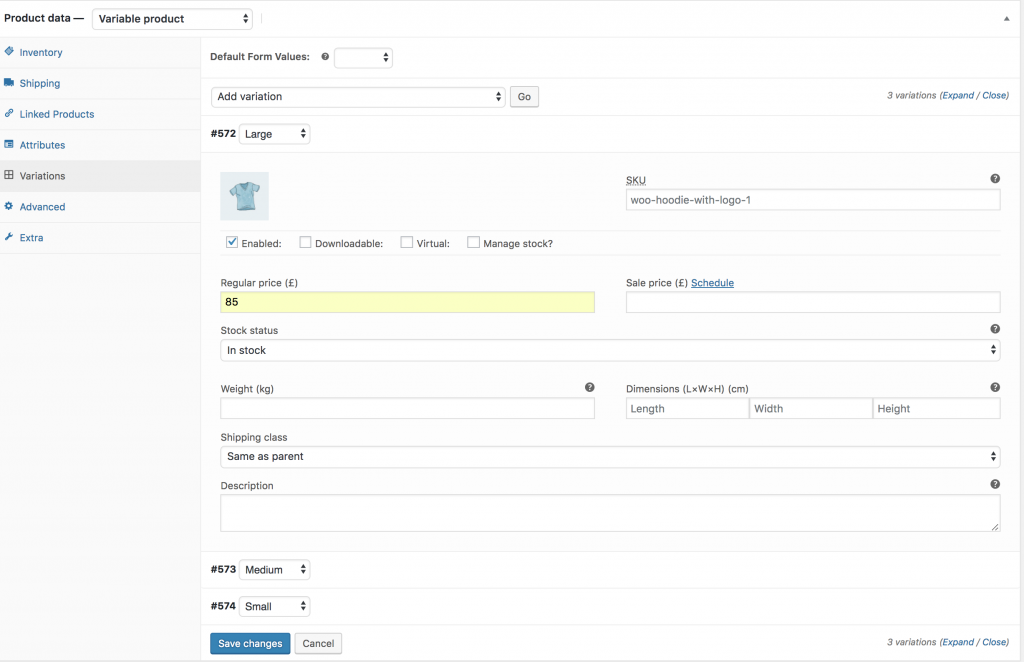
Now get into Variations tab. Click on Add Variation dropdown. Here you will notice two options. First one is Add Variation and the second one is Create variations from all attributes.

In this tutorial, I am going to select Create variation from all attributes and click Go button. It’ll add all available variations like the following.
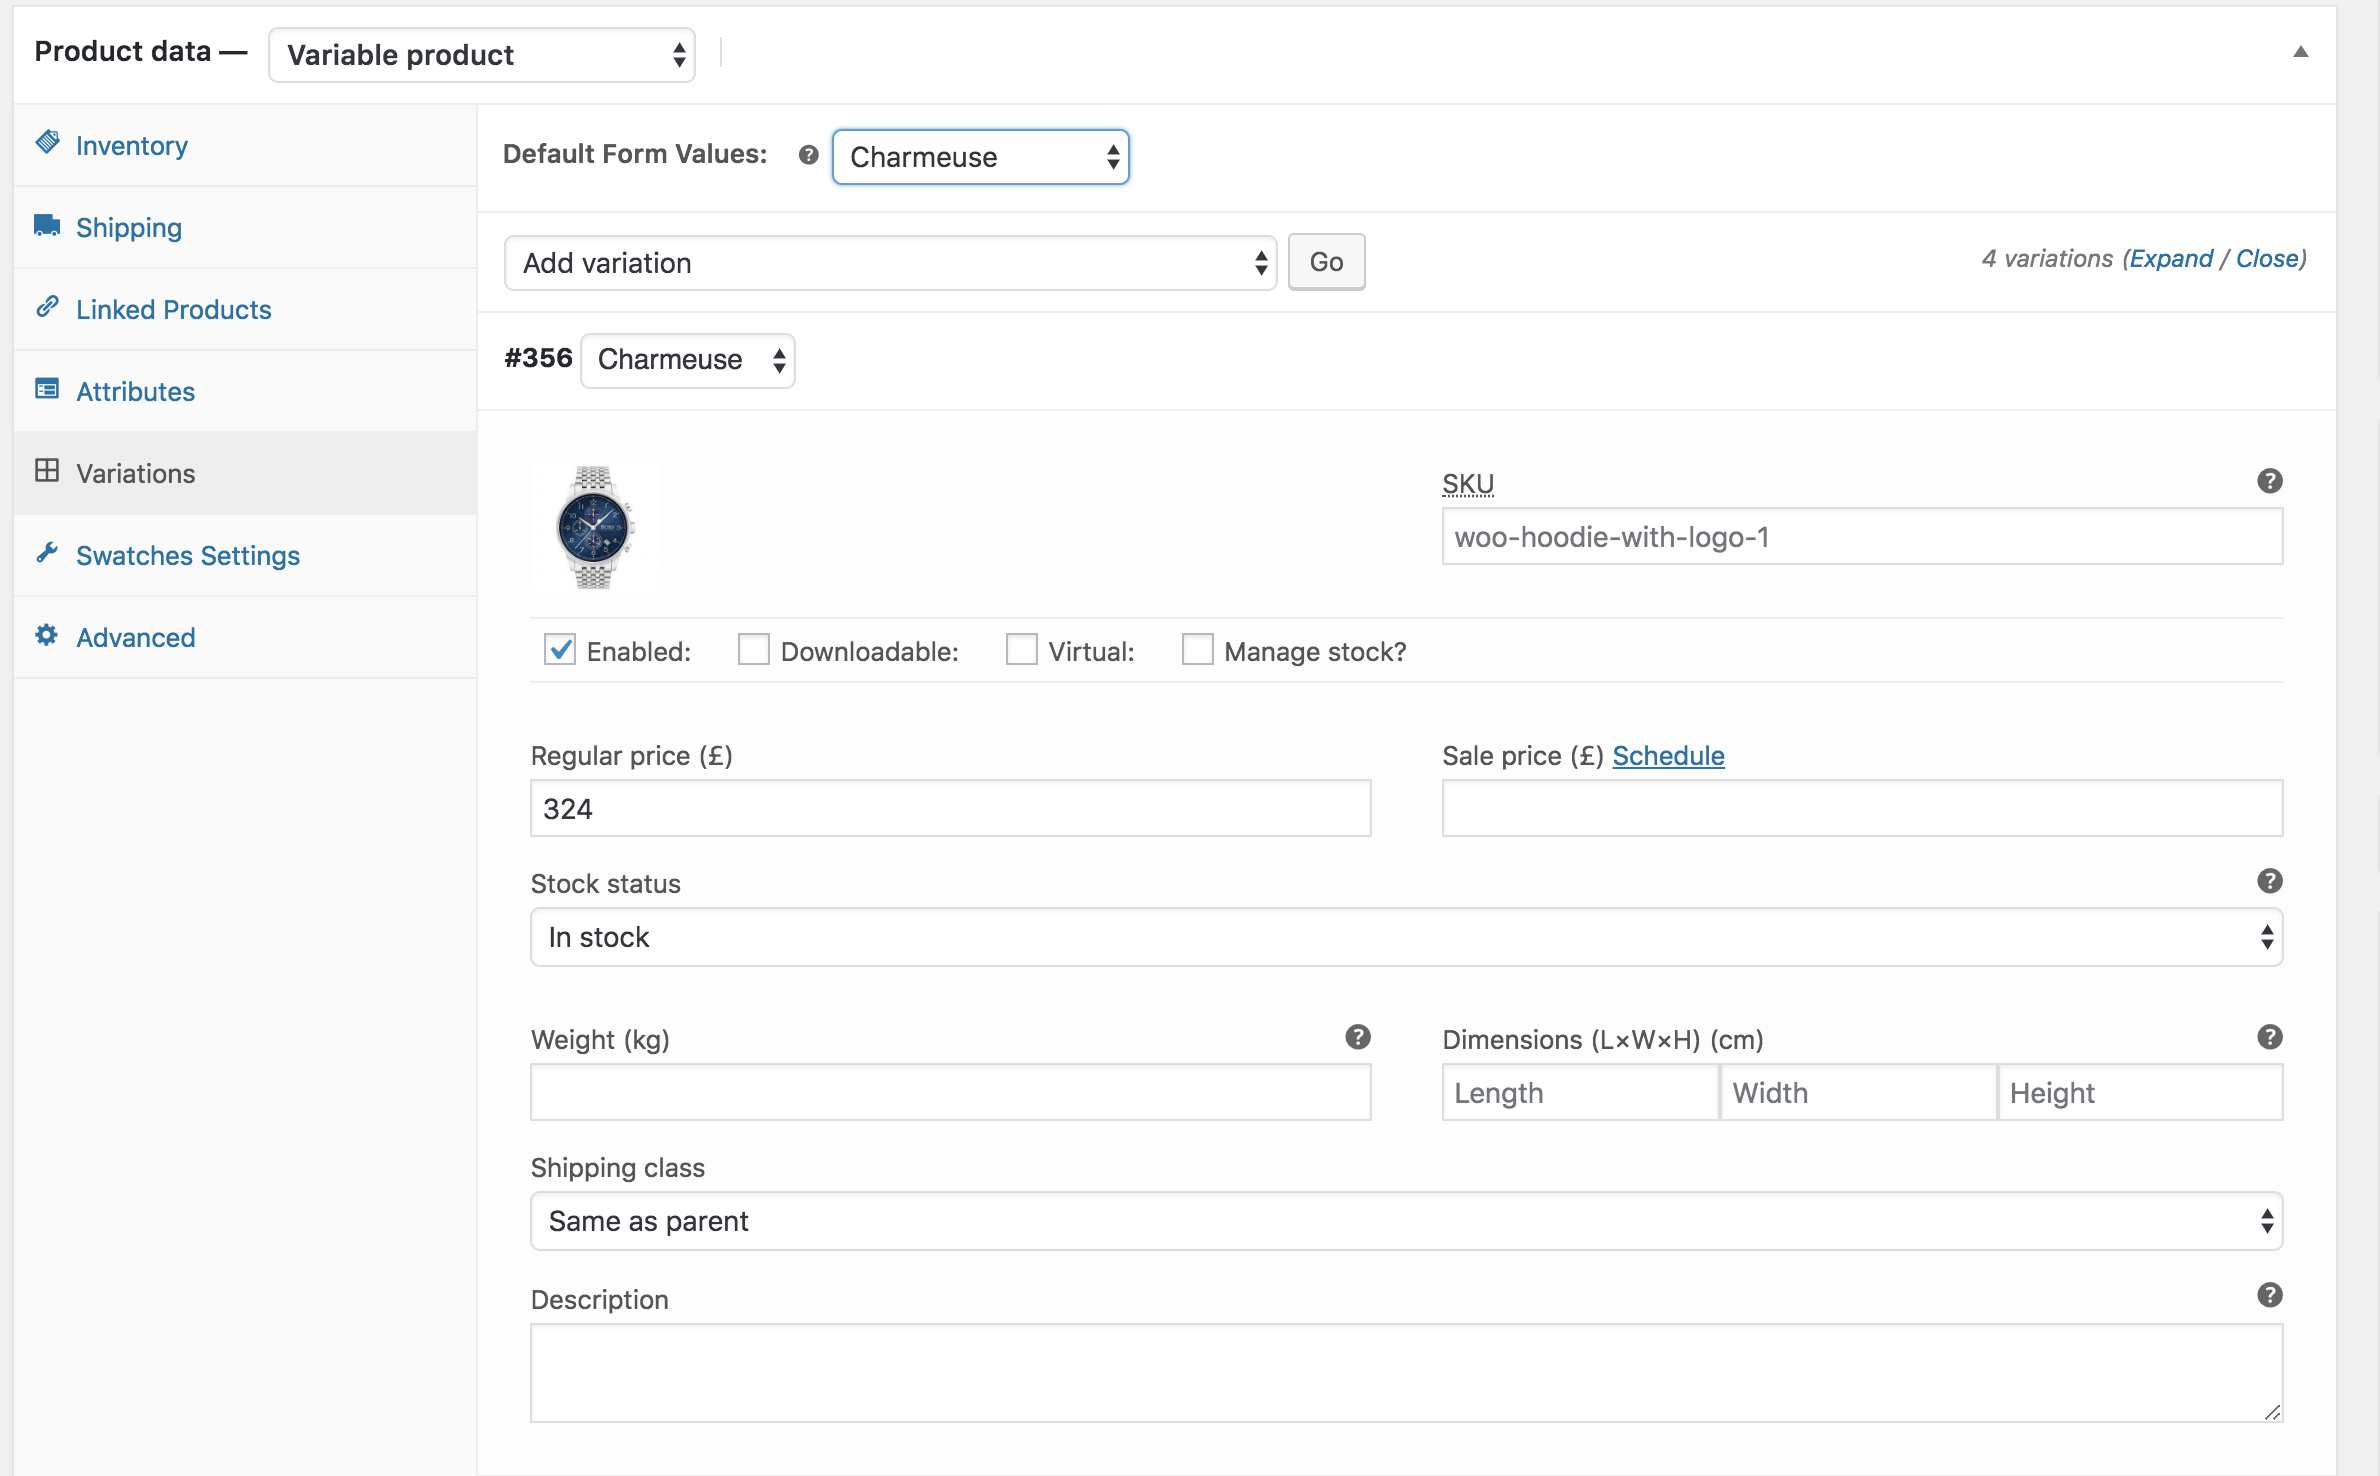
You can see the above image thatCharmeuse, Satin, Silk, Velvet and Wool image variations are there. From this screen you can add variation image, variation price, and other variation specific details. When you have done with adding all your required details in each variation, click the Save Changes button.
Remember! Don’t forget to add the price in each variation, otherwise, variations won’t be visible on the product frontend. If you can successfully add variation. You can see the following swatches in your product frontend.
6. How To Enable Color Swatches

Frontend Preview
- How To Create To Color Variation Swatches From Scratch
- How To Create To Color Variation Swatches For Existing Global Attributes
- How To Create To Color Variation Swatches For Custom Product Level Attributes
- How To Create To Color Variation Swatches For Existing Custom Product Level Attributes
How To Create Color Variation Swatches From Scratch
Video Tutorial
Step 1: Create Attribute
First, we need to create a Color attribute and its variations globally. To do this, go to Products → Attributes.
Fill in the Name field with your desired attribute name (in this tutorial, we’ll use Color). You can leave the Slug field empty, as it will be generated automatically. From the Type dropdown, select Color. Once all required fields are completed, click the Add Attribute button.
After creating an attribute, you will notice a list is created on the right side. Check the following screenshot.

Step 2: Create Attribute Variations
The more variation you would add, they would get added to this list. When an attribute is created, we need to create attribute variations. To create product variations, click on the Configure terms from the attribute list.

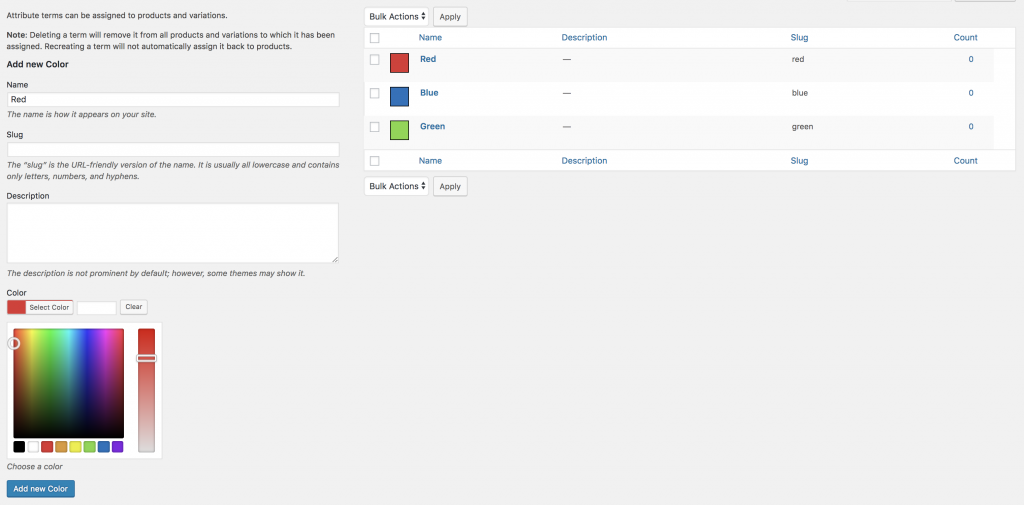
As we have created a Color attribute. We’ll add colors as variations inside the Color attribute. In this tutorial, we’ll add Green, Blue, and Red Variations. To create variation inside Color attribute. Fill the Name field with your desired variation name, leave the slug field empty, and select your desired color from the color picker.
Step 3: Enable Attribute Variation in Variable Product
It’s time to enable color swatch inside a variable product. To enable color swatch in your desired product. Get into your desired product edit mode. Make sure you have variable product selected from Product Data.
After selecting Variable Product from the Product Data dropdown, go to the Attributes tab. Click on the Custom Product Attribute dropdown to see all globally created attributes. Since we’ve only created a Color attribute, it will now appear in this list.
Now select the Color attribute and click Add. After that, the following screens will appear.
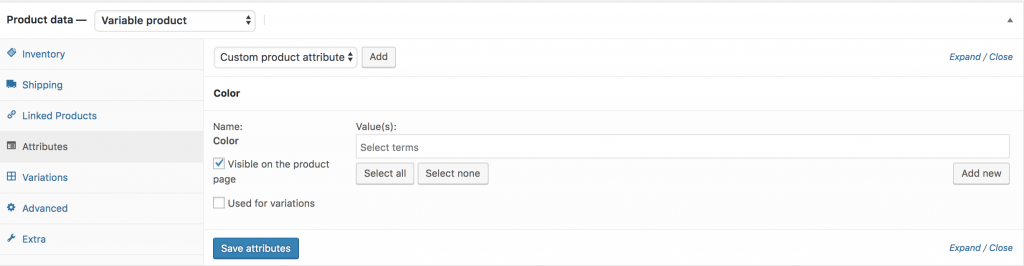
If you want to select every available variation under the color attribute, click the Select All button. To clear all selected variations at once, click Select None.
After selecting all variations using the Select All button, make sure the Used for variations option is checked, then click the Save Attributes button. Refer to the screenshot below for guidance.
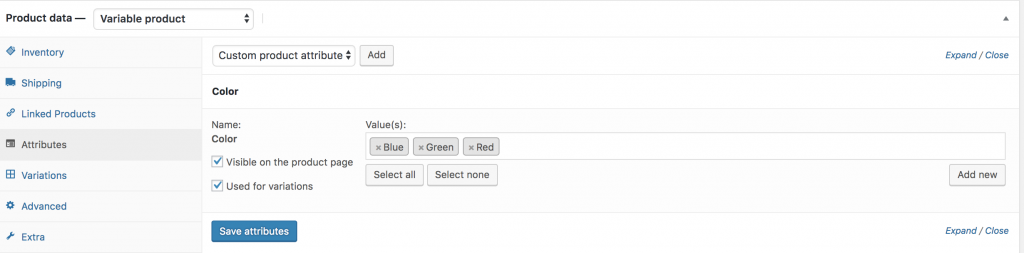
Now go to the Variations tab and open the Add Variation dropdown. There you’ll see two options: the first is Add Variation, and the second is Create variations from all attributes.
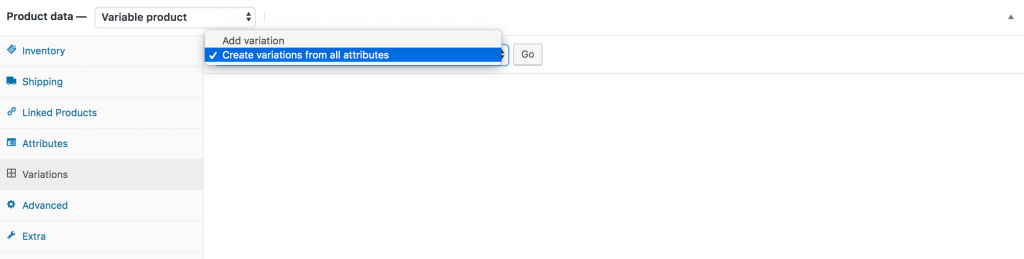
In this tutorial, I will select Create variations from all attributes and click the Go button. This will generate all available variations, as shown below.
You can see in the image above that the Blue, Green, and Red color variations are listed. From this screen, you can add a variation image, set the variation price, and fill in other variation-specific details.
Once you’ve entered all the necessary information for each variation, click the Save Changes button.
Important: Make sure you add a price for every variation; otherwise, the variation will not appear on the product frontend.
After successfully adding the color variations, you will see the corresponding swatches displayed on your product frontend.

How To Create Color Variation Swatches For Existing Globally Created Attributes
Video Tutorial
If you already have a variable product in your store and have attribute variation created globally in attributes >> products page, then this tutorial is for you.
Step 1: Editing Attribute
Go to Products >> Attributes. All your existing global attributes will appear in the attribute list. After installing the WooCommerce Variation Swatches plugin, a new Type field is added. By default, this field will display Select under the Type column.

WooCommerce Variation Swatches comes with four attribute types: Color, Image, Button, and Radio. You can assign any of these types to your preferred attribute.
For this tutorial, a Pattern attribute has already been created. We’ll apply the Color attribute type to this Pattern attribute.
To set the Color type for the Pattern attribute, simply click Edit.

After selecting Button, the attribute editing panel will open. From the Type dropdown, choose Color.

Once you’ve selected the attribute type, return to the attribute list page. You’ll see that the Pattern attribute now shows Color under the Type column instead of the default Select.

After setting the attribute type, the product frontend will appear as shown in the screenshot. Don’t worry if your attribute variations look white — this happens because no colors have been assigned to the variations yet.
Step 2: Editing Variations
To assign colors to the Pattern attribute variations, go to Products → Attributes and click Configure terms under the Pattern attribute.

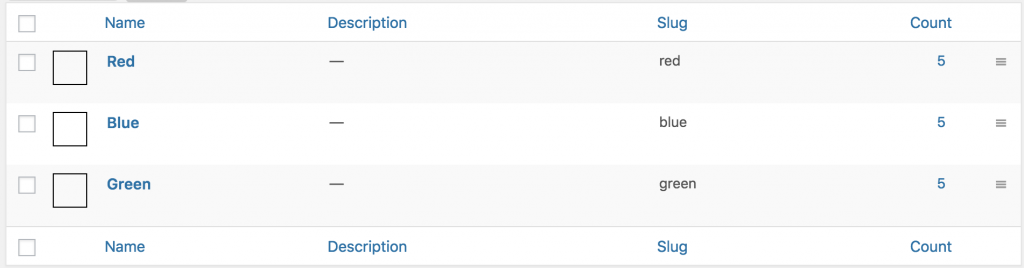
After clicking Configure terms, a list of attribute variations will appear. For the Pattern attribute, I have three variations: Blue, Green, and Red. Since no colors have been assigned yet, they appear as shown in the screenshot.
Edit each variation individually to assign a color. For demonstration, I’ll click the Edit link for the Red variation.
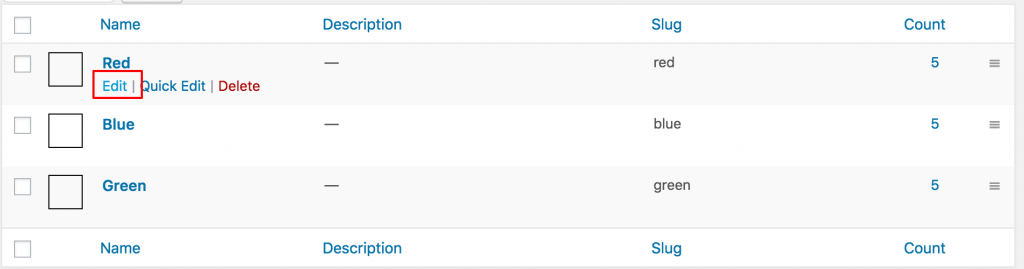
In the variation edit panel, choose the desired color using the color picker and save your changes by clicking the Update button. For the Red variation, I selected the red color.
Once colors have been added to all variations, the variation list page will appear as shown in the screenshot.
The frontend of my variable product, now linked with the global attribute, will appear as shown in the image.
How To Create Color Variation Swatches For Custom Product Level Attributes
Video Tutorial
Step 1: Pro Plugin Setup
If your store has variable products but no global product attributes, it means the attributes and variations were created manually. To convert these manually created variations into color swatches, ensure you have the premium version of WooCommerce Variation Swatches installed.
Step 2: Change Manual Attribute Type
If you go to the Attributes tab in the product data section while editing your product and see variations separated by a pipe (|) symbol, as shown in the screenshot, it means the variations were created manually.
To convert these manually created attribute variations, go to the Swatches Settings tab and choose Color from the Select (Default) dropdown.
After selecting the attribute type, the product frontend will appear as shown in the screenshot. Don’t worry if the attribute variations appear white — this happens because no colors have been assigned to the variations yet.
Step 3: Select Color For Variations
After selecting the attribute type, press the Color attribute accordion. It will reveal the setting to add colors for its available variations.
Once you’ve successfully added colors to the variations, the corresponding swatches will appear on your product frontend as shown.

How To Create Color Variation Swatches For Custom Existing Product Level Attributes
Video Tutorial
Auto Convert All Dropdown Into Image Swatches If Variation Has a Feature Image Set (Advanced)
Auto Convert All Dropdown Into Image Swatches If Variation Has a Feature Image Set (Custom Attribute Per Product Variation)
Auto Convert All Dropdown Into Image Swatches If Variation Has a Feature Image Set (Global Attribute)
Setup Swatches In Elementor Page Builder
Setup Swatches With Printful Plugin
Setup Swatches With Dokan Multivendor Plugin
Setup Swatches In AliDropship Plugin
How To Enable Label / Button Swatches
Frontend Preview
- How To Create To Label/Button Variation Swatches For Global Attributes
- How To Create To Label/Button Variation Swatches For Manual Attributes
- How To Create To Label/Button Variation Swatches From Scratch
How To Create Label/Button Variation Swatches For Globally Created Attributes
Video Tutorial
Go to Products → Attributes. All existing global attributes are displayed on this page. After installing the WooCommerce Variation Swatches plugin, a Type field is added, which shows Select by default.

WooCommerce Variation Swatches comes with four attribute types: Color, Image, Button, and Radio. You can assign any of these types to your desired attribute.
For demonstration, we have created a Size attribute. We’ll assign the Button type to it.
To set the Button type for the Size attribute, click Edit.

After clicking the Edit link, the attribute editing panel will open. From the Type dropdown, select Button.
Once you’ve selected the attribute type, return to the attribute list page. You’ll now see that the Size attribute displays Button under the Type column instead of the default Select.

After selecting the attribute type, the product frontend will appear as shown in the screenshot.
How To Create Label/Button Variation Swatches From Manually Created Attributes
Video Tutorial
Step 1: Pro Plugin Setup
If your store has variable products but no global product attributes, it means the attributes and variations were created manually. To convert these manually created variations into image swatches, ensure you have the premium version of WooCommerce Variation Swatches installed.
Step 2: Change Manual Attribute Type
If you go to the Attributes tab under the product data section while editing your product and see the variations separated by a pipe (|) symbol, as shown in the screenshot, it means those variations were created manually.
To convert these manually created attribute variations, go to the Swatches Settings tab and choose Button from the Select (Default) dropdown.
After selecting attribute type, the frontend of the product would look like the following screenshot.
How To Create Label Variation Swatches From Scratch
Video Tutorial
Step 1: Create Attribute
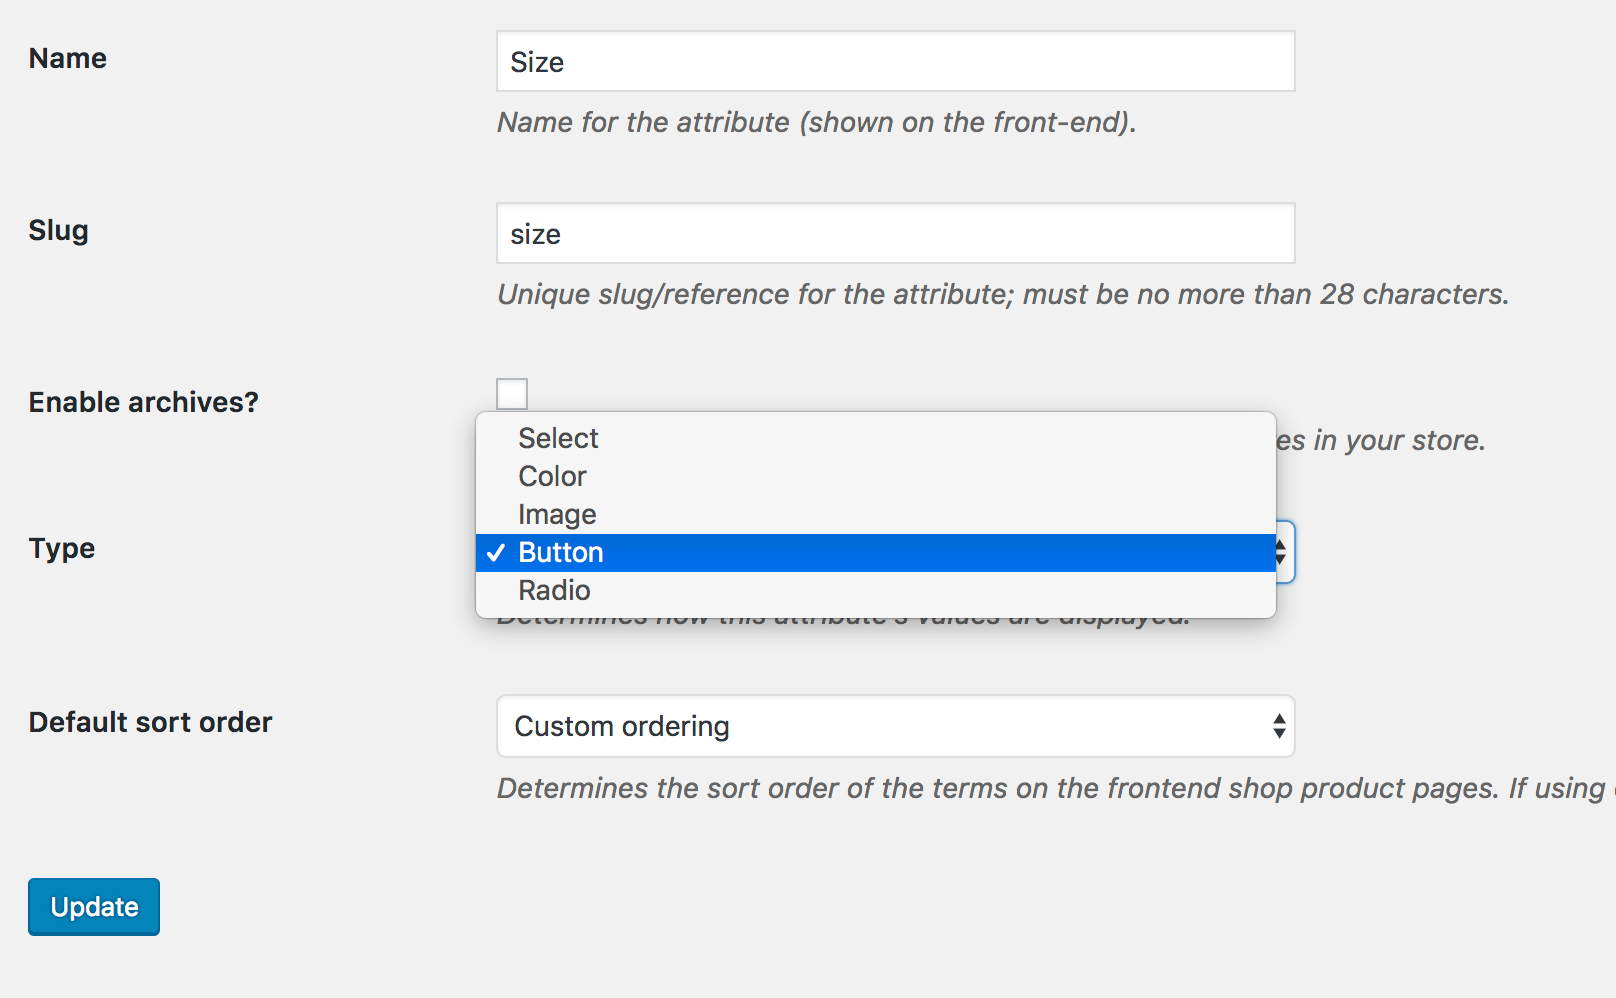
First, we need to create the label/button attribute and its variations globally. To do this, go to Products → Attributes. Since we’re creating a label attribute for our product, enter your preferred attribute name—in this tutorial, I’ve named it Size.
You can leave the Slug field empty; WordPress will generate it automatically. From the Type dropdown, select the Button attribute type. After filling in the required fields, click the Add Attribute button.
After creating attribute, you will notice a list is created in the right side. Check the following screenshot.

Step 2: Create Attribute Variations
The more variations you add, the more they will appear in this list. Once an attribute is created, the next step is to set up its variations. To create these variations, click Configure terms from the attribute list.

As we’ve created a label attribute, we’ll now add label titles as variations under this button attribute. In this tutorial, we’ll add Small, Medium, and Large as variations.
To create each variation, fill in the Name field with your desired variation title, leave the Slug field empty, and click Save after adding each one.

Step 3: Enable Attribute Variation in Variable Product
Now it’s time to enable button/label swatches in a variable product. To do this, open your desired product in edit mode and ensure that Variable Product is selected under Product Data.
After selecting Variable Product from the Product Data dropdown, go to the Attributes tab. Click the Custom Product Attribute dropdown, which displays all your globally created attributes. Since we’ve only created the Size attribute, it appears in this dropdown.

Now select the Size attribute and click on Add. You can see the following screens appears afterward.

To select all available variations of the Size attribute, click the Select All button. To deselect all variations at once, click the Select None button. After selecting all variations with Select All, make sure Used for variations is checked, then click Save Attributes. Refer to the screenshot below for guidance.
Now, go to the Variations tab and click the Add Variation dropdown. You’ll see two options: Add Variation and Create variations from all attributes.

In this tutorial, I’ll select Create variations from all attributes and click the Go button. This will add all available variations, as shown below.
You can see in the image above that the Small, Medium, and Large variations are listed. From this screen, you can add variation images, set variation prices, and fill in other variation-specific details. Once you’ve added all the required information for each variation, click the Save Changes button.
Important: Make sure to add a price for each variation; otherwise, the variations won’t appear on the product frontend.
Once the variations are successfully added, the corresponding swatches will be displayed on your product frontend.
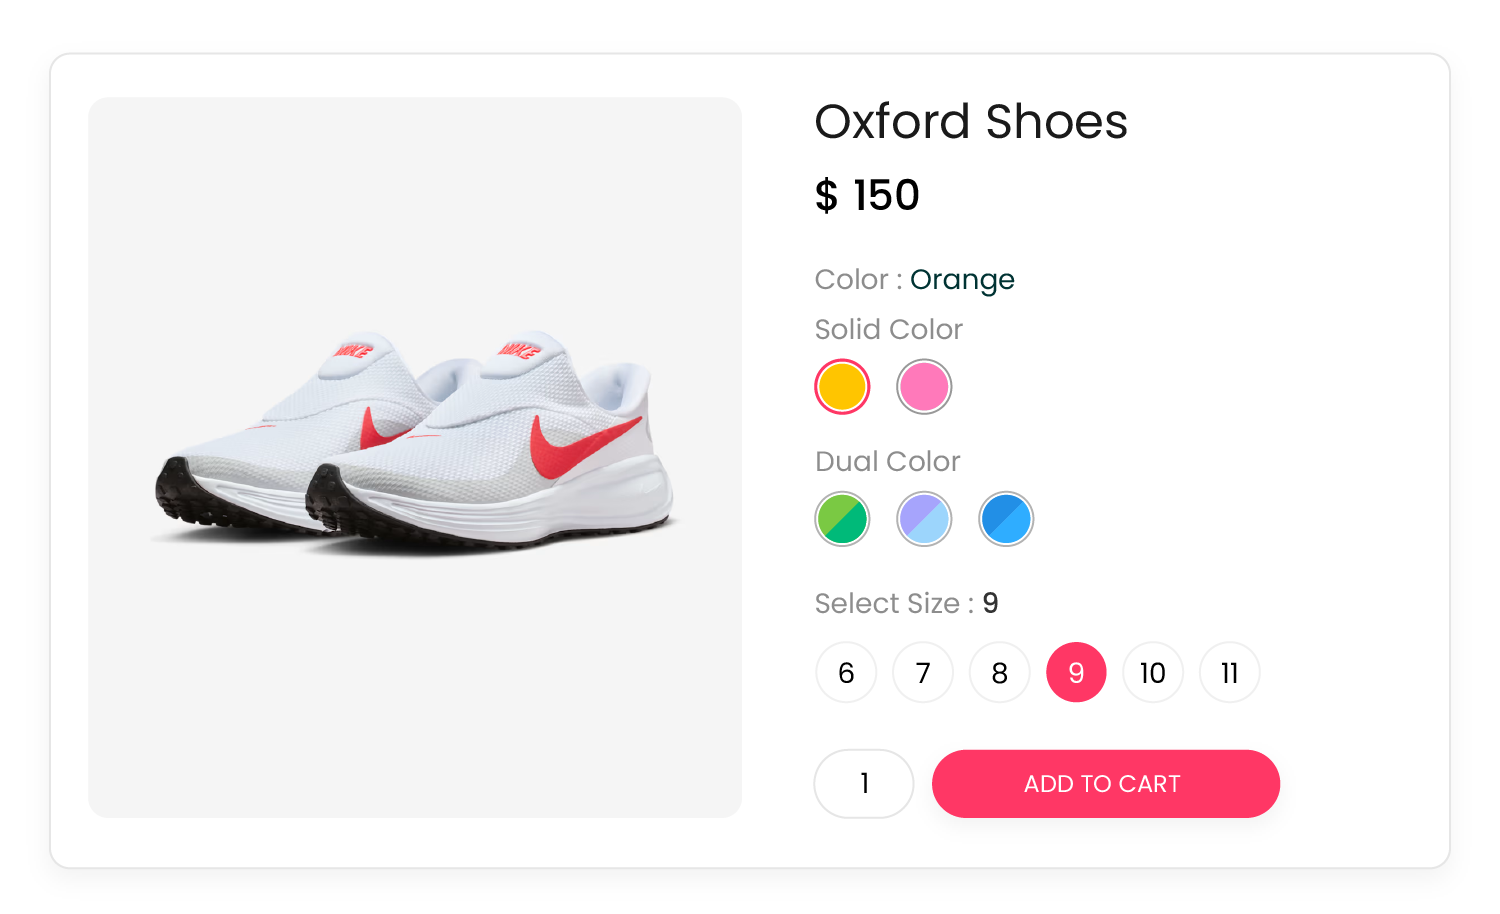
7. How To Create Multi / Dual Color Swatches (Globally)
Step 1: Define Attribute Type
To start creating multi/dual color variation swatches globally, go to Products → Attributes. Enter your desired attribute name in the Name field — in this tutorial, we’ll use DualColor.
You can leave the Slug field empty, as the system will generate it automatically. From the Type dropdown, select Color as the attribute type. Then, click the Add Attribute button to continue.
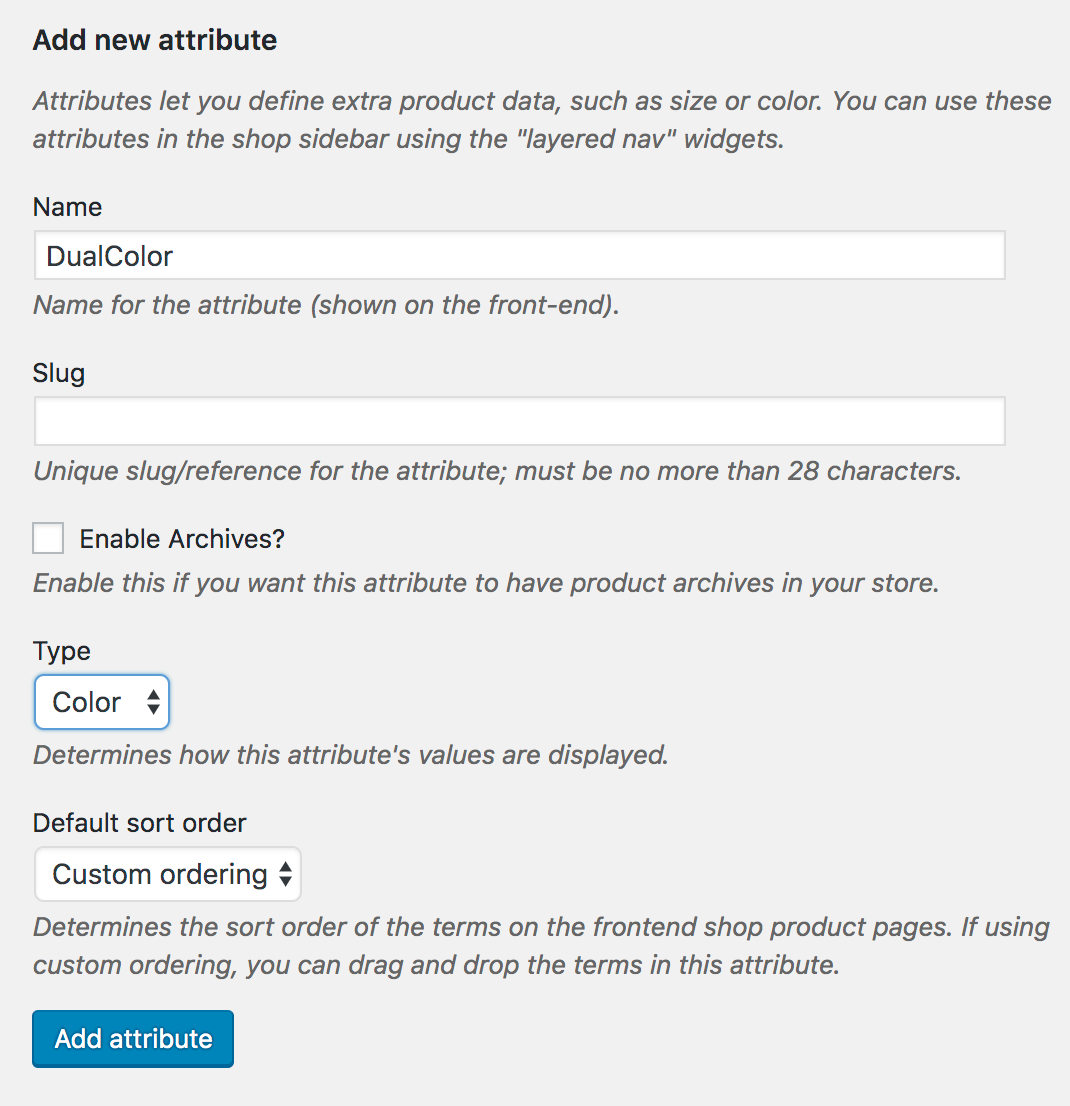
After clicking the Add Attribute button, you’ll see a list appear on the right side, where the DualColor attribute will be listed.

Step 2: Create Variation for DualColor Attribute
From the attribute list table, click the Configure terms link in the DualColor attribute row to create its variations.
In this table, you’ll see all your product attributes, each with a Configure terms link. Whenever you want to add new variations or edit existing ones, this is the way to do it.

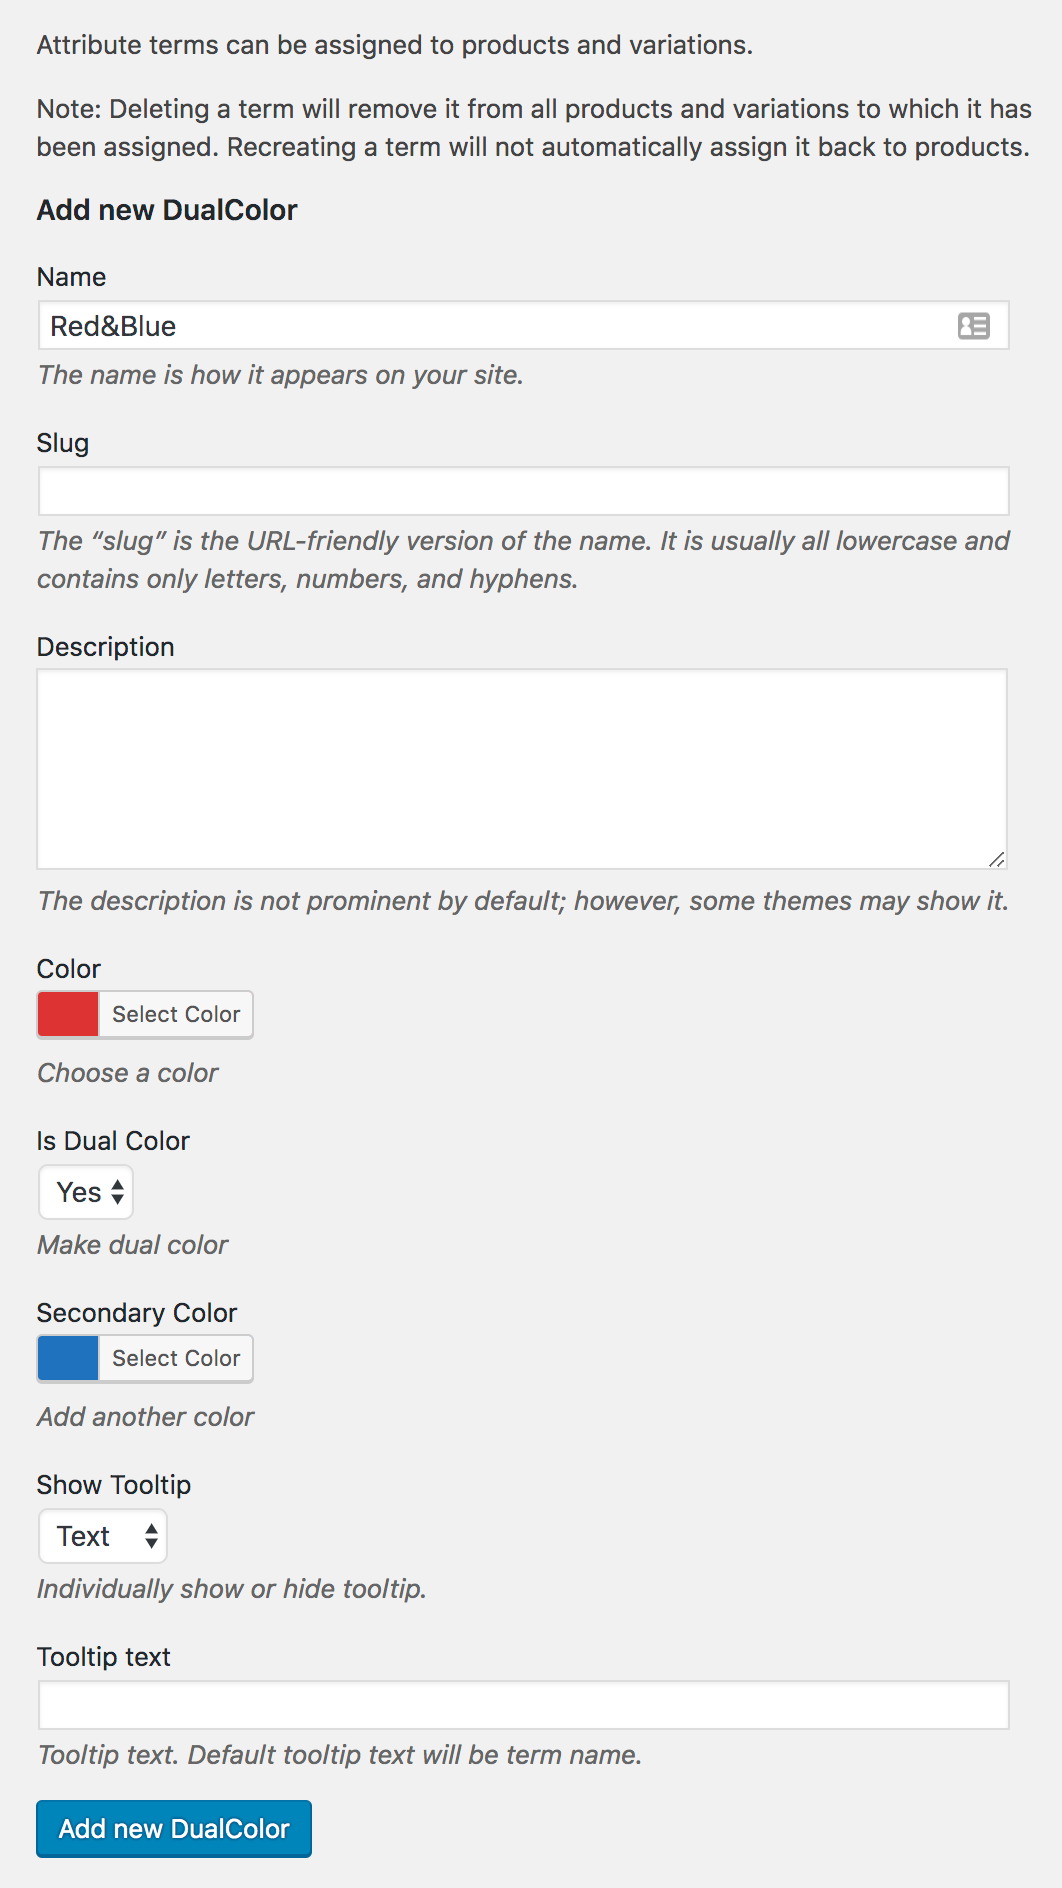
Now, we’ll create Red&Blue and Green&Black variations for the DualColor attribute.
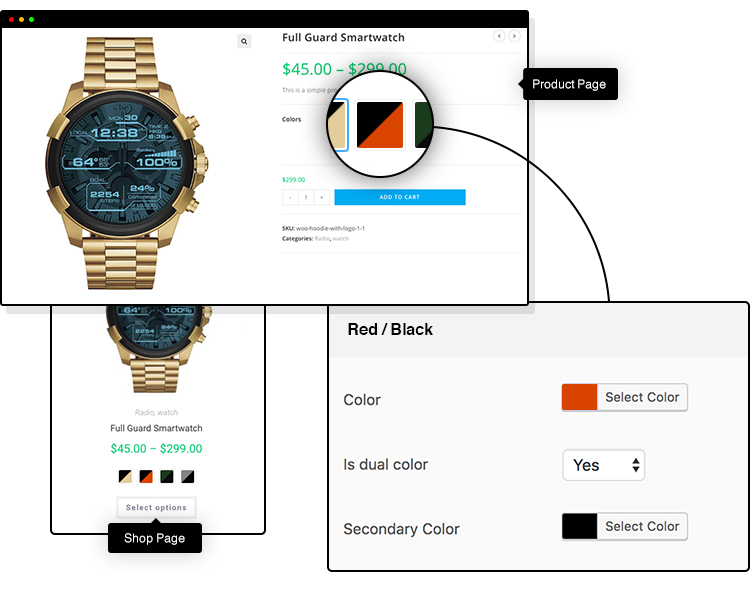
Creating an attribute variation is similar to creating an attribute. Enter the desired variation name in the Name field and leave the Slug field empty. Choose your Primary Color and select Yes for the Is Dual Color option. This will reveal the Secondary Color option, where you can pick the secondary color using the color picker. Click Add New to save the variation.
For demonstration, I’ve created a variation named Red&Blue, with Red as the primary color and Blue as the secondary color.
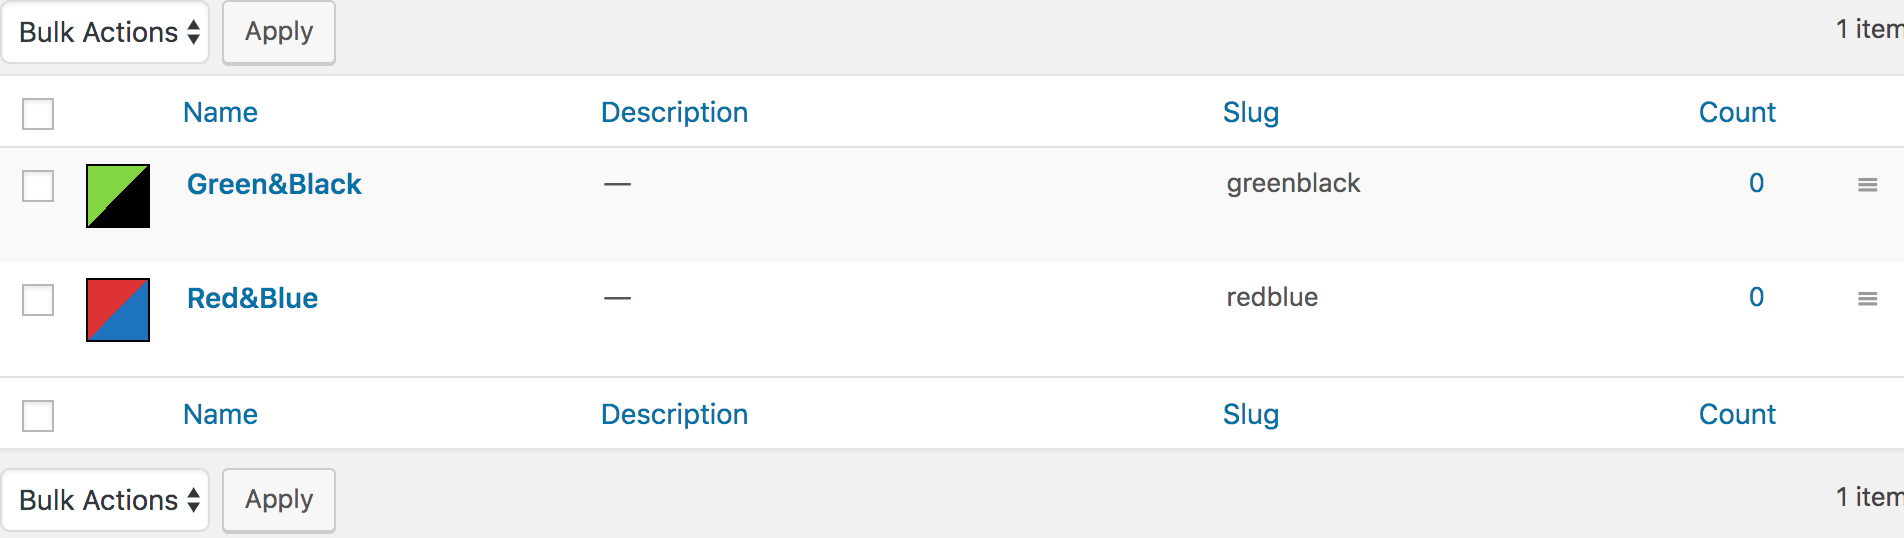
I’ll repeat the same process for the Green&Black variation. After creating all your attribute variations, a list of variations will appear on the right side of the variation creation form. This way, you can see all the variable product variations I’ve created.
Step 3: Enable WooCommerce Dual Color Swatches On Variable Products
We’ve successfully created WooCommerce multicolor swatches for product attribute variations globally. Now, it’s time to link them to a variable product.
To create a variable product, go to Products → Add New. Enter a name for your product and add a description. Make sure Variable Product is selected in the Product Data dropdown.

Next, go to the Attributes tab and click the Custom Product Attribute dropdown. This dropdown will display all globally created product attributes.
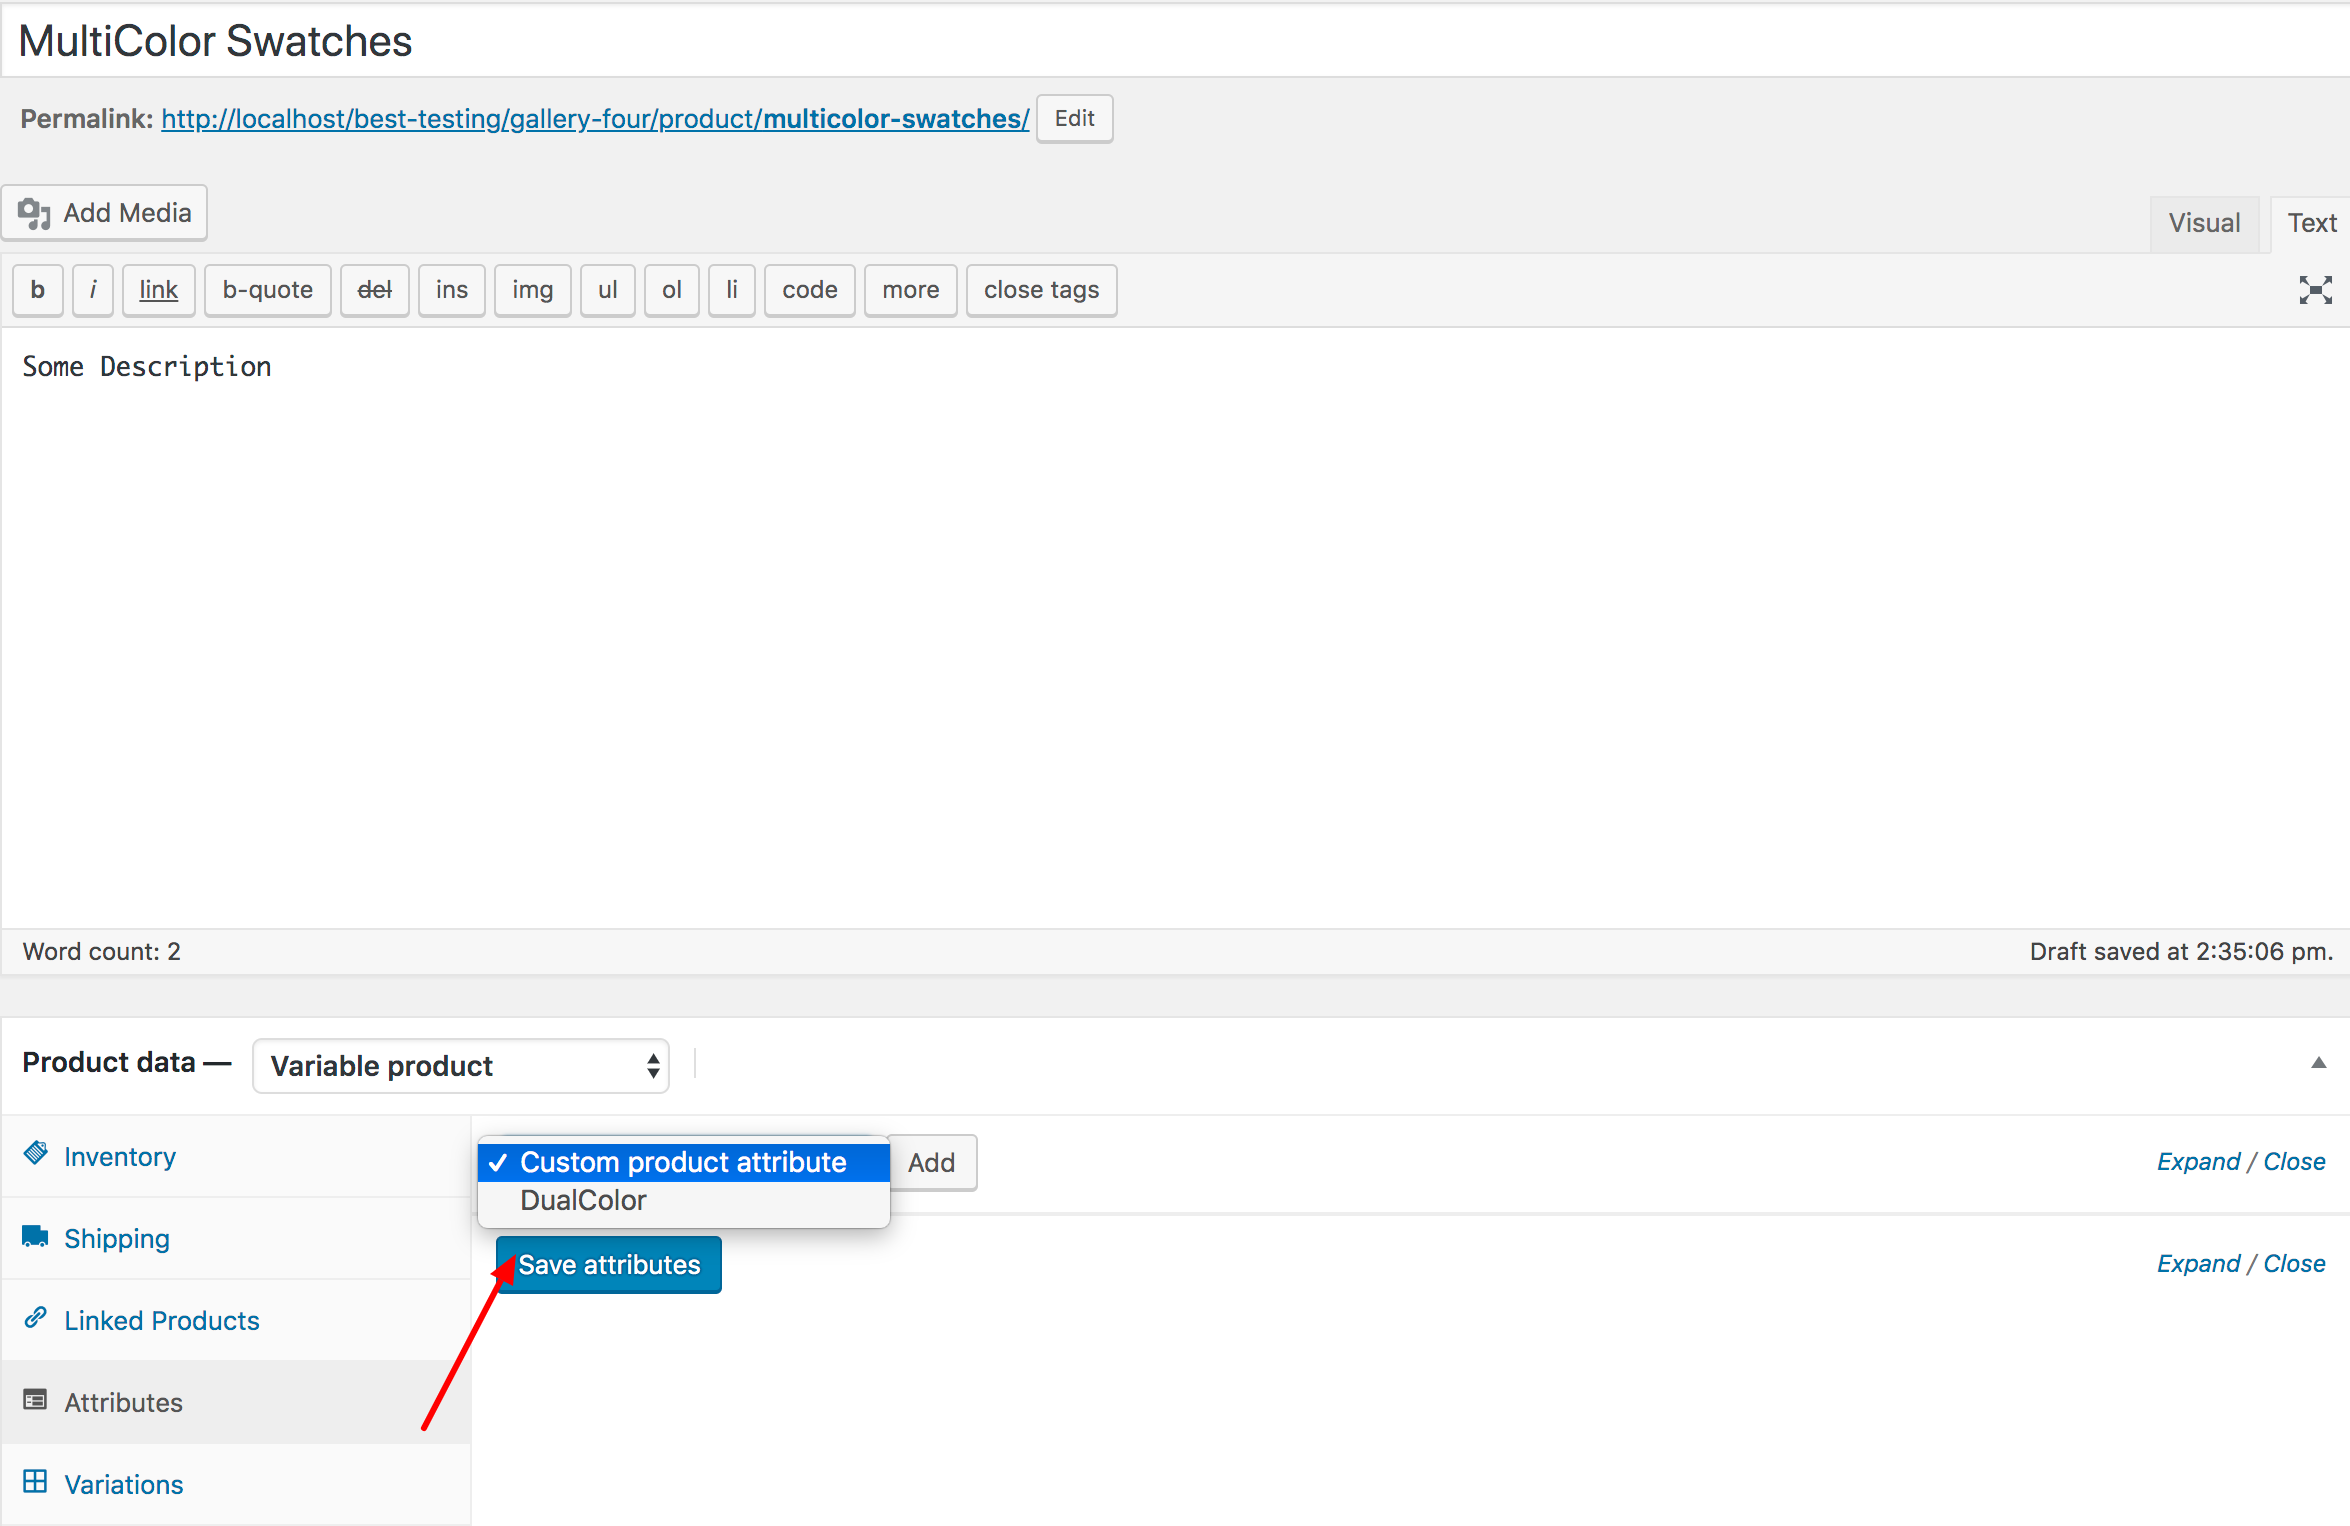
Choose your desired attribute from the list — in this example, it’s the DualColor attribute. After selecting it, click the Add button.
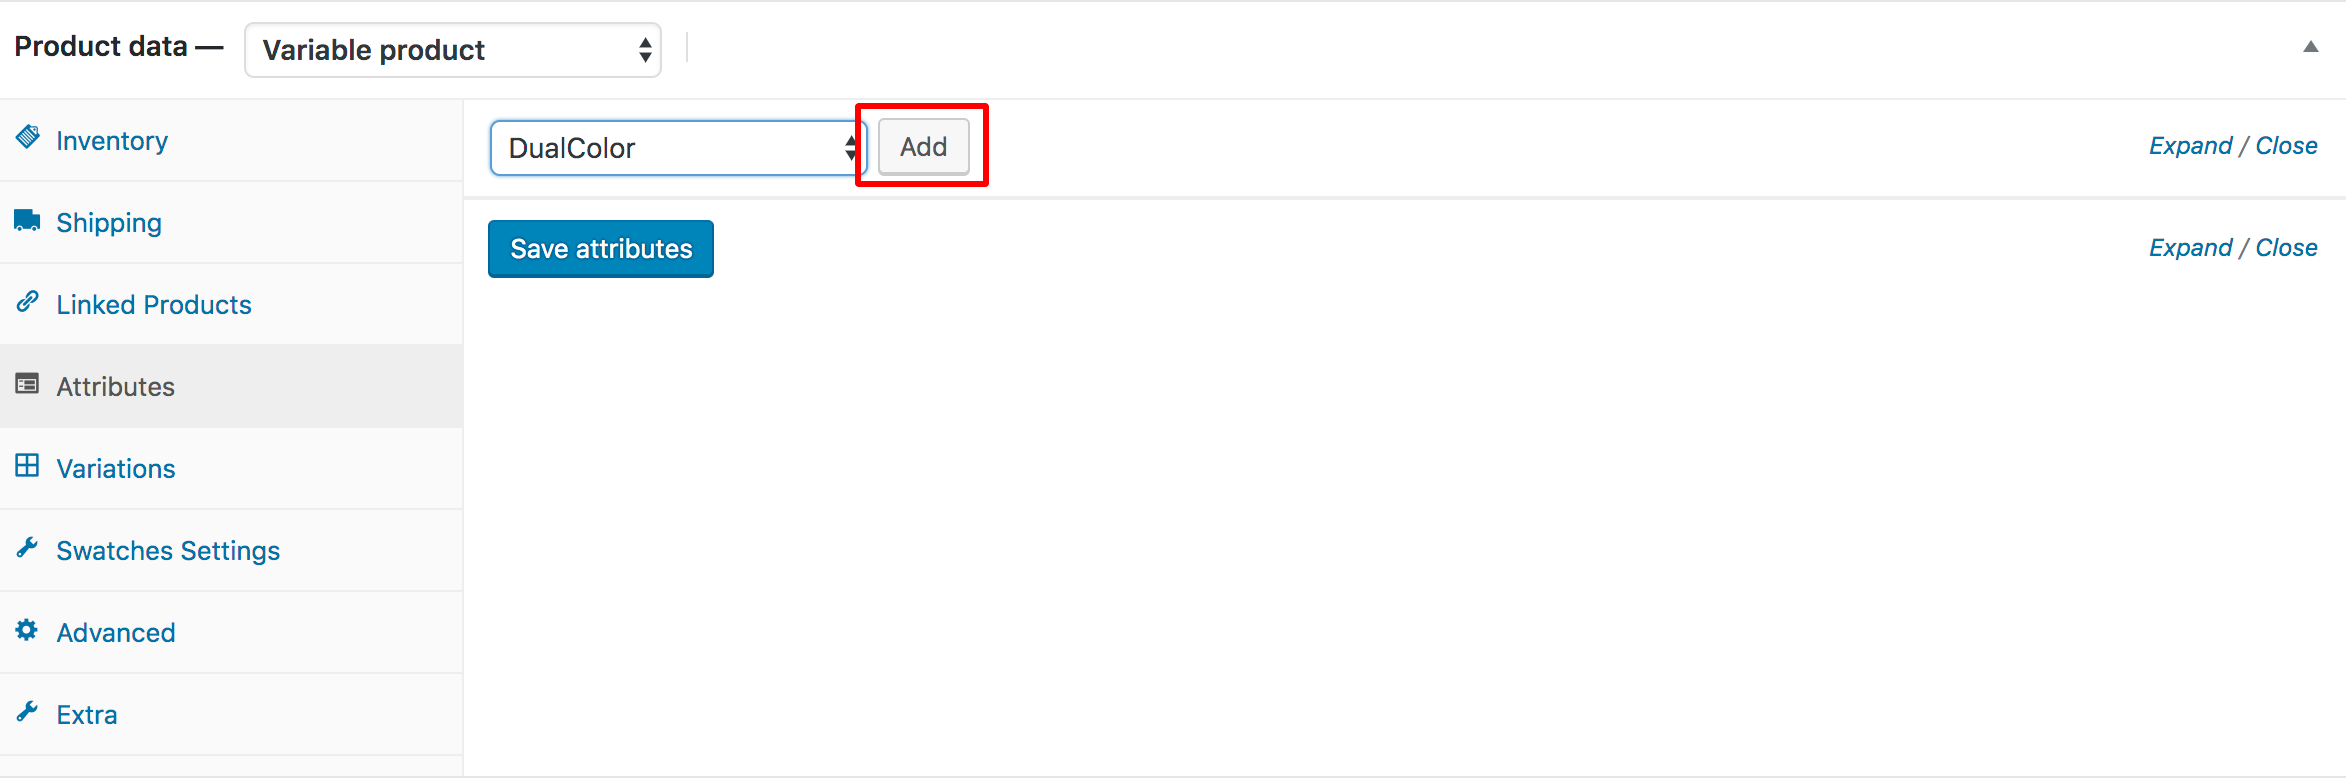
After adding the DualColor swatches, you’ll see the screen shown below. From here, you can add all attribute variations at once by clicking the Select All button.
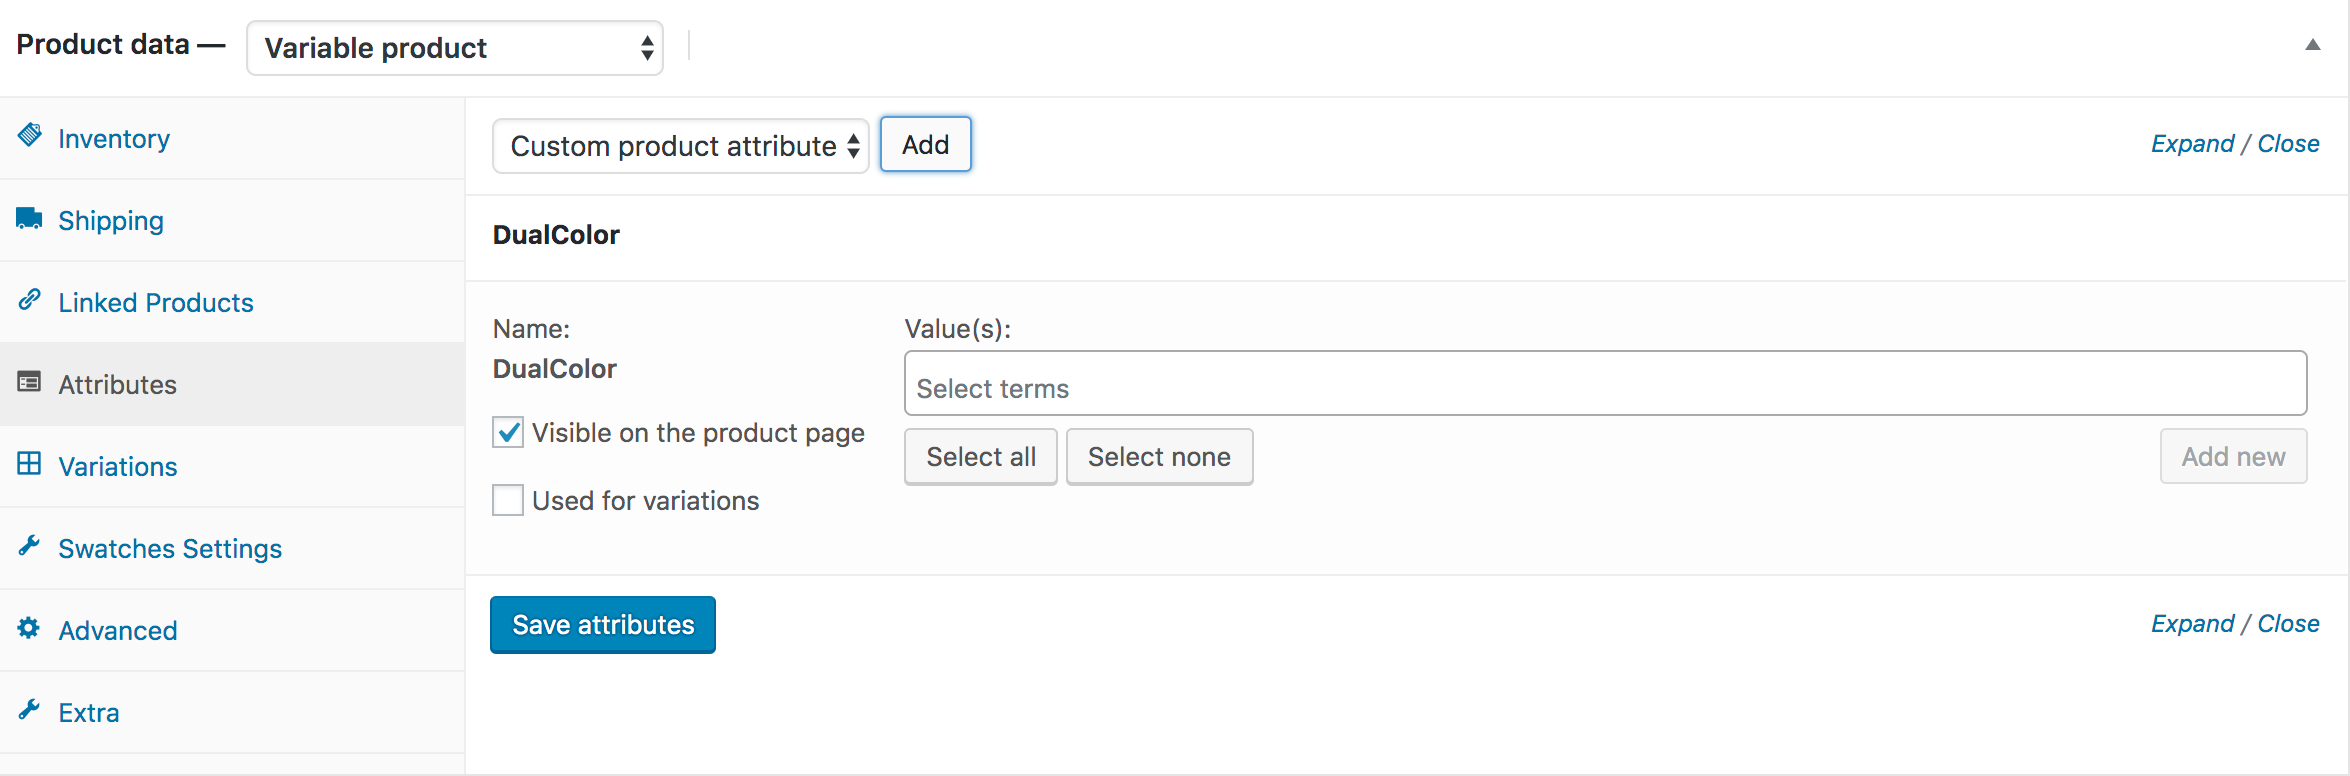
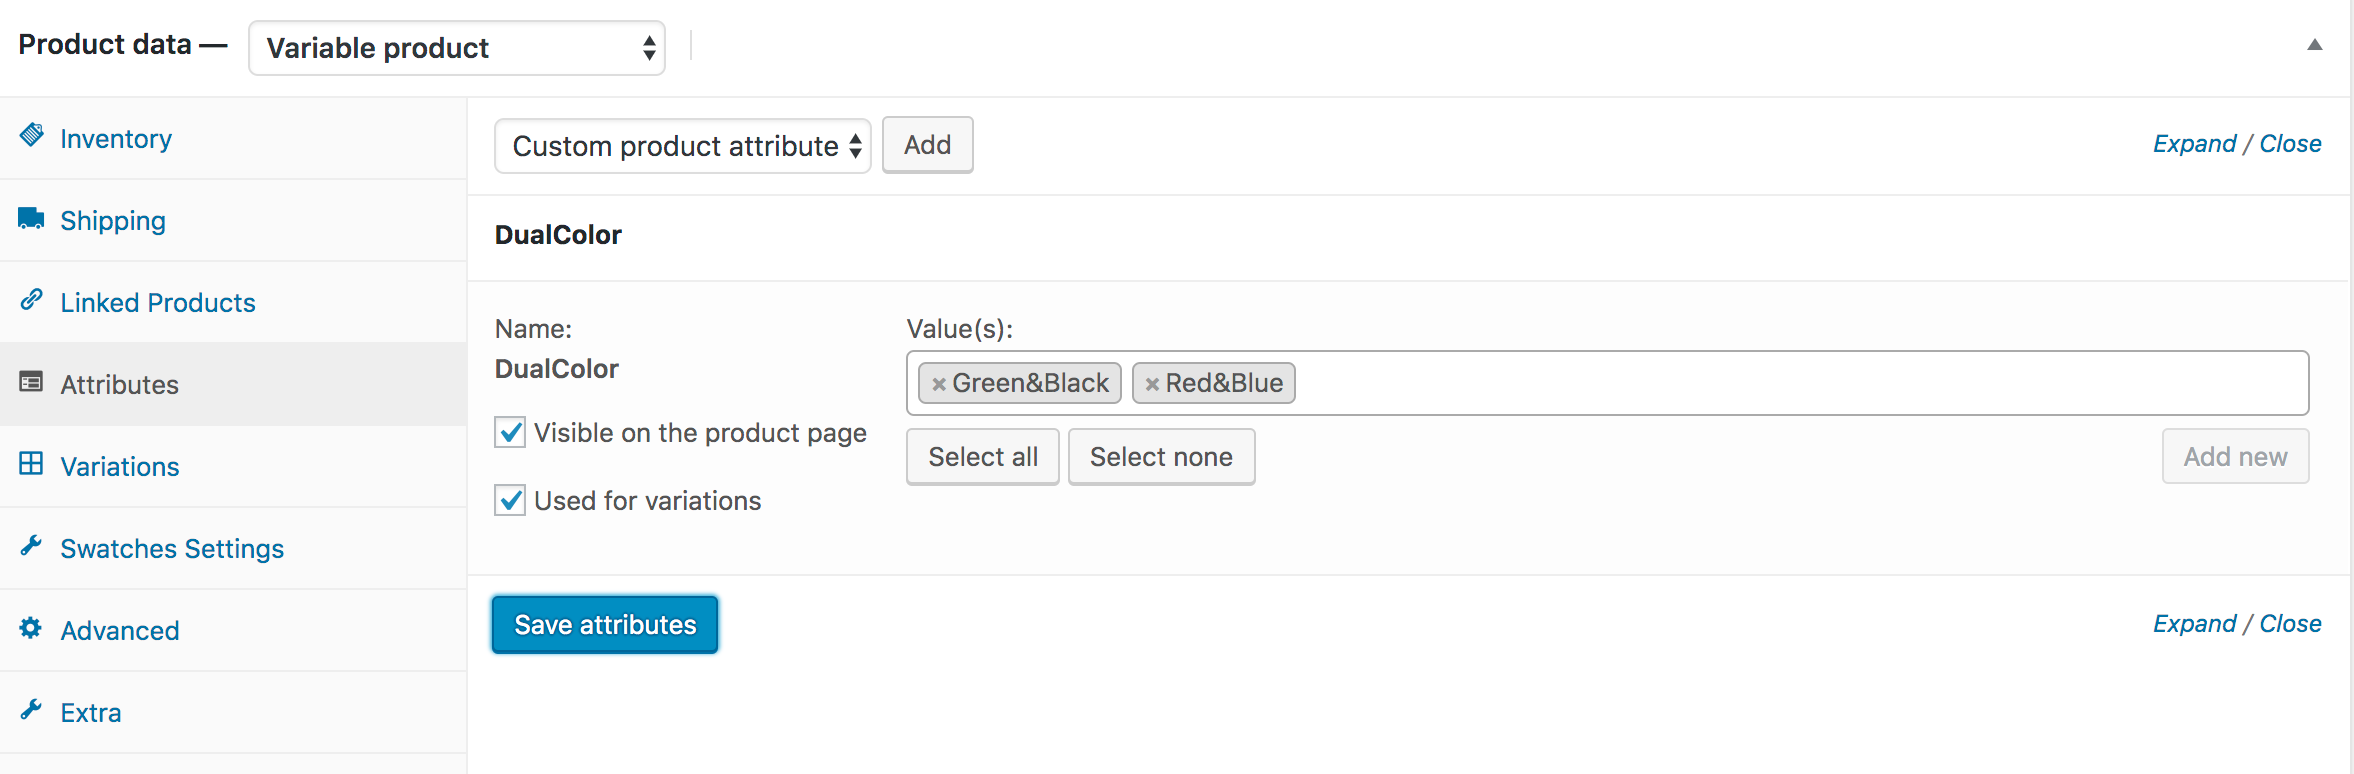
As shown in the screenshot, my two DualColor variations — Green&Black and Red&Blue — are listed. Make sure Used for variations is checked, then click the Save Attributes button.
Next, go to the Variations section and click the Add Variation dropdown. Choose the Create variations from all attributes option and then click the Go button.
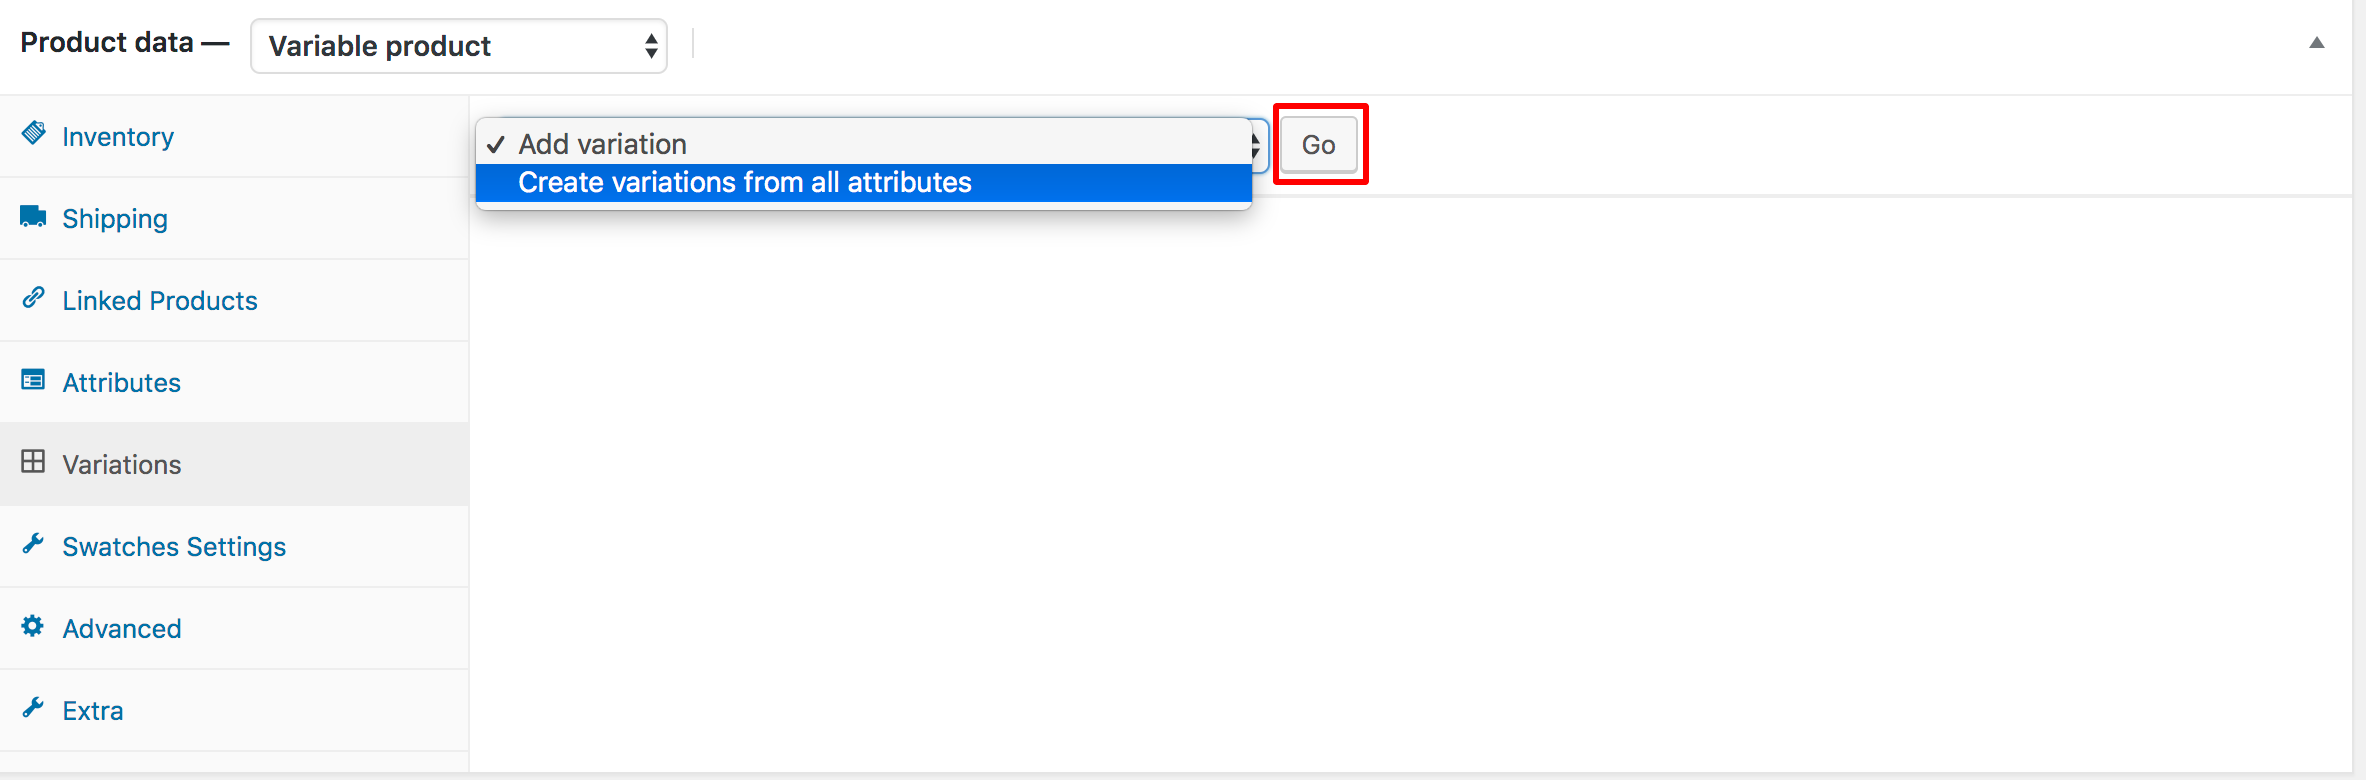
After clicking the Go button, the attribute variations will be listed one after another in an accordion style. As shown in the screenshot, my two variations — Green&Black and Red&Blue — are displayed.
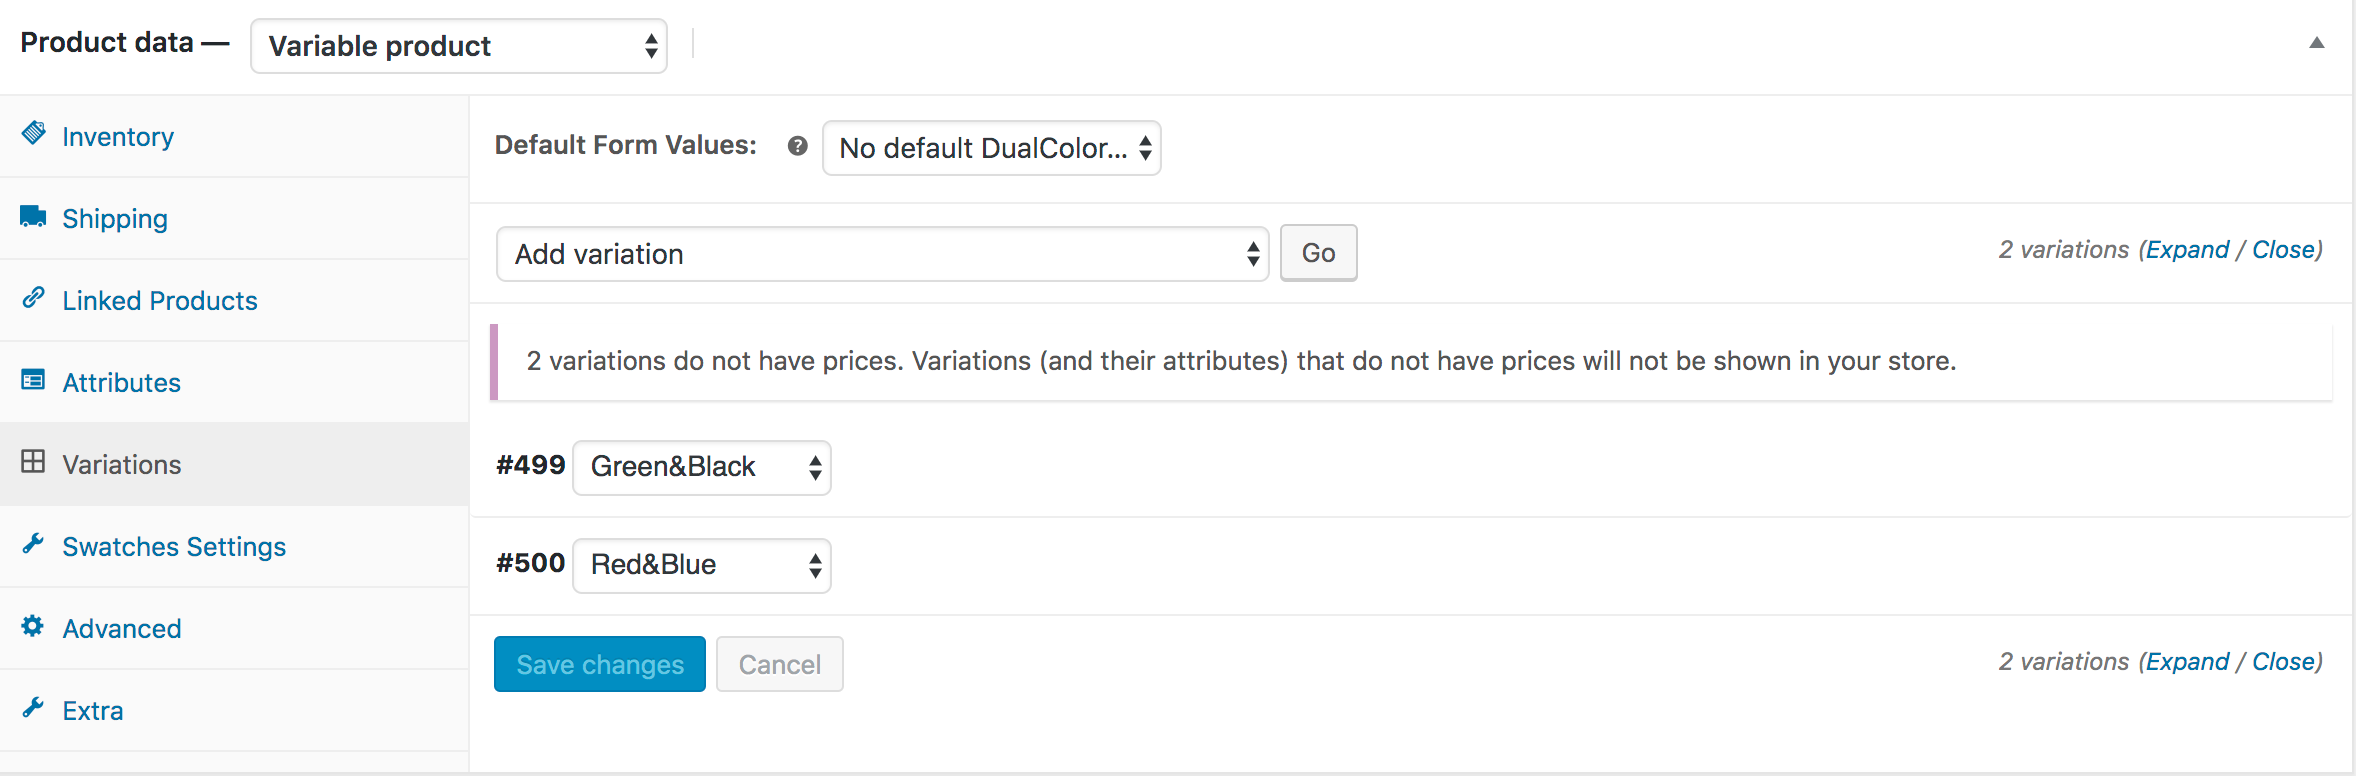
These variable product variations won’t appear on the product frontend until prices are defined. For demonstration, I’ll add a price and a feature image for the Green&Black variation.

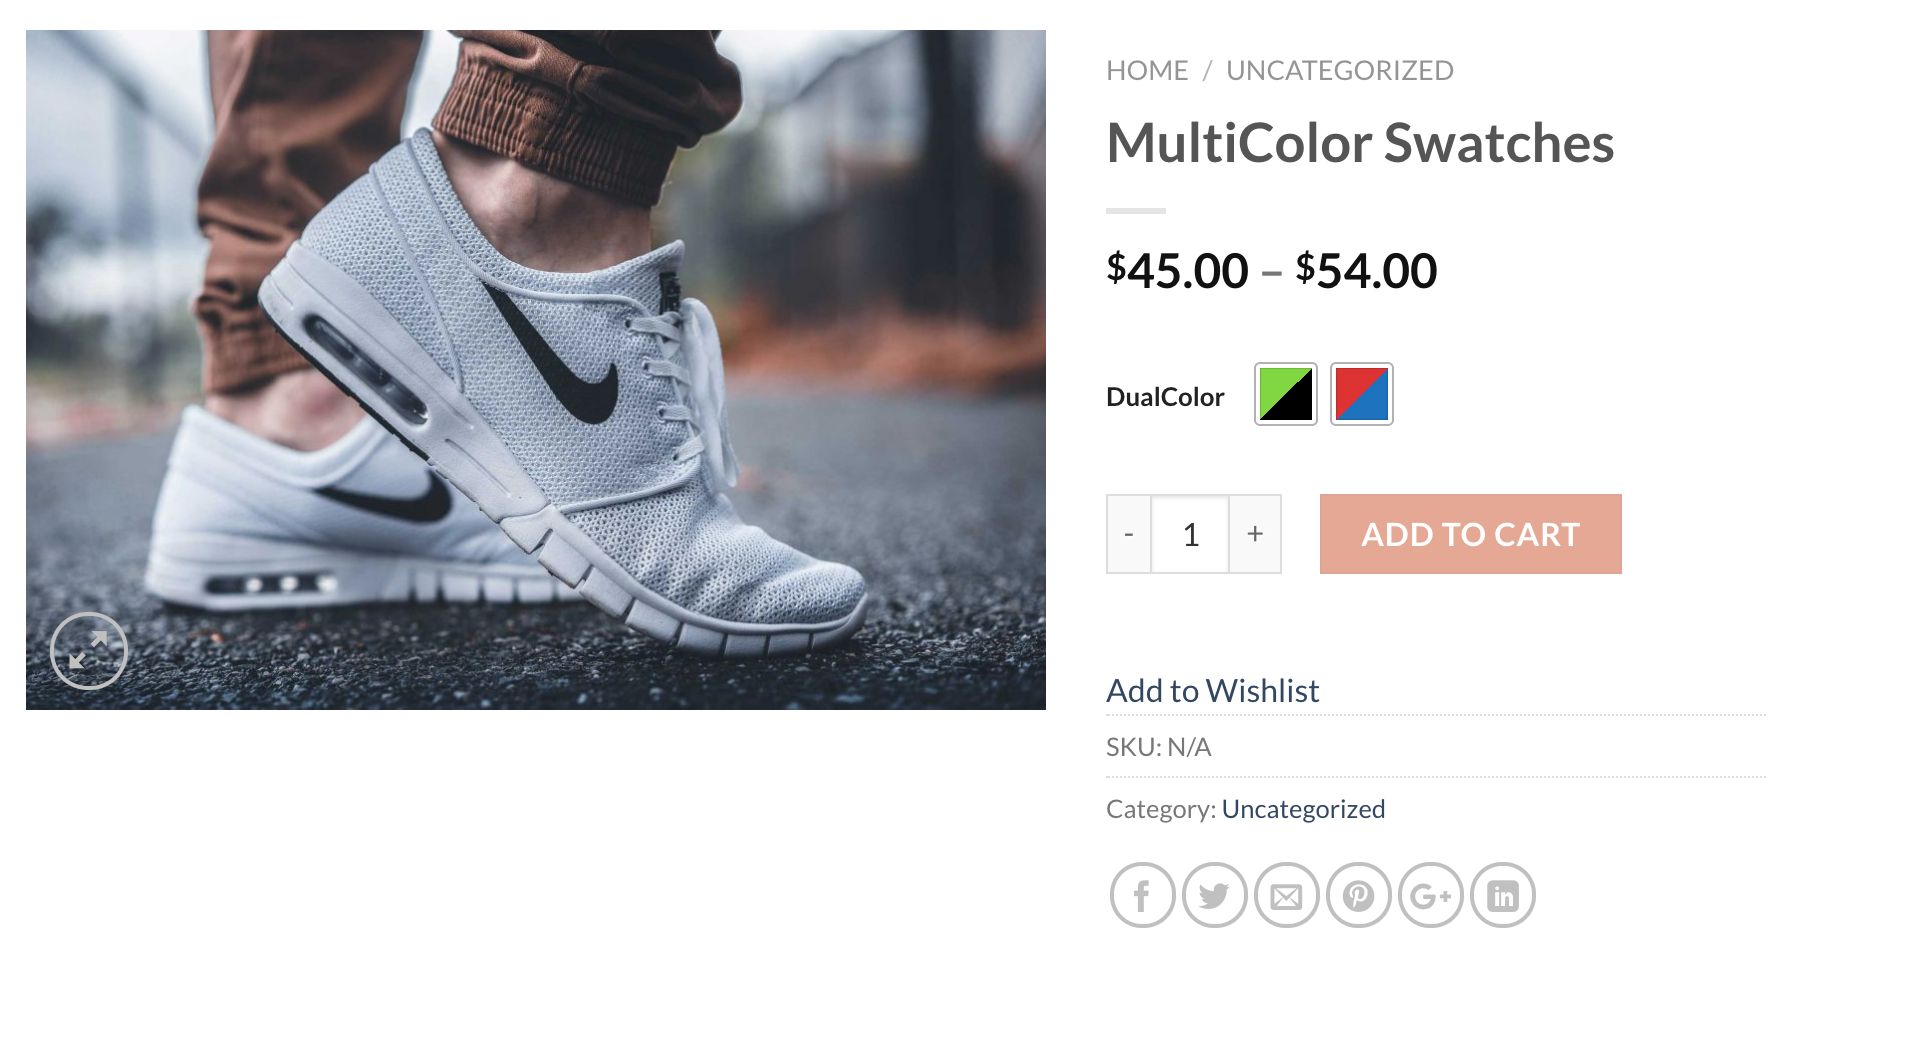
I’ve done the same for the Red&Blue variation. Click Save Changes to update your settings. Now, publish the product and view the frontend. The product page will appear as shown in the screenshot.
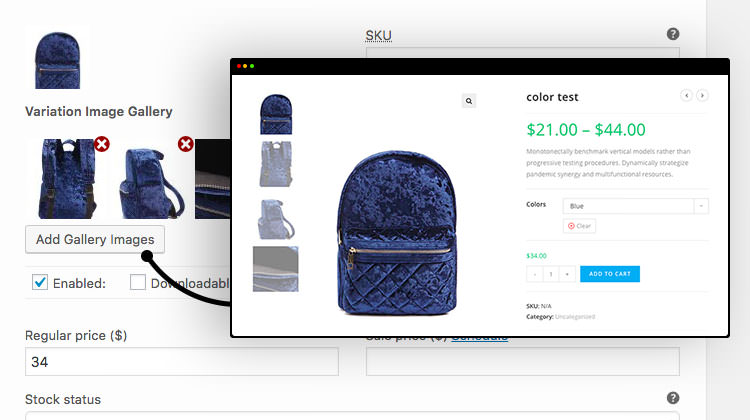
Insert Extra Images Per Product Variations
Frontend Preview
This feature lets you add two additional images for each product variation. To enable it, install and activate the WooCommerce Variation Image Gallery plugin.
Video Tutorial
Auto Convert Variation Dropdowns Into Button Swatches. Just Activate Plugin and Enjoy The magic.
Convert Global Attribute Variation Into Button Swatches
Convert Product Basis Variation Into Button Swatches
How To Enable Radio Swatches (Advanced)
Frontend Preview
- How To Create To Radio Variation Swatches For Global Attributes
- How To Create To Radio Variation Swatches For Manual Attributes
- How To Create To Radio Variation Swatches From Scratch
How To Create Radio Variation Swatches For Globally Created Attributes
Video Tutorial
Go to Products → Attributes. All existing global attributes are listed on this page. After installing the WooCommerce Variation Swatches plugin, a Type field is added, which shows Select by default.
WooCommerce Variation Swatches comes with four attribute types: Color, Image, Button, and Radio. You can assign any of these types to your desired attribute.
For demonstration, we’ve created a Size attribute. We’ll assign the Radio type to it.
To set the Radio type for the Size attribute, click Edit.

After clicking the Edit link, the attribute editing panel will open. From the Type dropdown, select Radio.
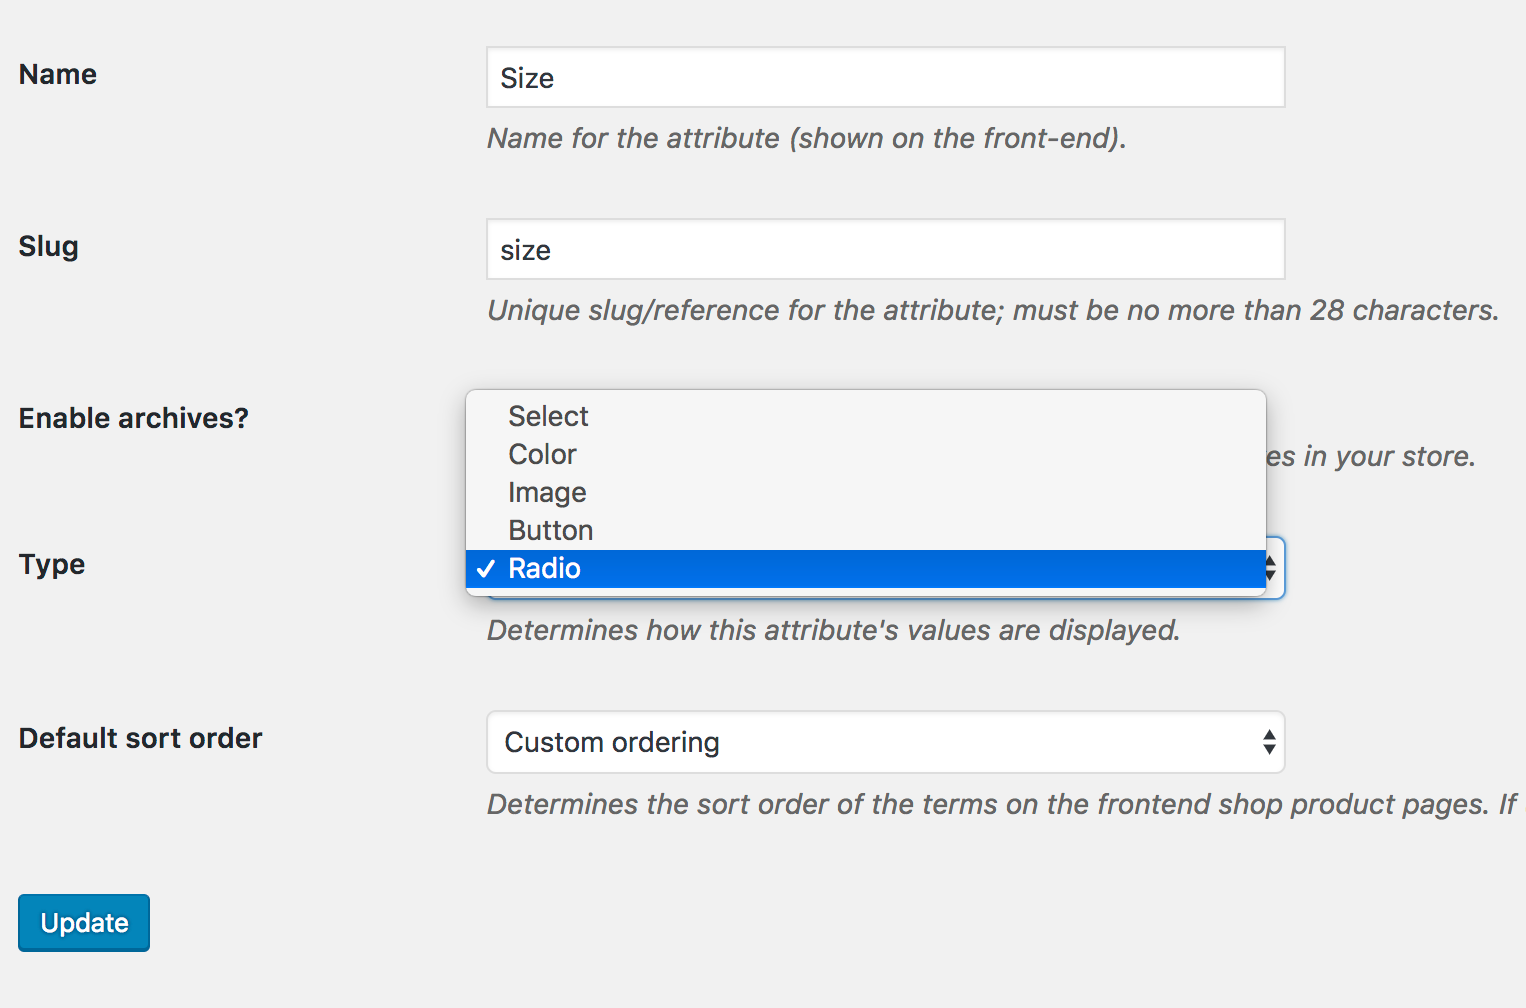
Once the attribute type is selected, return to the attribute list page. You’ll see that the Size attribute now shows Radio under the Type column instead of the default Select.

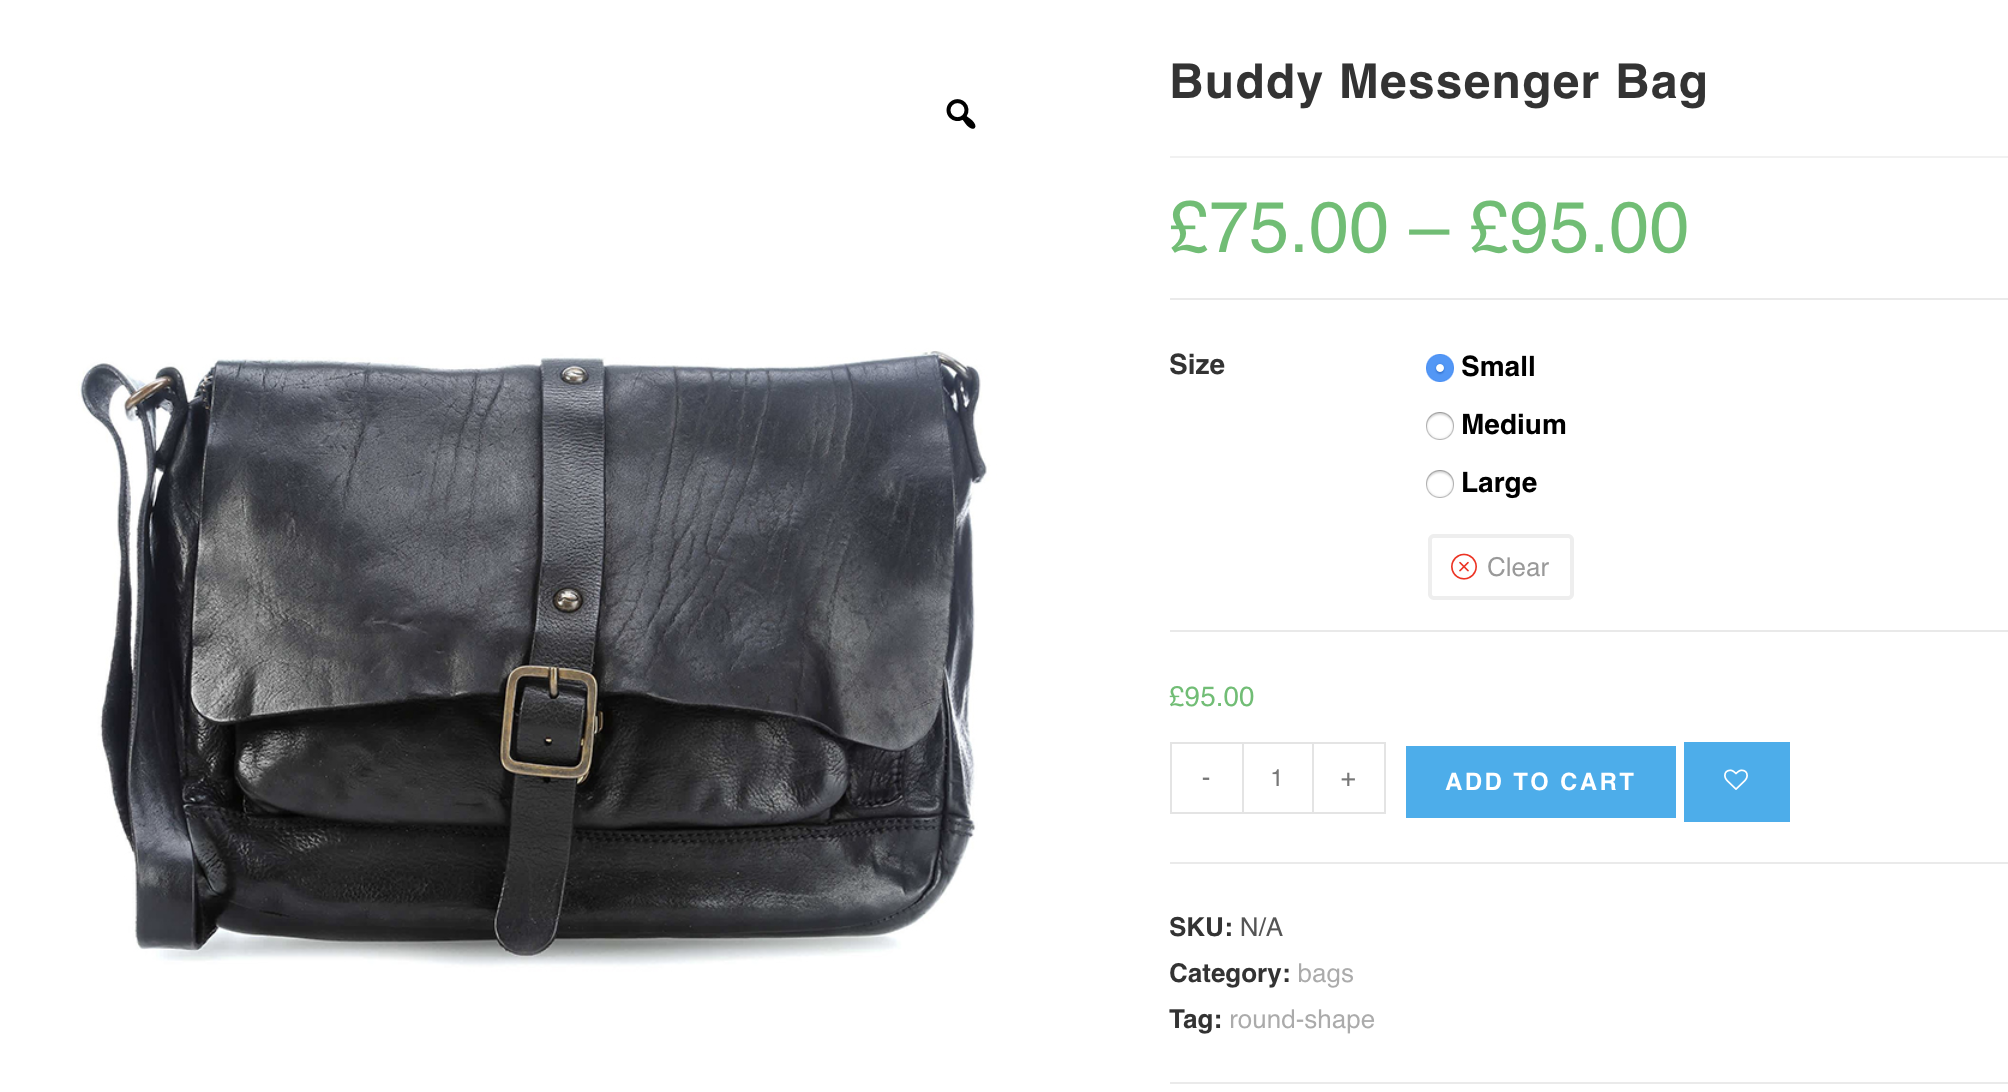
After selecting attribute type, the frontend of the product would look like the following screenshot.
How To Create Radio Variation Swatches From Manually Created Attributes
Video Tutorial
Step 1: Pro Plugin Setup
If your store has variable products but no global product attributes, it means the attributes and variations were created manually. To convert these manually created variations into image swatches, ensure you have the premium version of WooCommerce Variation Swatches installed.
Step 2: Change Manual Attribute Type
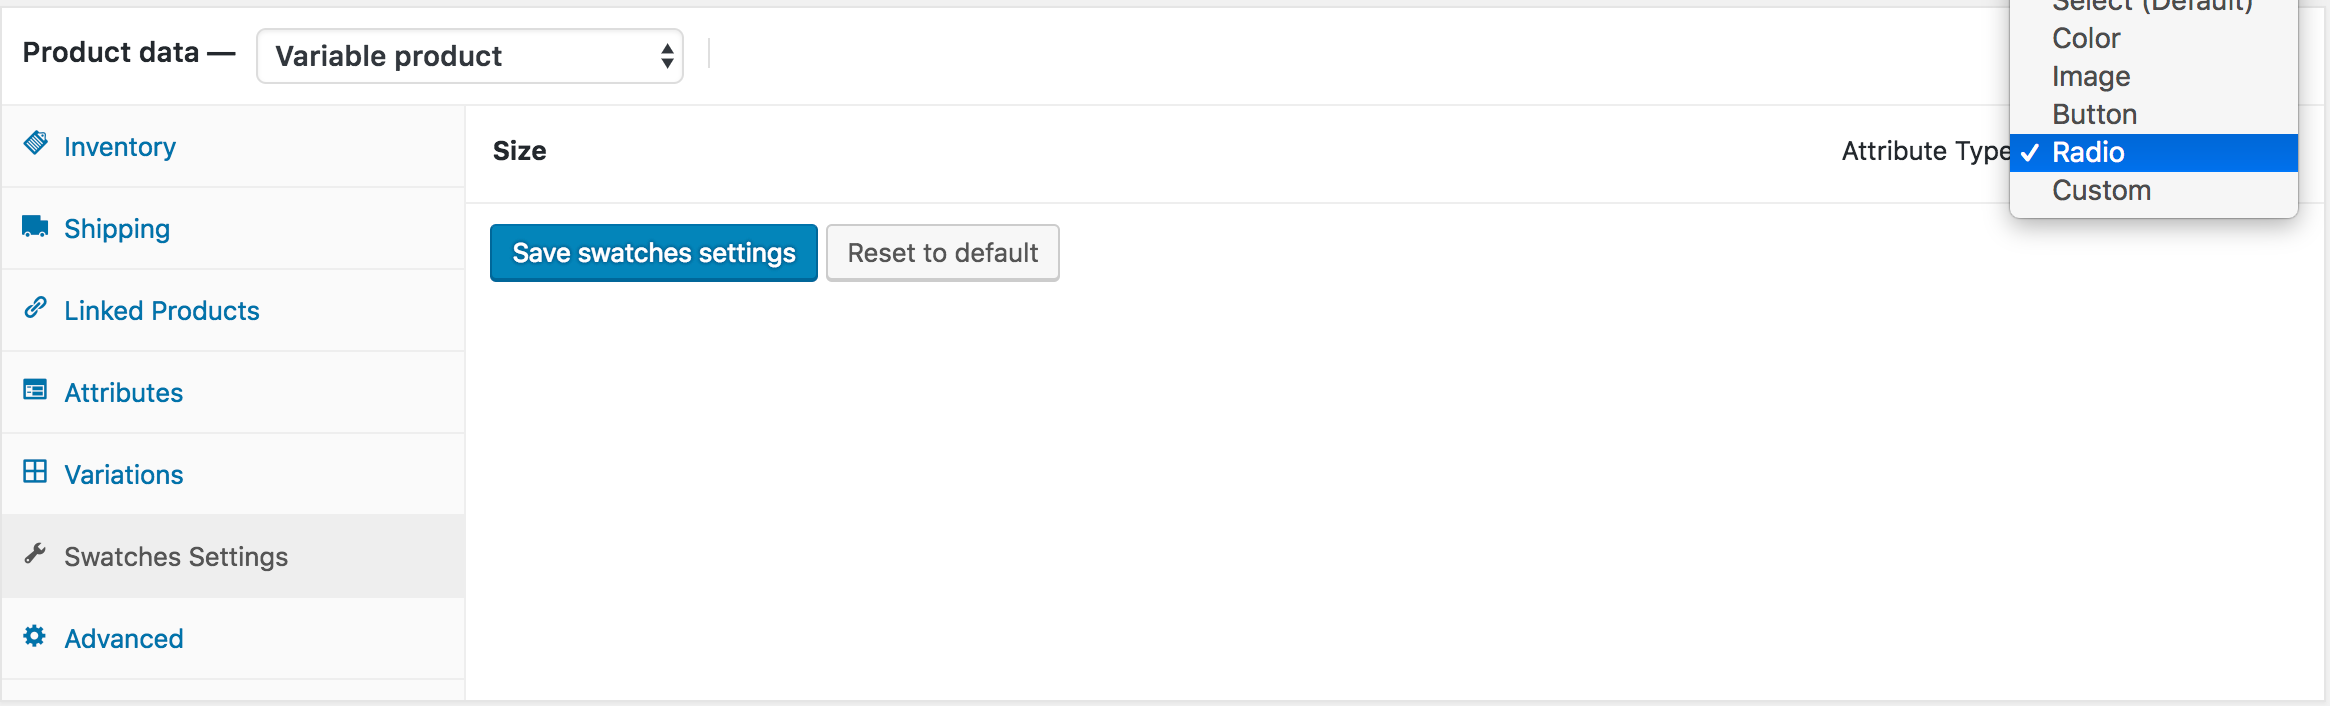
If you go to the Attributes tab in the product data section while editing your product and see variations separated by a pipe (|) symbol, as shown in the screenshot, it means the variations were created manually.
To convert these manually created attribute variations, go to the Swatches Settings tab and choose Radio from the Select (Default) dropdown.
After selecting attribute type, the frontend of the product would look like the following screenshot.
How To Create Radio Variation Swatches From Scratch
Video Tutorial
Step 1: Create Attribute
First, we need to create the radio attribute and its variations globally. To do this, navigate to Products → Attributes. Since we’ll create a radio attribute for our product, enter your preferred attribute name in the Name field. In this tutorial, I’ve named it Size.
You can leave the Slug field empty—WooCommerce will generate it automatically. From the Type dropdown, select Radio as the attribute type. Once all required fields are completed, click the Add Attribute button.

After creating attribute, you will notice a list is created in the right side. Check the following screenshot.

Step 2: Create Attribute Variations
The more variations you add, the more they will appear in this list. Once an attribute is created, the next step is to create its variations. To add variation terms, click on Configure terms from the attribute list.

As we’ve now created a Radio attribute, the next step is to add variation labels under it. In this tutorial, we’ll be adding Small, Medium, and Large as Radio variations. To create each variation, simply fill the Name field with your desired label, leave the Slug field empty, and click Add new (or Save) each time. Every variation you create will automatically appear in the list on the right.

Step 3: Enable Attribute Variation in Variable Product
Now it’s time to apply radio swatches to a variable product. Open the product you want to edit, go to the Product Data section, and ensure the product type is set to Variable Product.

Once you’ve selected “Variable product” from the Product Data dropdown, go to the Attributes tab. Click on the “Custom product attribute” dropdown, and you’ll find all globally created attributes listed there. Since we’ve only created the Size attribute, it appears as the available option.

Select the Size attribute and click Add. Once added, the following screen will appear.
If you want to include every available Size variation at once, simply click the Select all button. To remove all selected variations, use the Select none button. After choosing your variations with Select all, make sure to tick the Used for variations option and then click Save attributes. Refer to the screenshot below for guidance.
In this tutorial, I’m choosing the Create variations from all attributes option and clicking the Go button. This will automatically generate all available variations, as shown in the screenshot.
You can now see the Small, Medium, and Large variations listed. From this panel, you can upload variation images, set prices, and fill in any variation-specific details. Once you finish updating the information for each variation, make sure to click Save Changes.
Important: Don’t forget to set a price for every variation—without pricing, the variations won’t appear on the product page.
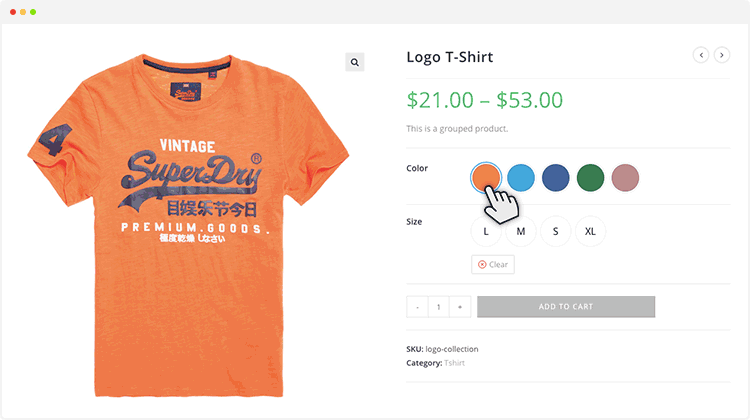
How To Change Variation Image Gallery Selecting Single Attribute Like Amazon And AliExpress (Advanced)
Normally, WooCommerce only updates the variation gallery when all selected attributes match a specific variation. With this feature enabled, the gallery can update instantly when a single attribute is chosen—similar to the behavior seen on Amazon or AliExpress.
Preview Images
Step 1: Plugin Installation
This functionality is available only in the premium version of the WooCommerce Variation Swatches plugin. To use it, ensure that the WooCommerce Variation Swatches Pro add-on is installed alongside the free version.
Step 2: Configure Global Settings
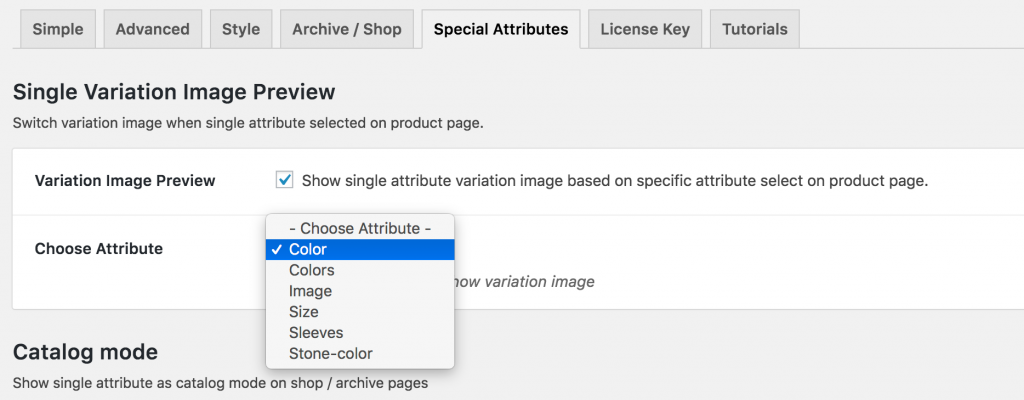
To enable global settings for changing variation image gallery based on only selected variation, head to the Special Attribute >> Single Variation Image Preview from Swatches Settings. Enable Variation Image preview settings and select your desired variation from Choose attribute settings. The variation you select from here, will change variation gallery image without selecting other attribute variations.
Step 2.1: Arrange Attribute Variations
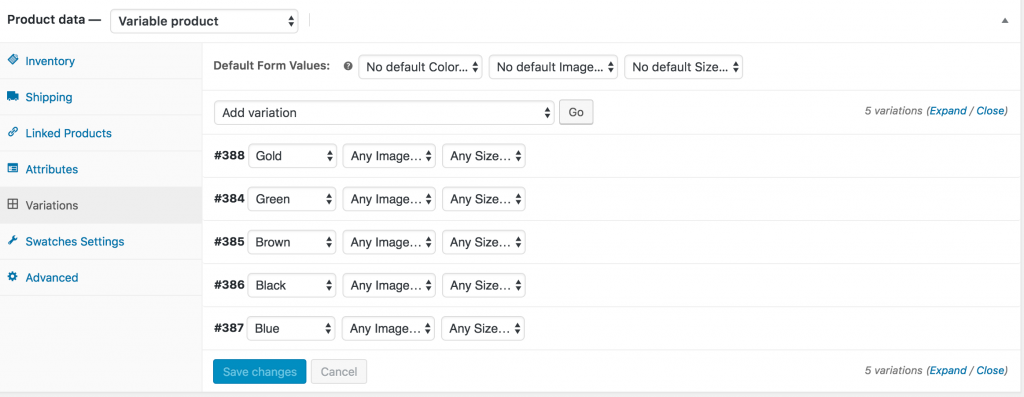
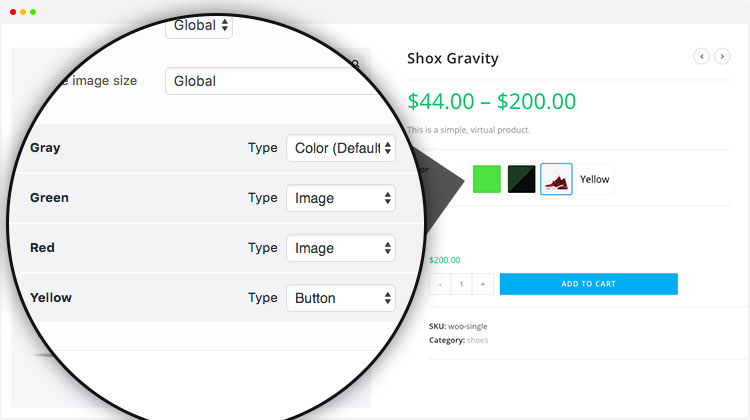
To configure this, refer to the screenshot below. In this example, I selected the Color variation globally, set color variations individually, and left the other variations as Any.
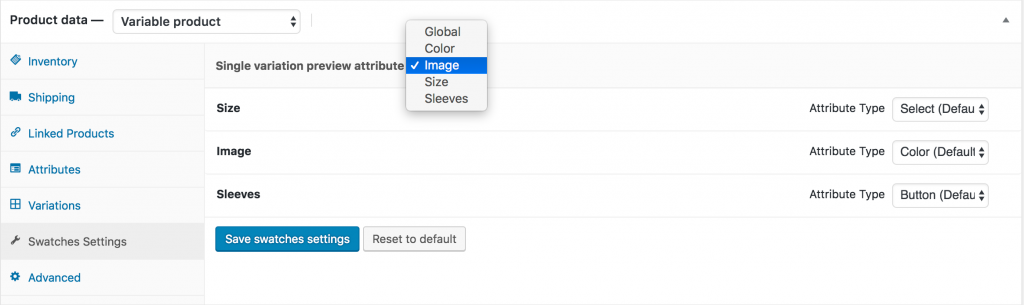
Step 3: Individual Product Settings
If the globally selected variation is already linked to all variable products in your store, you may not need this option. However, it becomes useful in certain situations:
- Some products may not have the attribute connected that you selected globally.
- For some products, you might want the product gallery to change based on a different attribute, ignoring the global settings.
In such cases, go to the product edit mode and open Swatches Settings. Then, select your desired attribute (not the globally selected one) from Single Variation Preview Attribute. In the screenshot, I’ve selected a non-globally assigned Image Attribute.
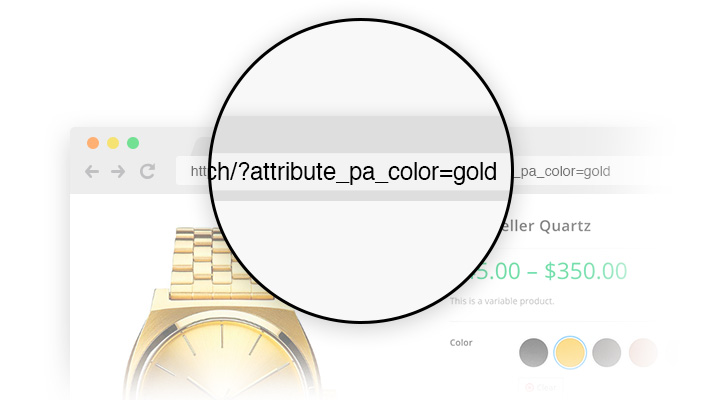
Generate Attribute Variation Link (Advanced)
Video Tutorial
Step 1: Plugin Installation
This is a premium feature of the WooCommerce Variation Swatches plugin. Make sure you have the WooCommerce Variation Swatches Pro plugin installed alongside the free version.
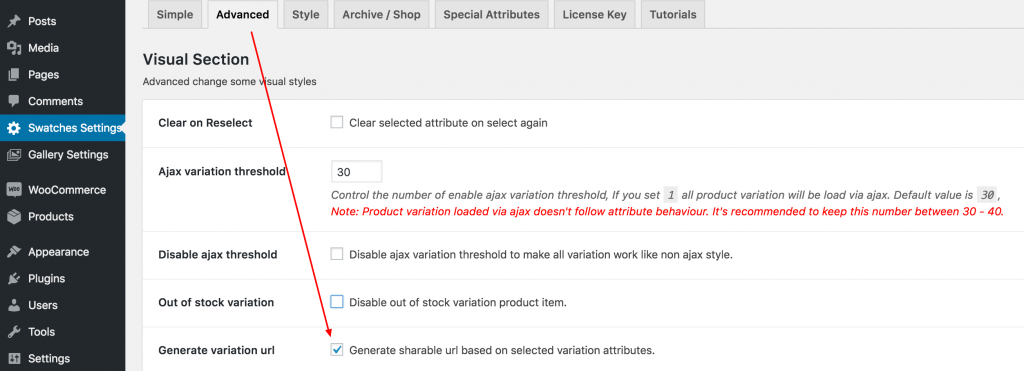
Step 2: Configure Option
To enable this setting, go to the Advanced tab in Swatches Settings and check the Generate Variation URL option. Then, click Save Settings.
Enlarge Special Attribute In Product Page

Video Tutorial
There can be many attributes in a WooCommerce variable product, but sometimes you may want a single attribute to stand out. To make this easier, the popular WooCommerce Variation Swatches plugin offers a dedicated option.
Go to Swatches Settings → Special Attribute → Large Size Attribute section. Select the attribute type and set your desired size to make it stand out on the product page.
Product Basis Swatches Customization (Advanced)
Frontend Preview
Video Tutorial
Step 1: Plugin Installation
This is a premium feature of the WooCommerce Variation Swatches plugin. Make sure you have the WooCommerce Variation Swatches Pro plugin installed alongside the free version.
To customize swatches for a specific product, open the product in edit mode. You’ll see Swatches Settings under Product Data, where you can start customizing the swatches for that product.
Show Selected Variation Name Beside Label
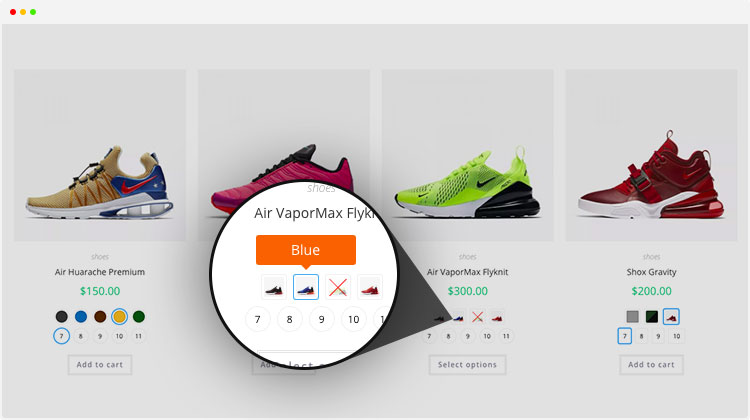
How To Enable Swatches on Archive/Shop Page With Add To Cart Button (Advanced)
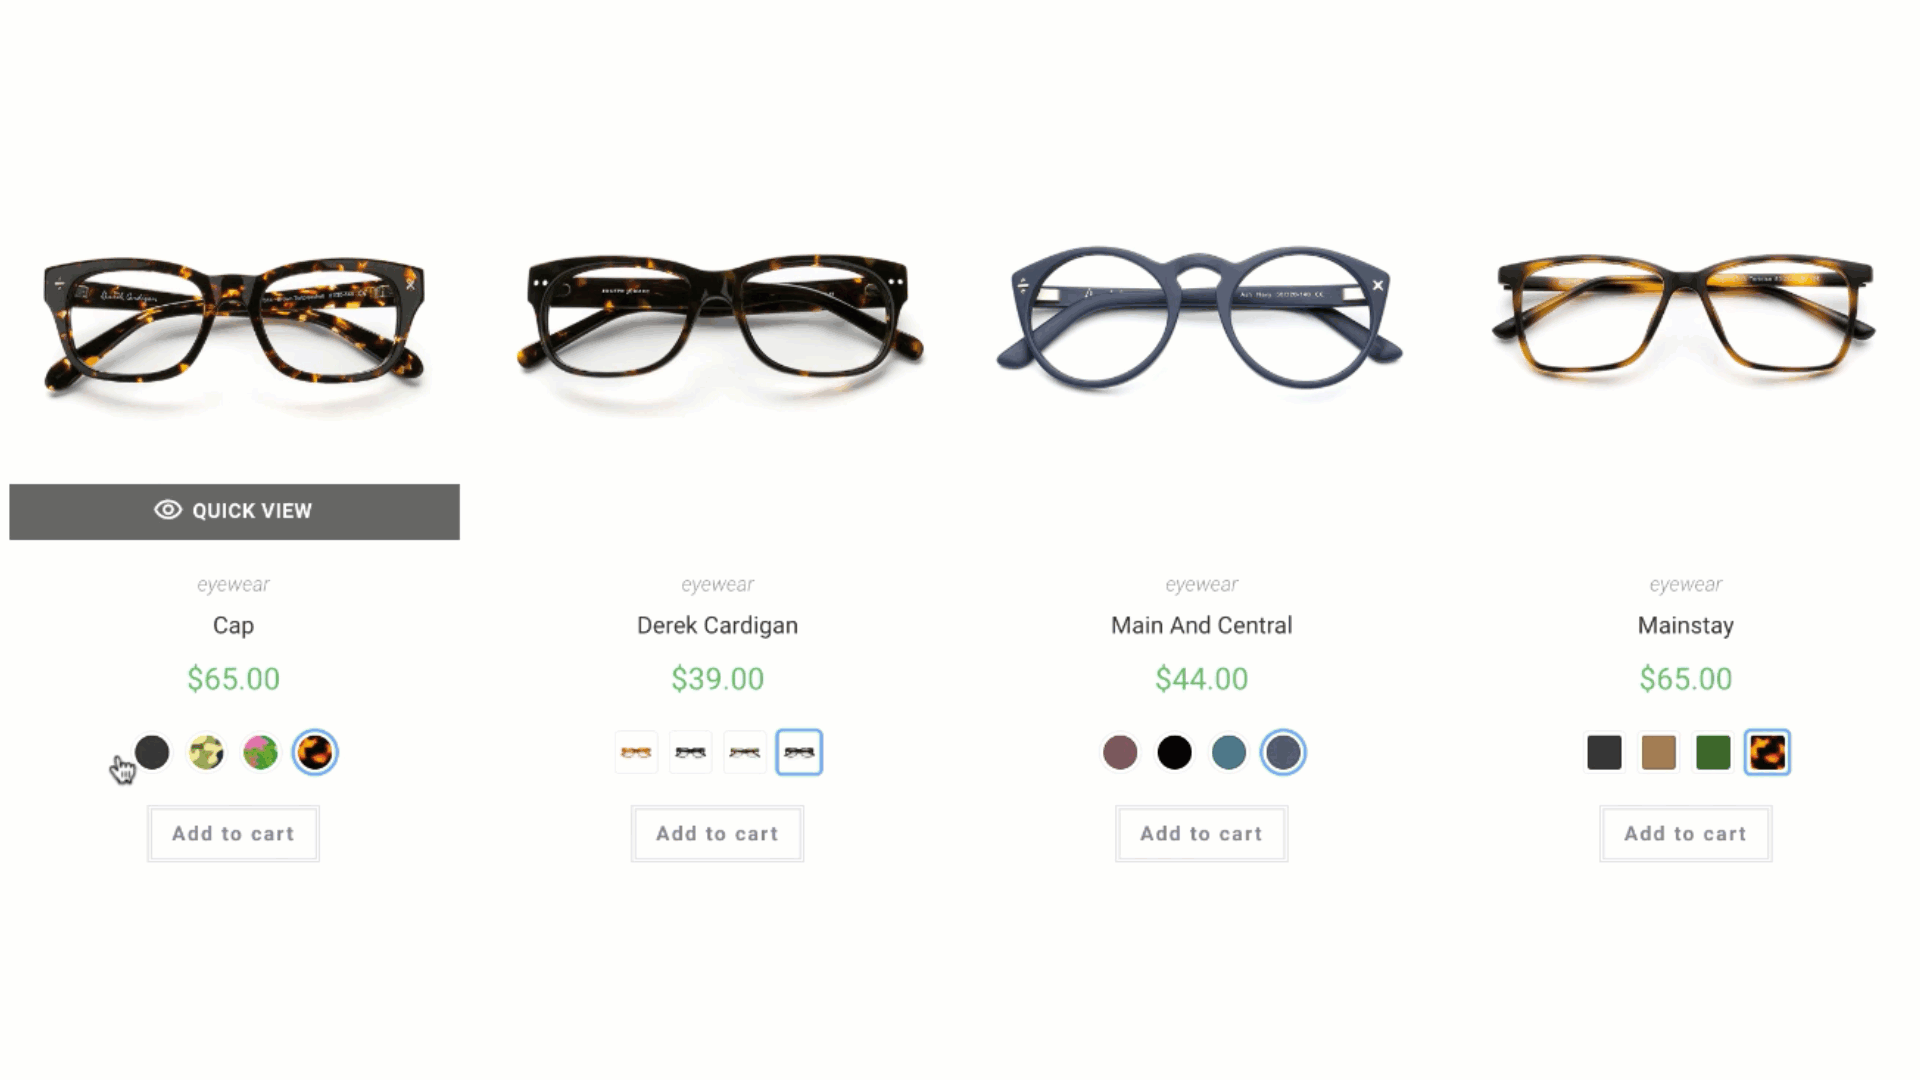
Frontend Preview
Video Tutorial
Step 1: Plugin Installation
This is a premium feature of the WooCommerce Variation Swatches plugin. Make sure you have the WooCommerce Variation Swatches Pro plugin installed alongside the free version.
Step 2: Configure Settings
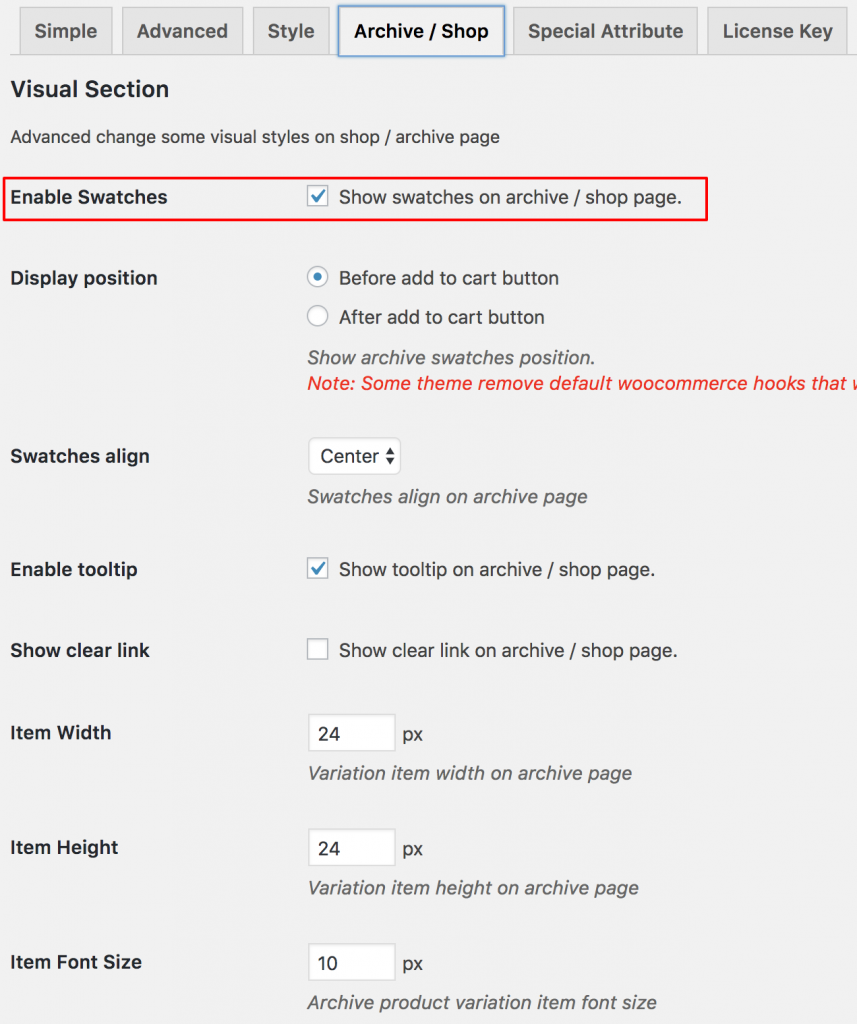
To display color, image, label, and radio swatches on your store pages, go to Swatches Settings → Archive/Shop tab. Enable the Show on Archive option to display swatches on the shop or archive pages. In themes like Flatsome, you can also enable swatches before or after the Add to Cart button.
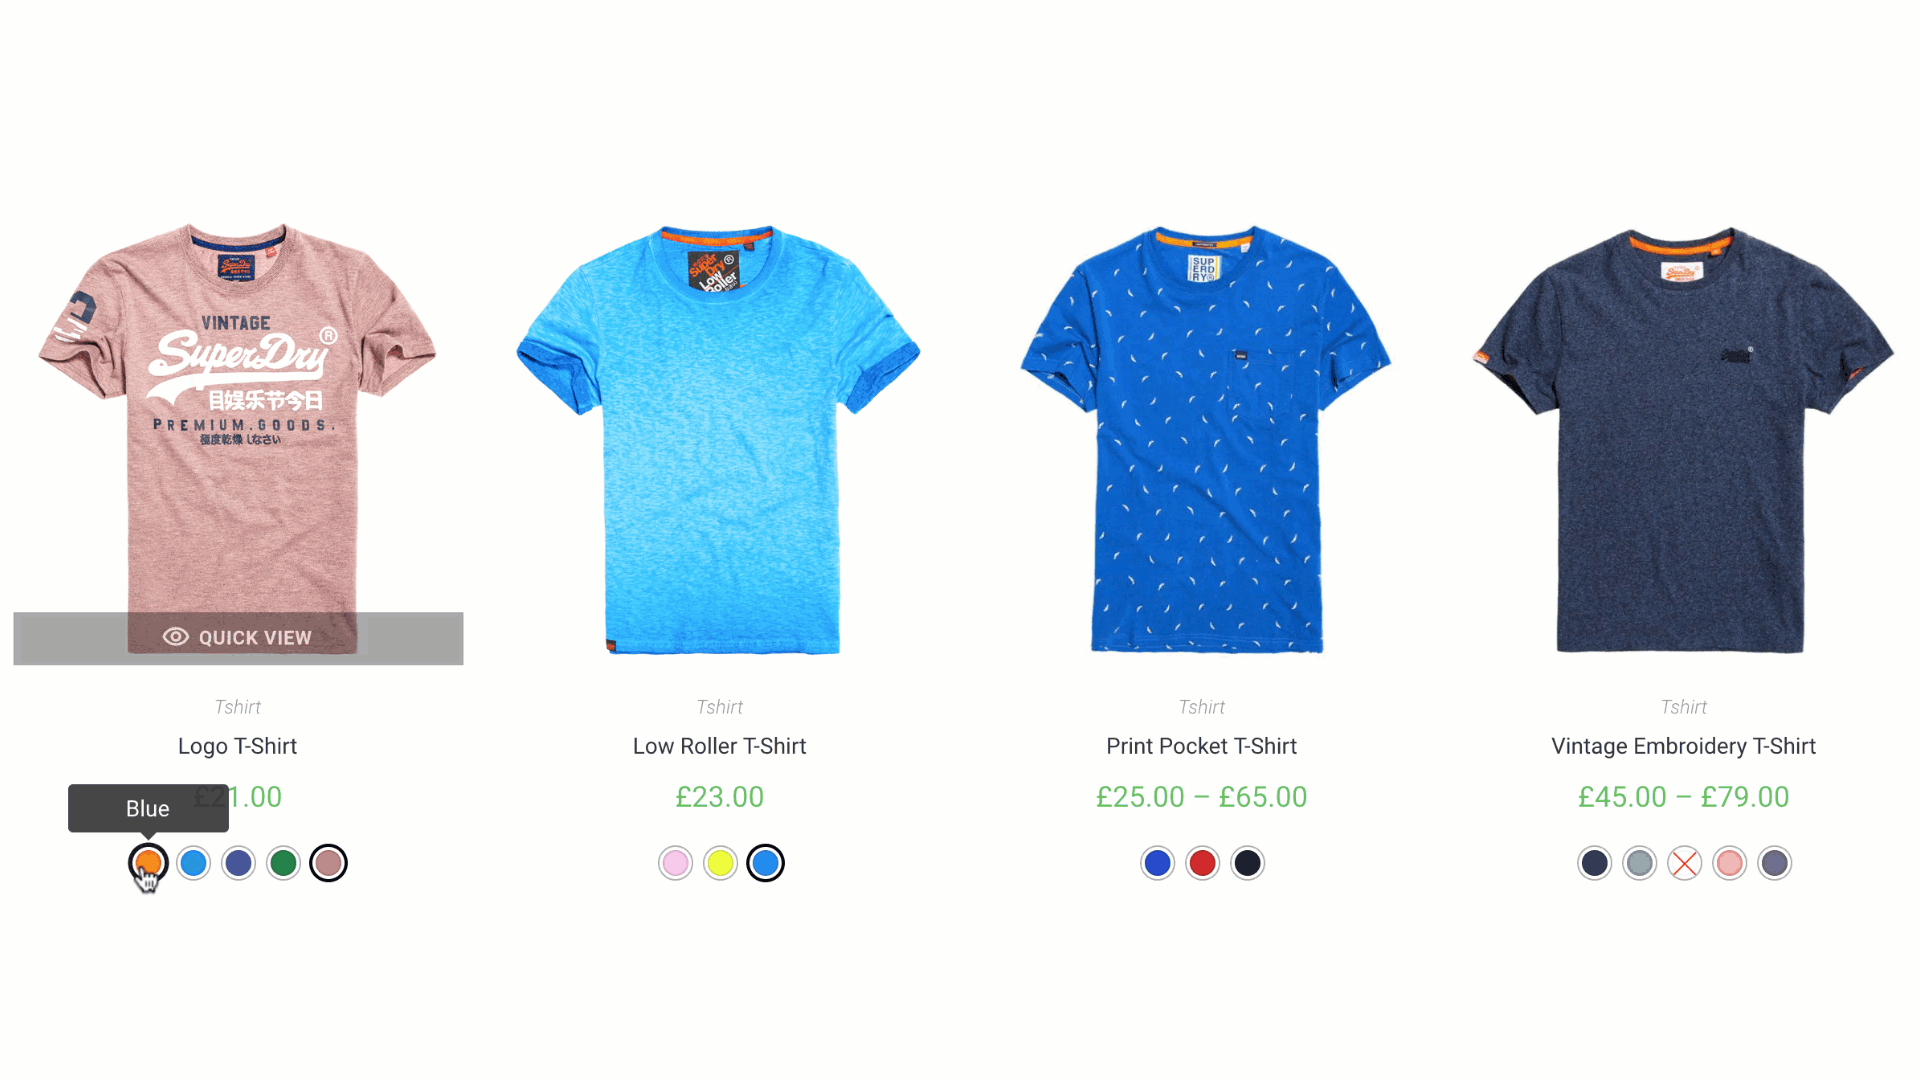
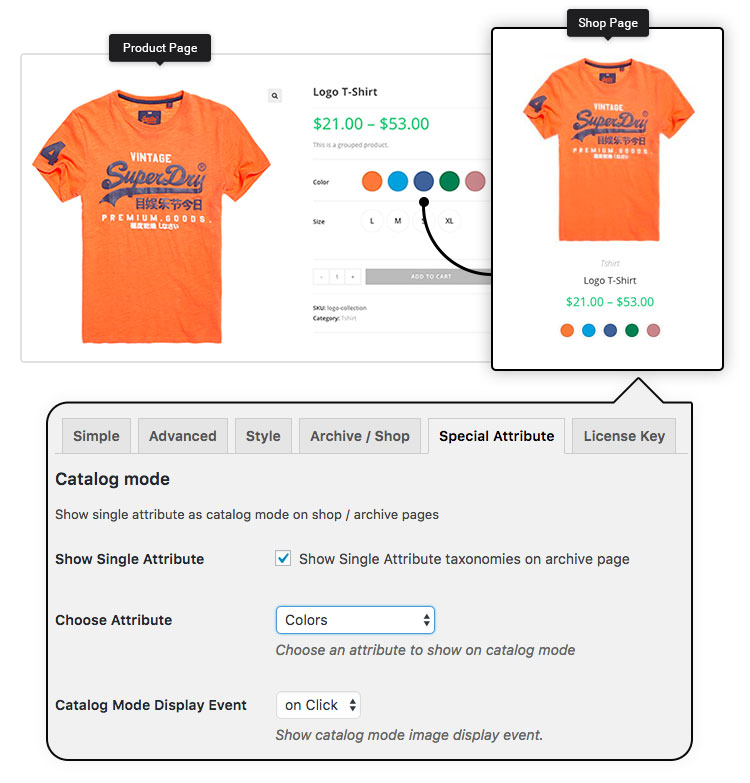
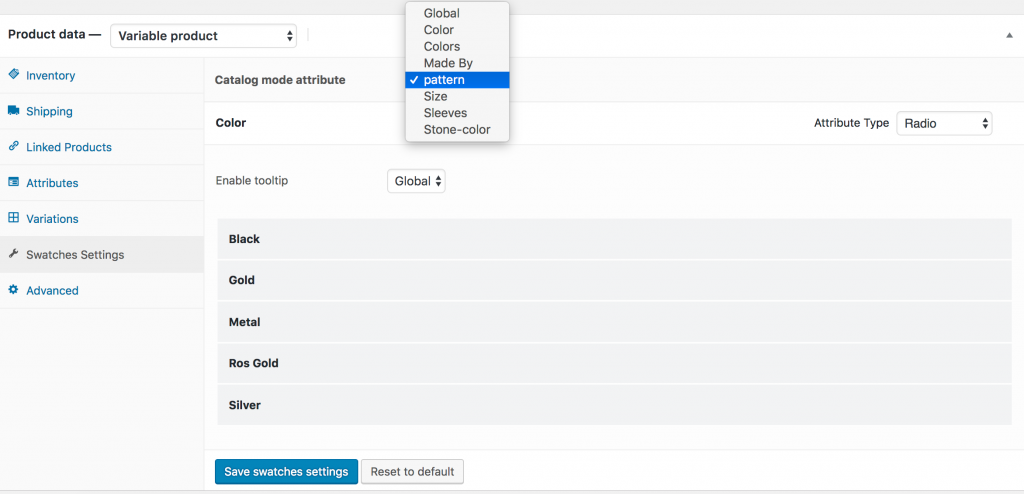
Multiple Attributes in Product Page, But Show Only Single Attribute in Catalog Page (Advanced)
Frontend Preview
Video Tutorial
Global Settings
This is a premium feature of the WooCommerce Variation Swatches plugin. Make sure you have the WooCommerce Variation Swatches Pro plugin installed alongside the free version.
To display a single attribute on the shop page, go to Swatches Settings → Special Attribute. Enable Show Single Attribute Settings and choose which attribute you want to display globally from the Choose Attribute dropdown.
From the Catalog Mode Display Event option, you can also decide how the product image will update—either on click or hover.
Individual Settings
If you’ve set Color as the global attribute type, only color swatches will appear on the catalog/archive pages. But sometimes you may want to override this for specific products. In that case, you’ll need to use Individual Settings.
For example, let’s say color swatches are enabled globally for all products, but for 2–3 specific items you want to display image swatches or button swatches instead. You can easily override the global setup for those products using the Individual Settings option.
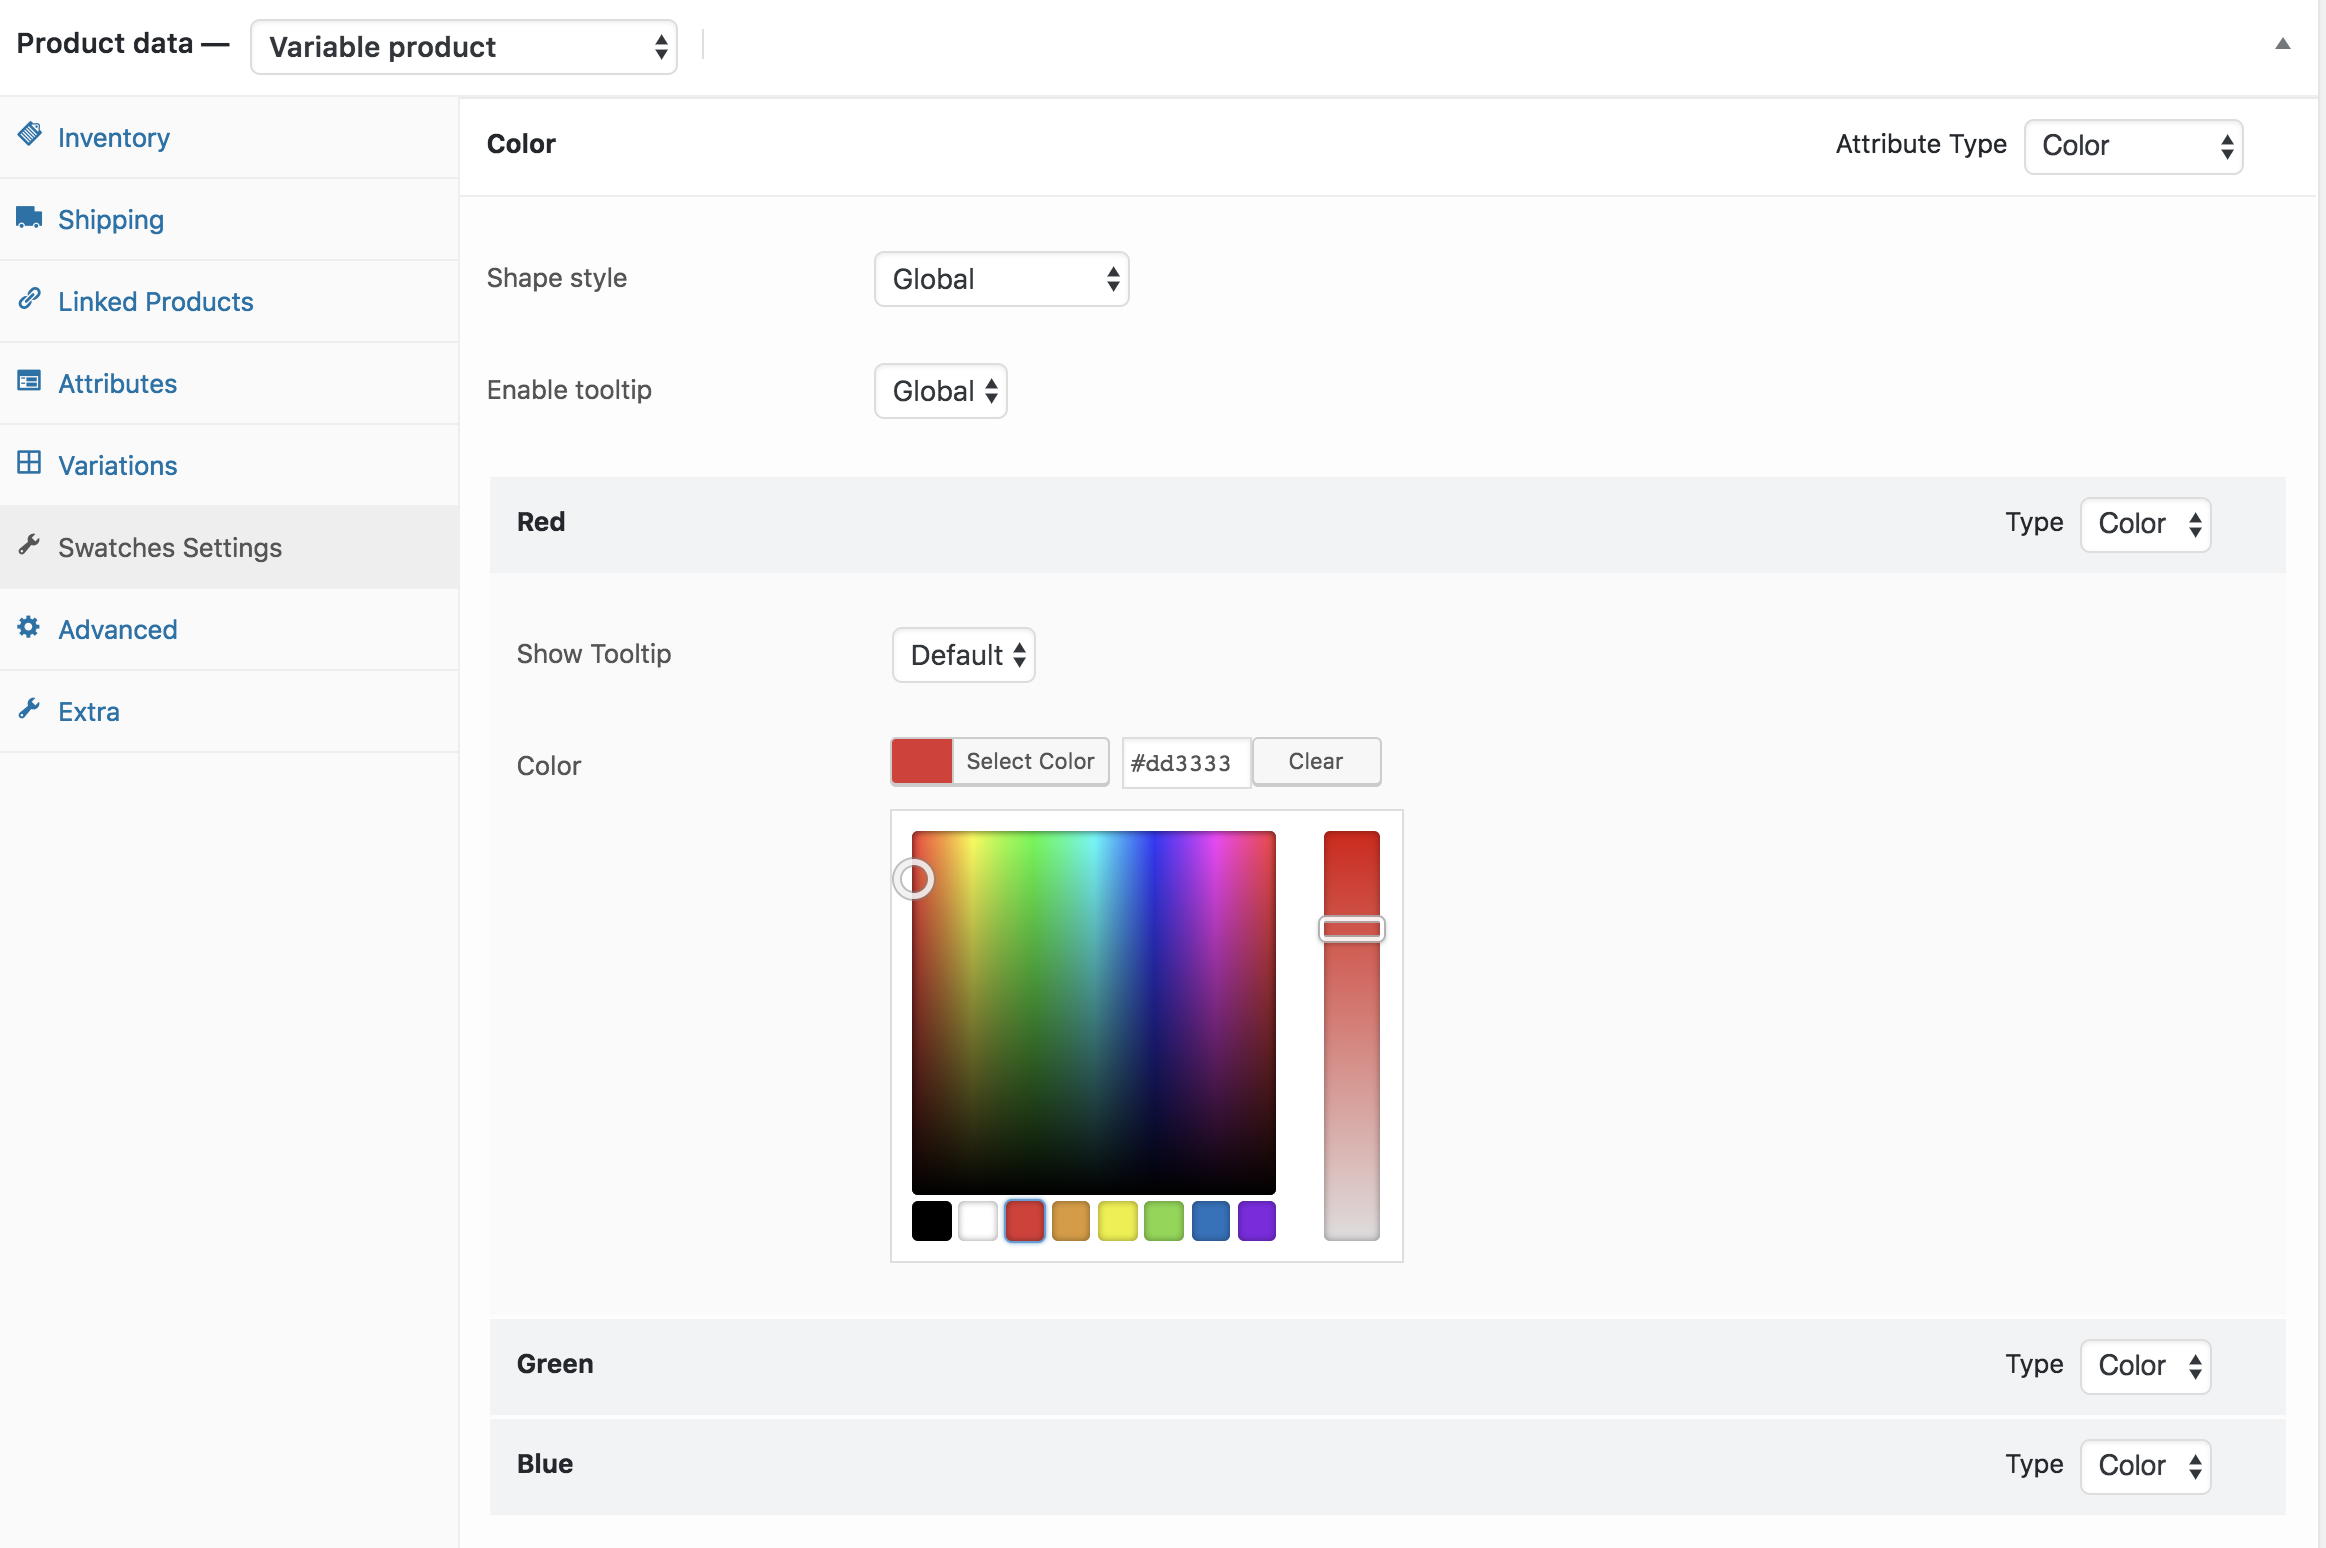
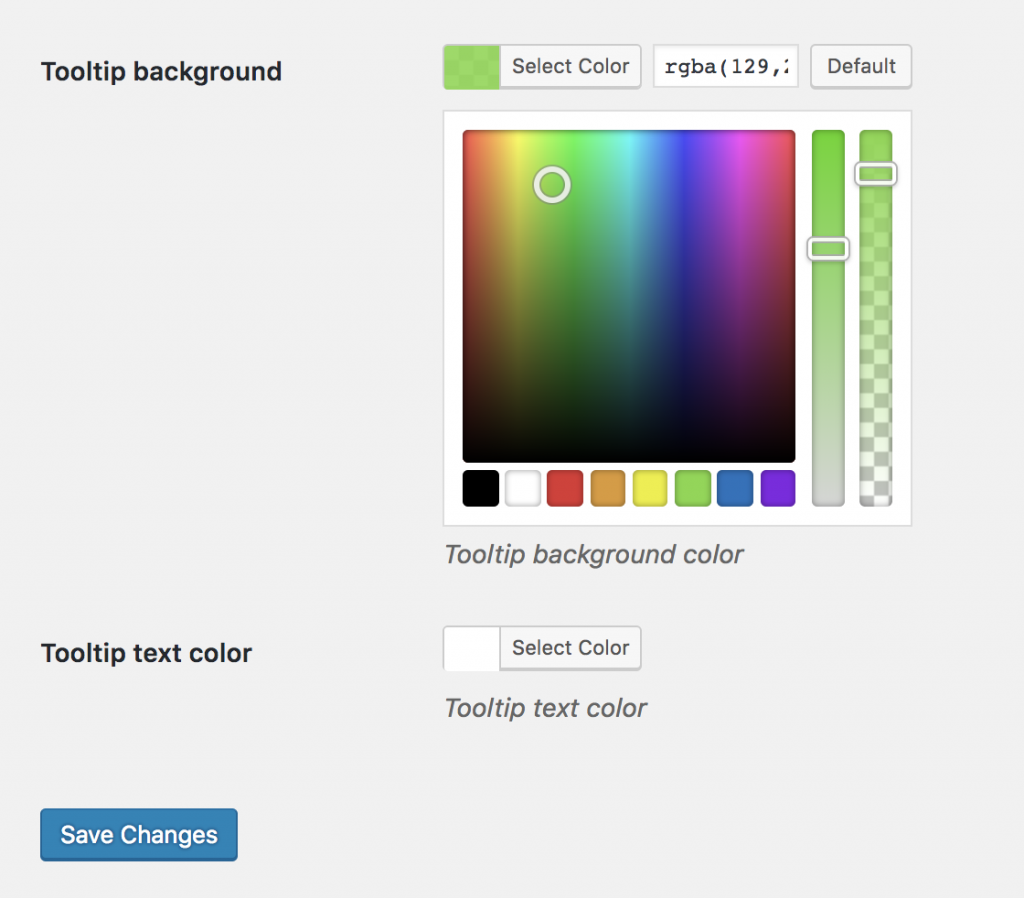
Customize Tooltip Background and Font Color (Advanced)
Customize tooltip background and text color from the Advanced settings.
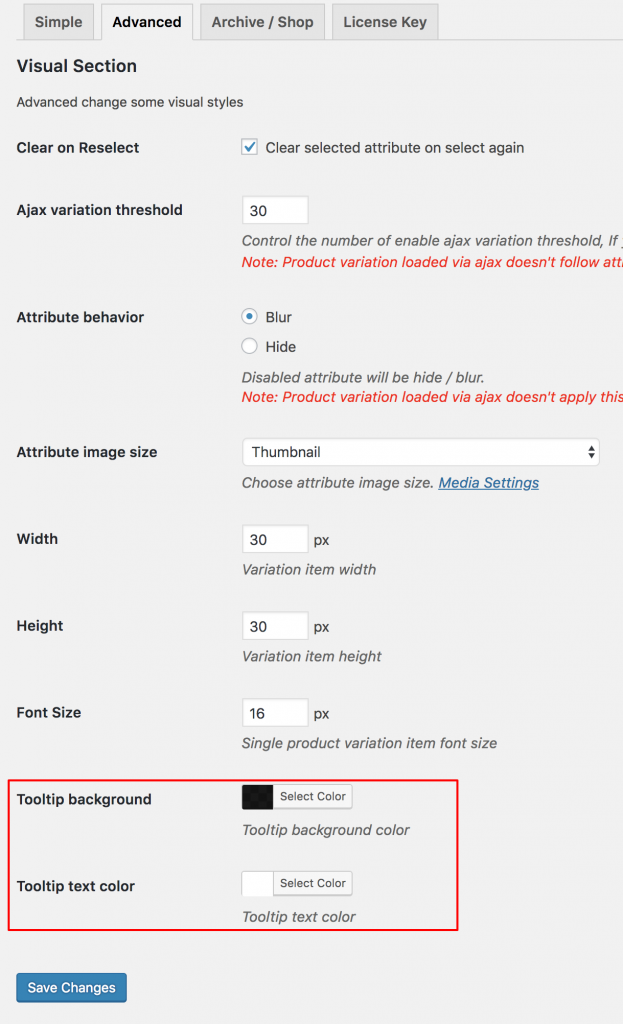
Navigate to the Tooltip Background settings, choose your preferred background and text colors, and save the changes. This will update the default tooltip styling across your entire store.
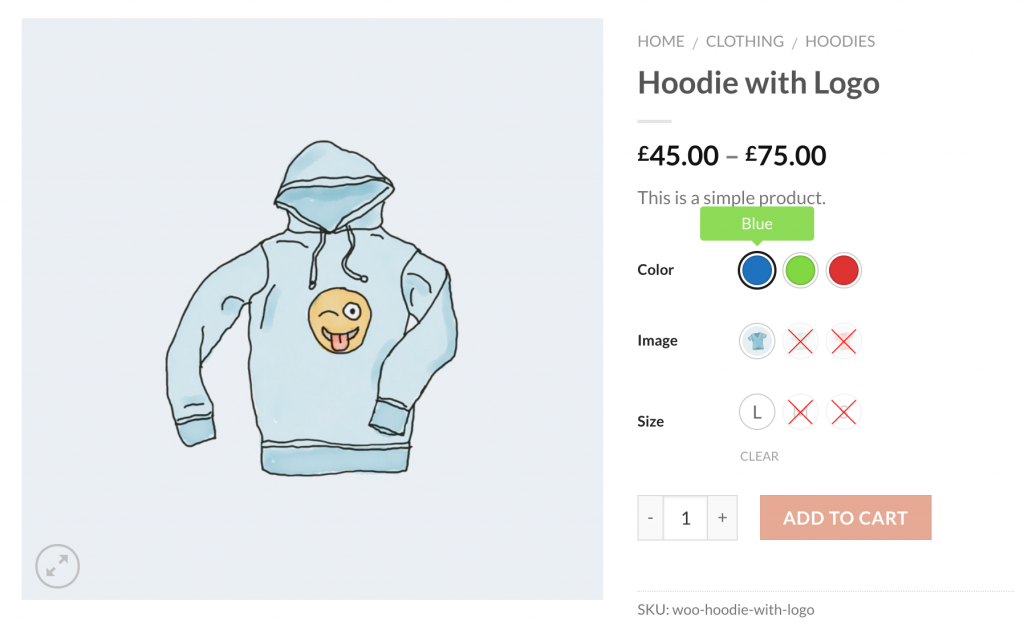
The tooltip frontend Preview looks like the following screenshot.
Tooltip Display Setting on Archive / Shop Pages (Advanced)
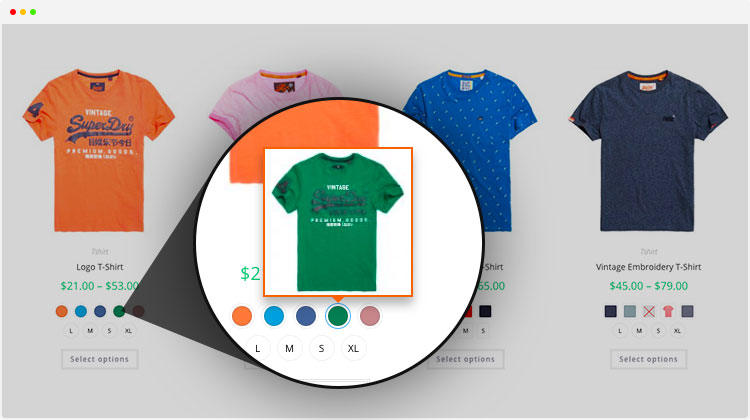
Image Tooltip
Text Tooltip
WooCommerce Variation Swatches lets you easily turn tooltips on or off for swatches displayed on archive or shop pages. Just go to Swatches Settings → Archive / Shop and use the ‘Show Tooltip on Archive’ option to enable or disable tooltips as needed.

Convert Buttons Swatches to Dropdown (If It’s needed)
Show Variation Product Stock Notice
Set More Limit To Equalize Catalog Swatches
attribute display limit
To equalize the number of variation swatches displayed on catalog pages, go to Swatches Settings under the Special Attributes section. Then, set your preferred Attribute Display Limit in the Catalog Mode settings.
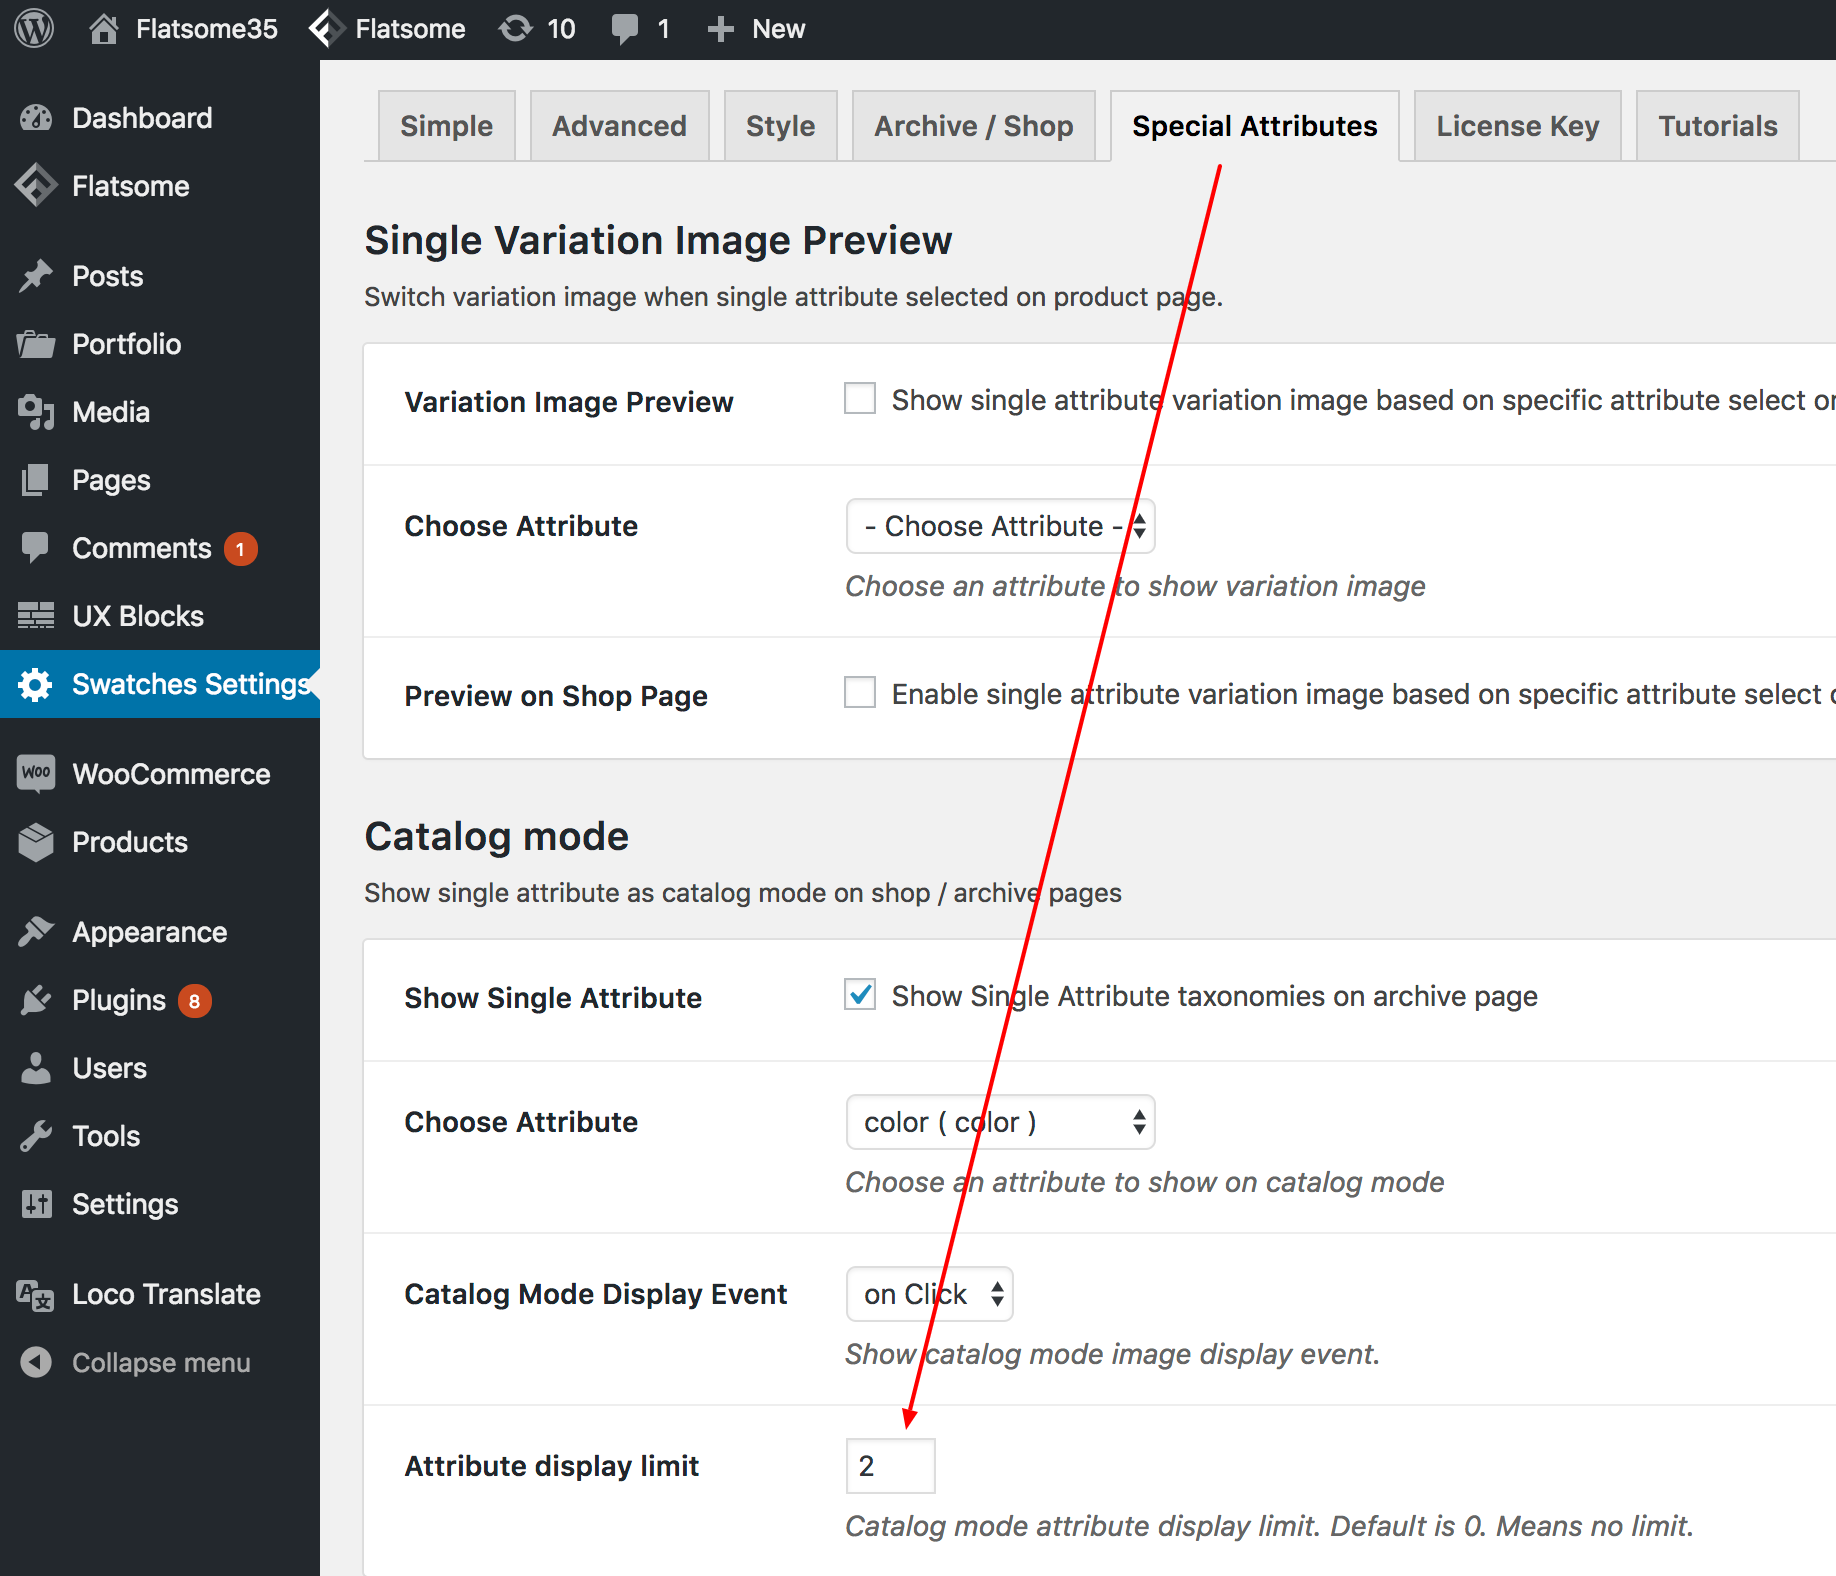
special attribute settings preview
Display Group Swatches on Product Page
Go to your WordPress dashboard and navigate to GetWooPlugins → Swatches Settings. Then click on the Group tab.
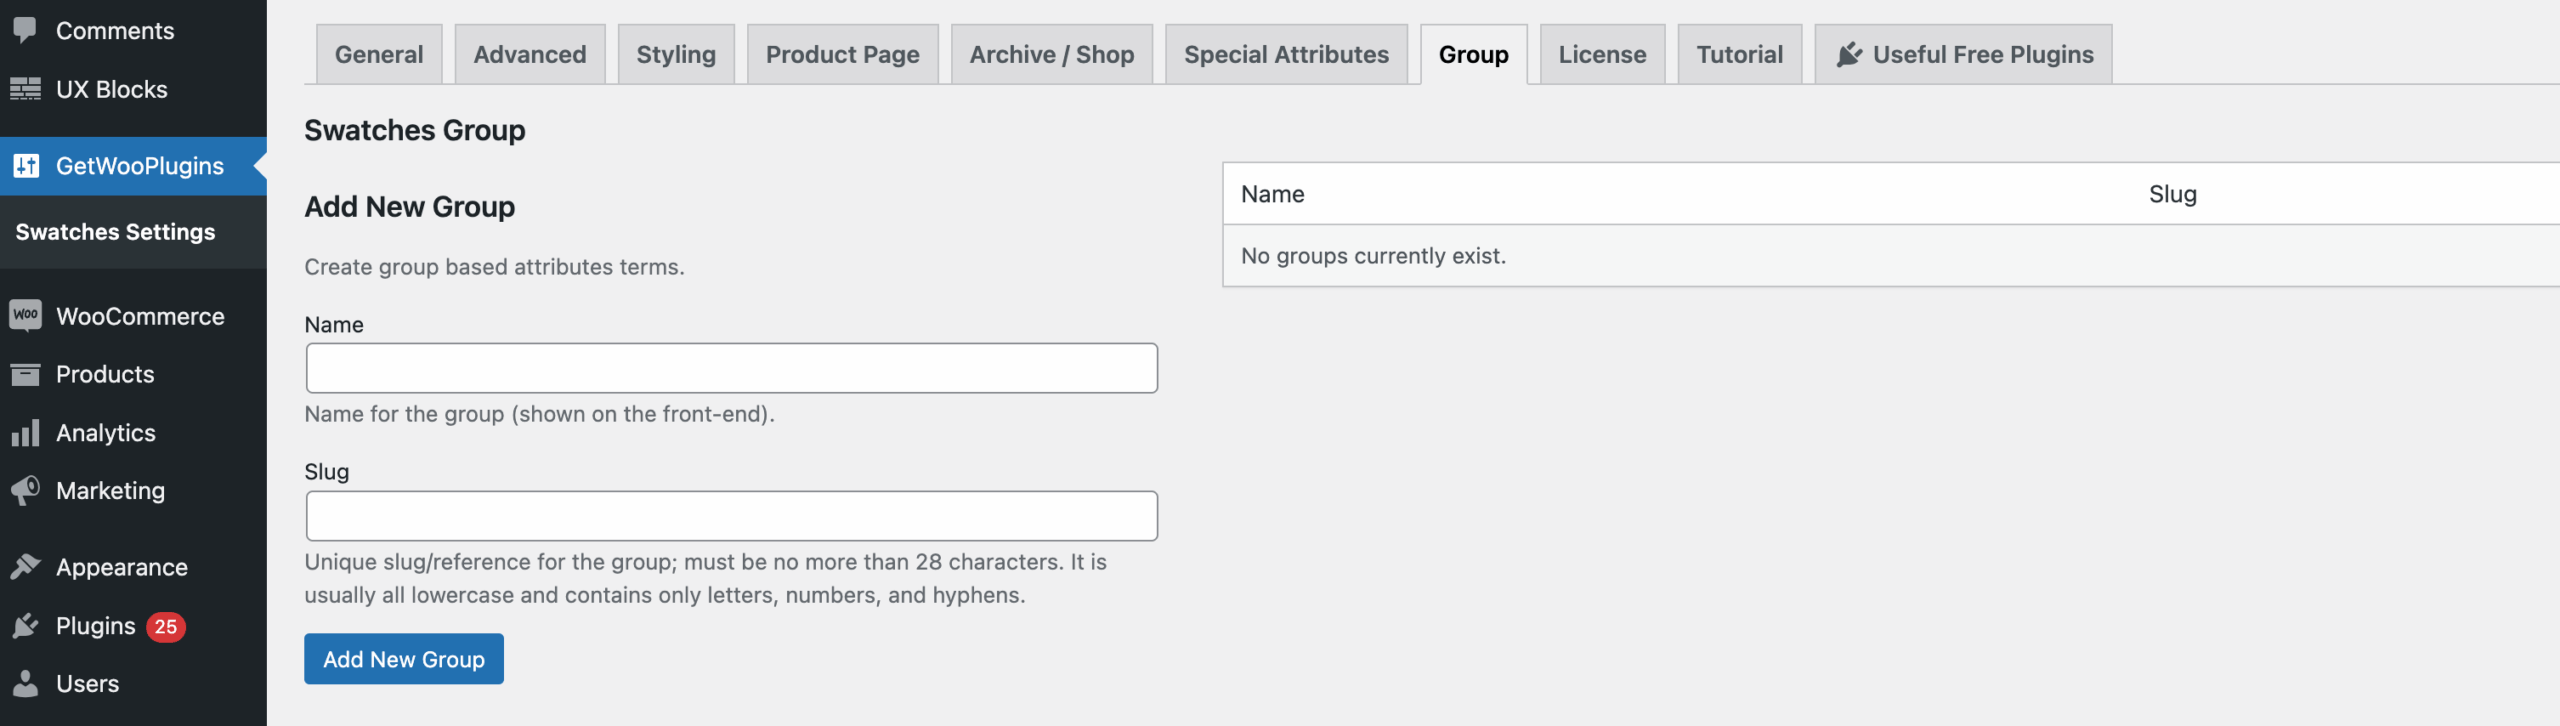
Enter a name for your swatches group. For example, I’ve named mine Dual Color & Solid Color.
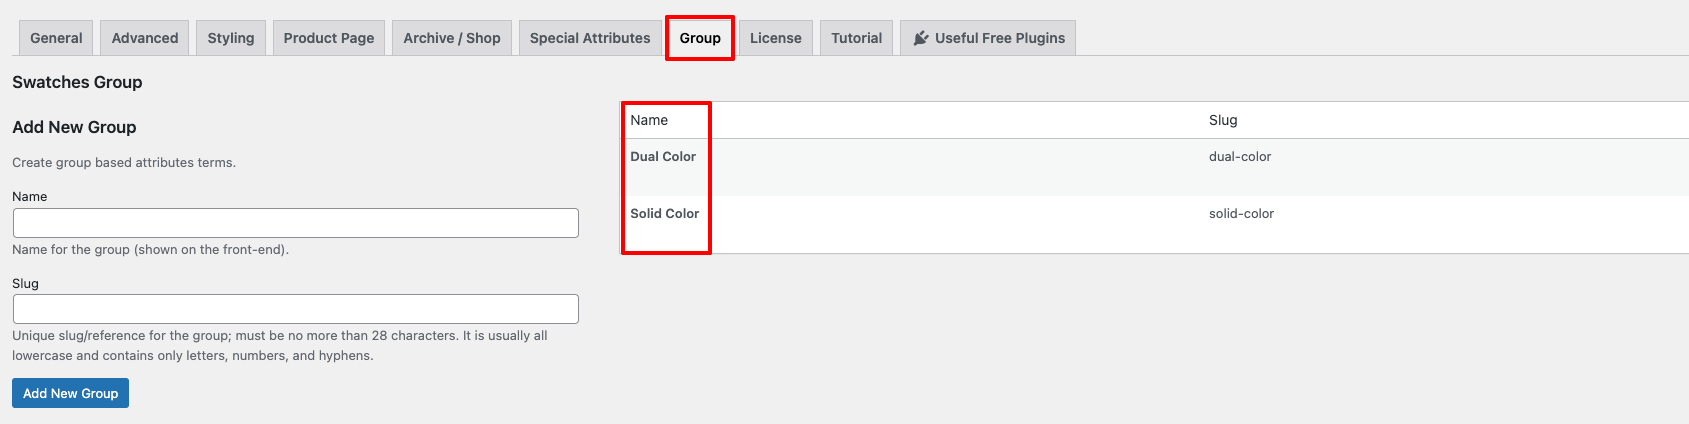
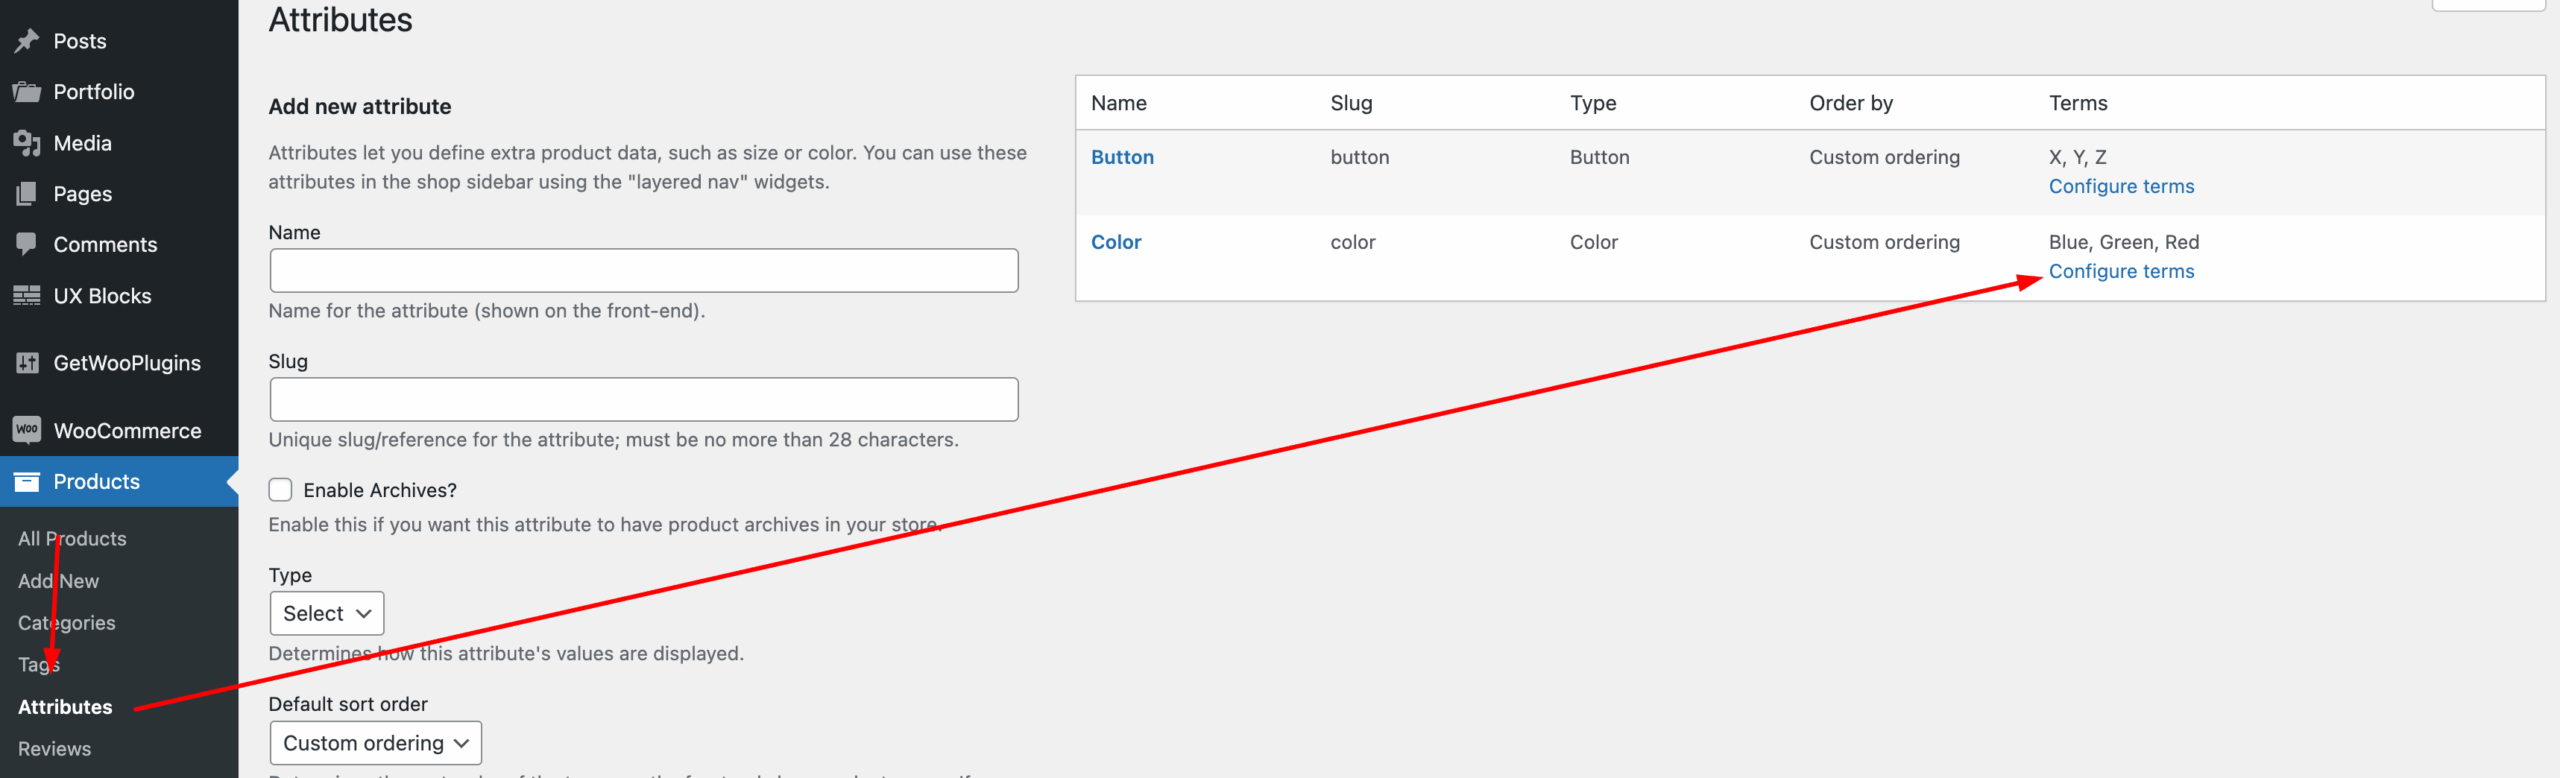
After creating the Group, Go to Products → Attributes, then click the Configure terms link for the specific global attribute you want to manage.
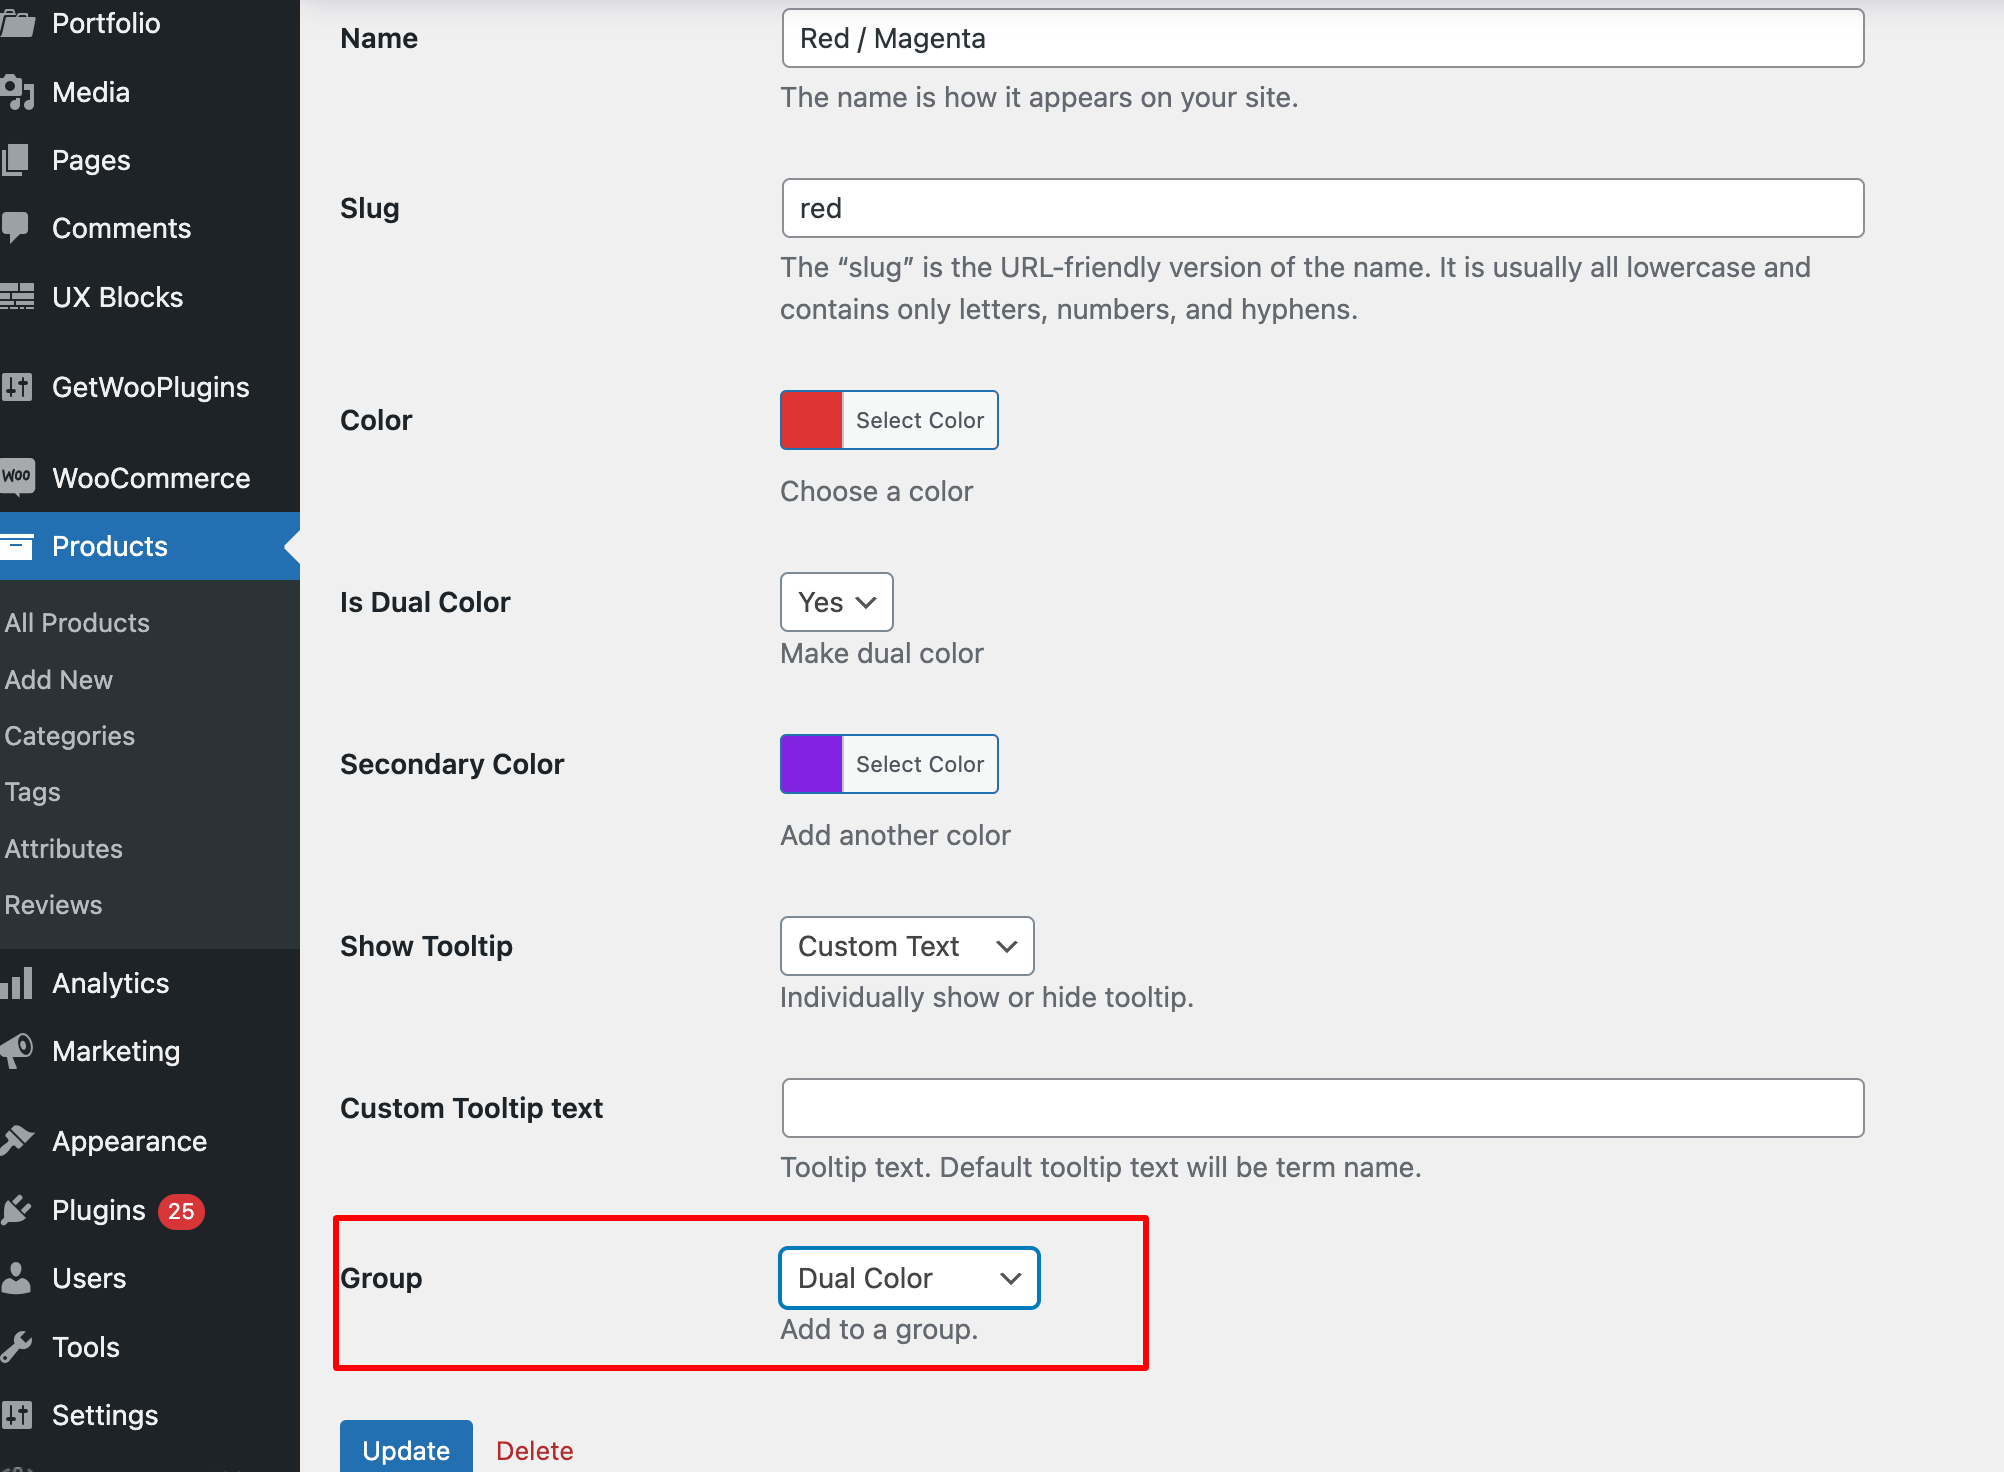
Now, select your desired variation/term to edit the option.

Scroll down to the bottom of the variation settings and choose your desired group name from the Group dropdown. Then click the update button.
Now, go back to your product page and refresh it. Look the color attribute is showing with two groups (Solid Color & Dual Color) horizontally.

Group Swatches Alignment on Product Page
Though the group swatches are aligned horizontally on product page by default, you can align it in a vertical style too.
For setting up this style, Go to Product Page > Group Swatches align > Select your desired choice. In my case, I am selecting vertical position > Click on save changes button.
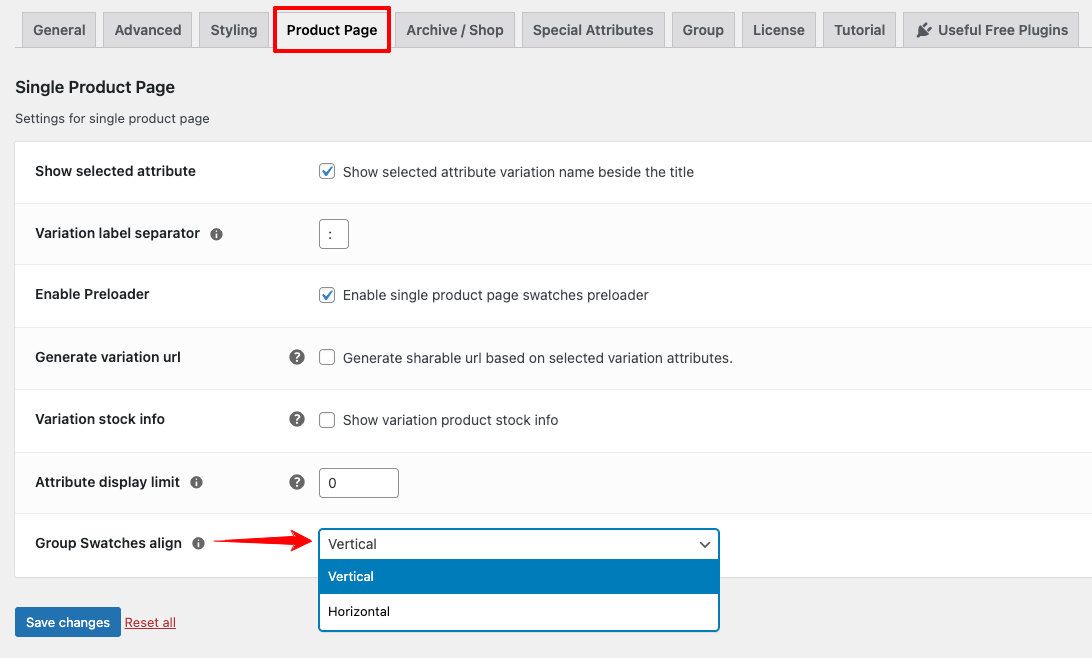
Come back to your product page and refresh it now. Wow! look, the color attribute is showing vertically.
Clear Button Display Setting on Archive / Shop
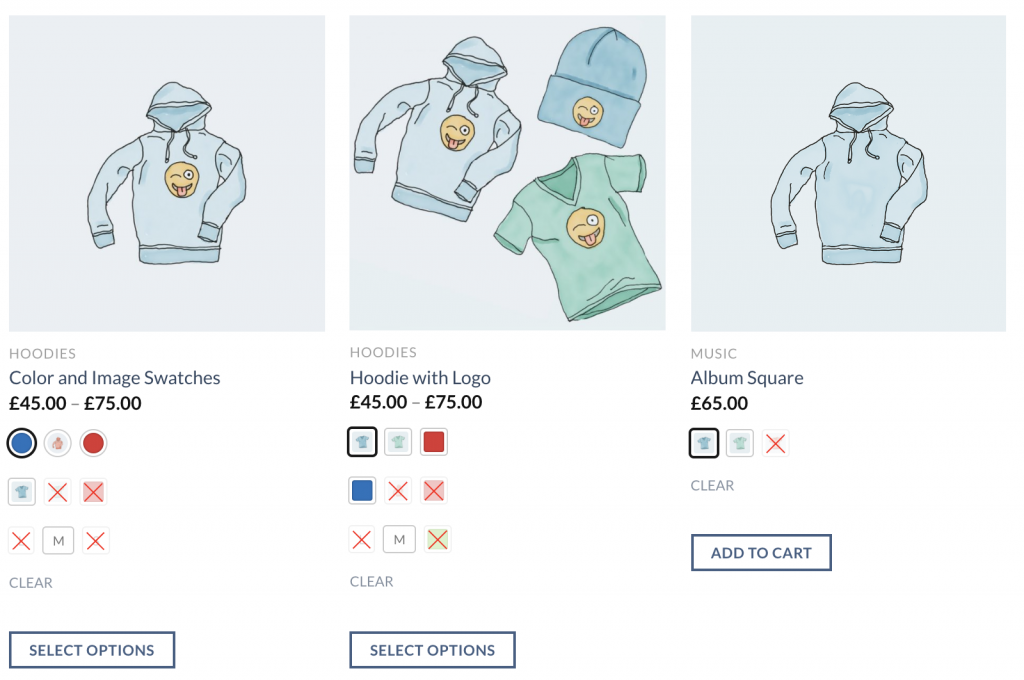
The Clear option lets customers reset their selected attribute variations. The WooCommerce Variation Swatches plugin provides a setting to enable or disable this Clear button on the archive/shop page.
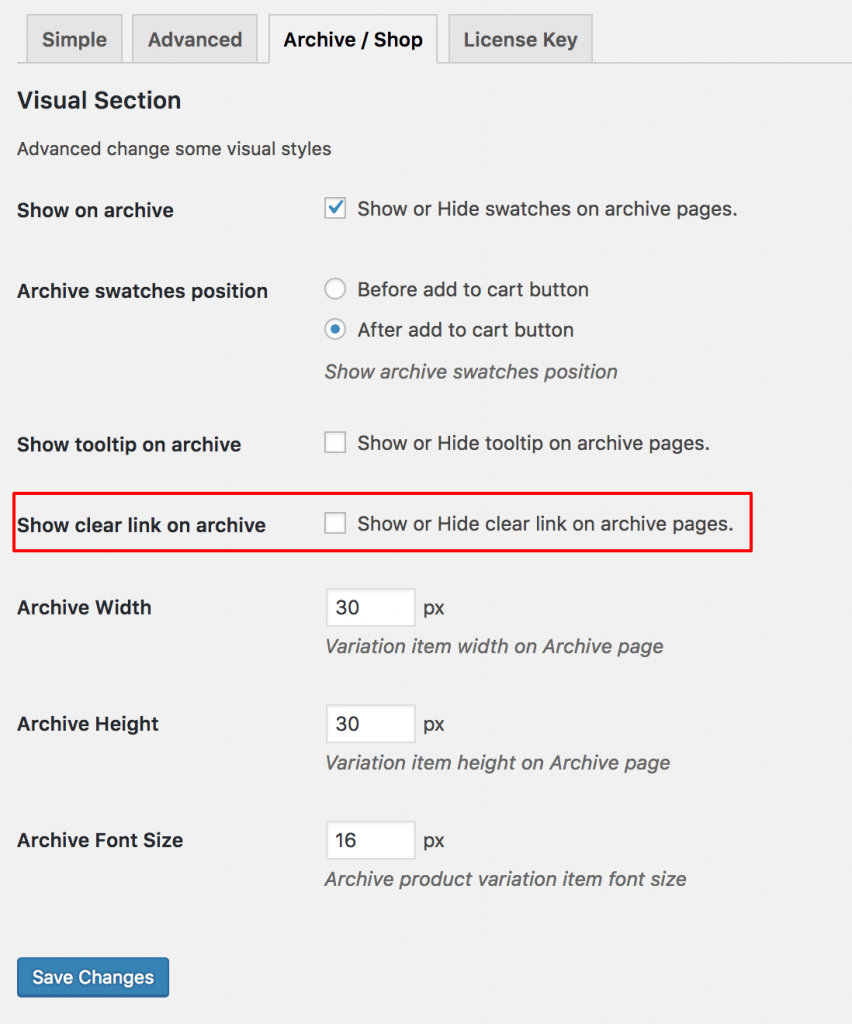
The Clear button lets customers reset the selected attribute variation. WooCommerce Variation Swatches provides a simple option to enable or disable this button on archive pages. If enabled, the Clear button will appear as shown below.
Keep Attribute Variation Selected on Product Page After Choosing from Catalog page Like Walmart
Round and Square Swatches
Square Swatches Preview
Round Swatches Preview
Square & Round Swatches Preview (premium Feature)
Video Tutorial
Global Settings
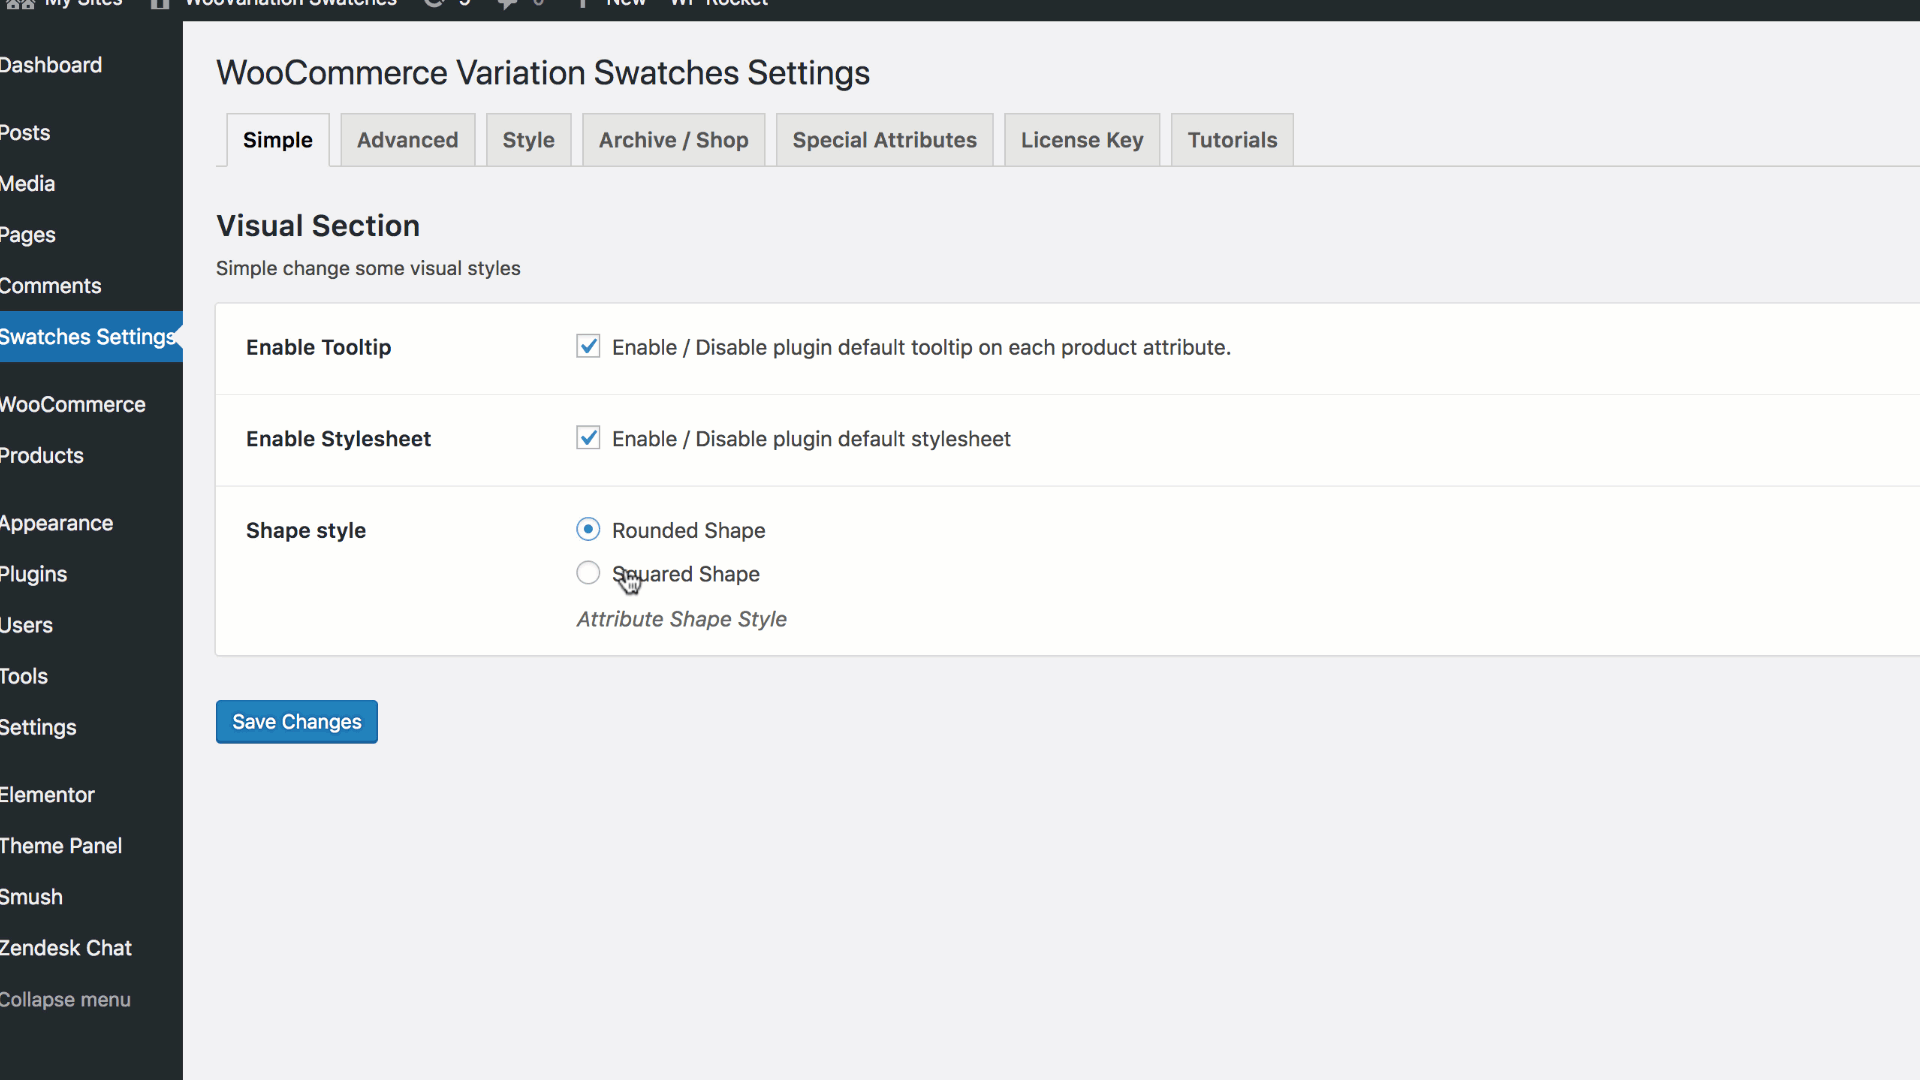
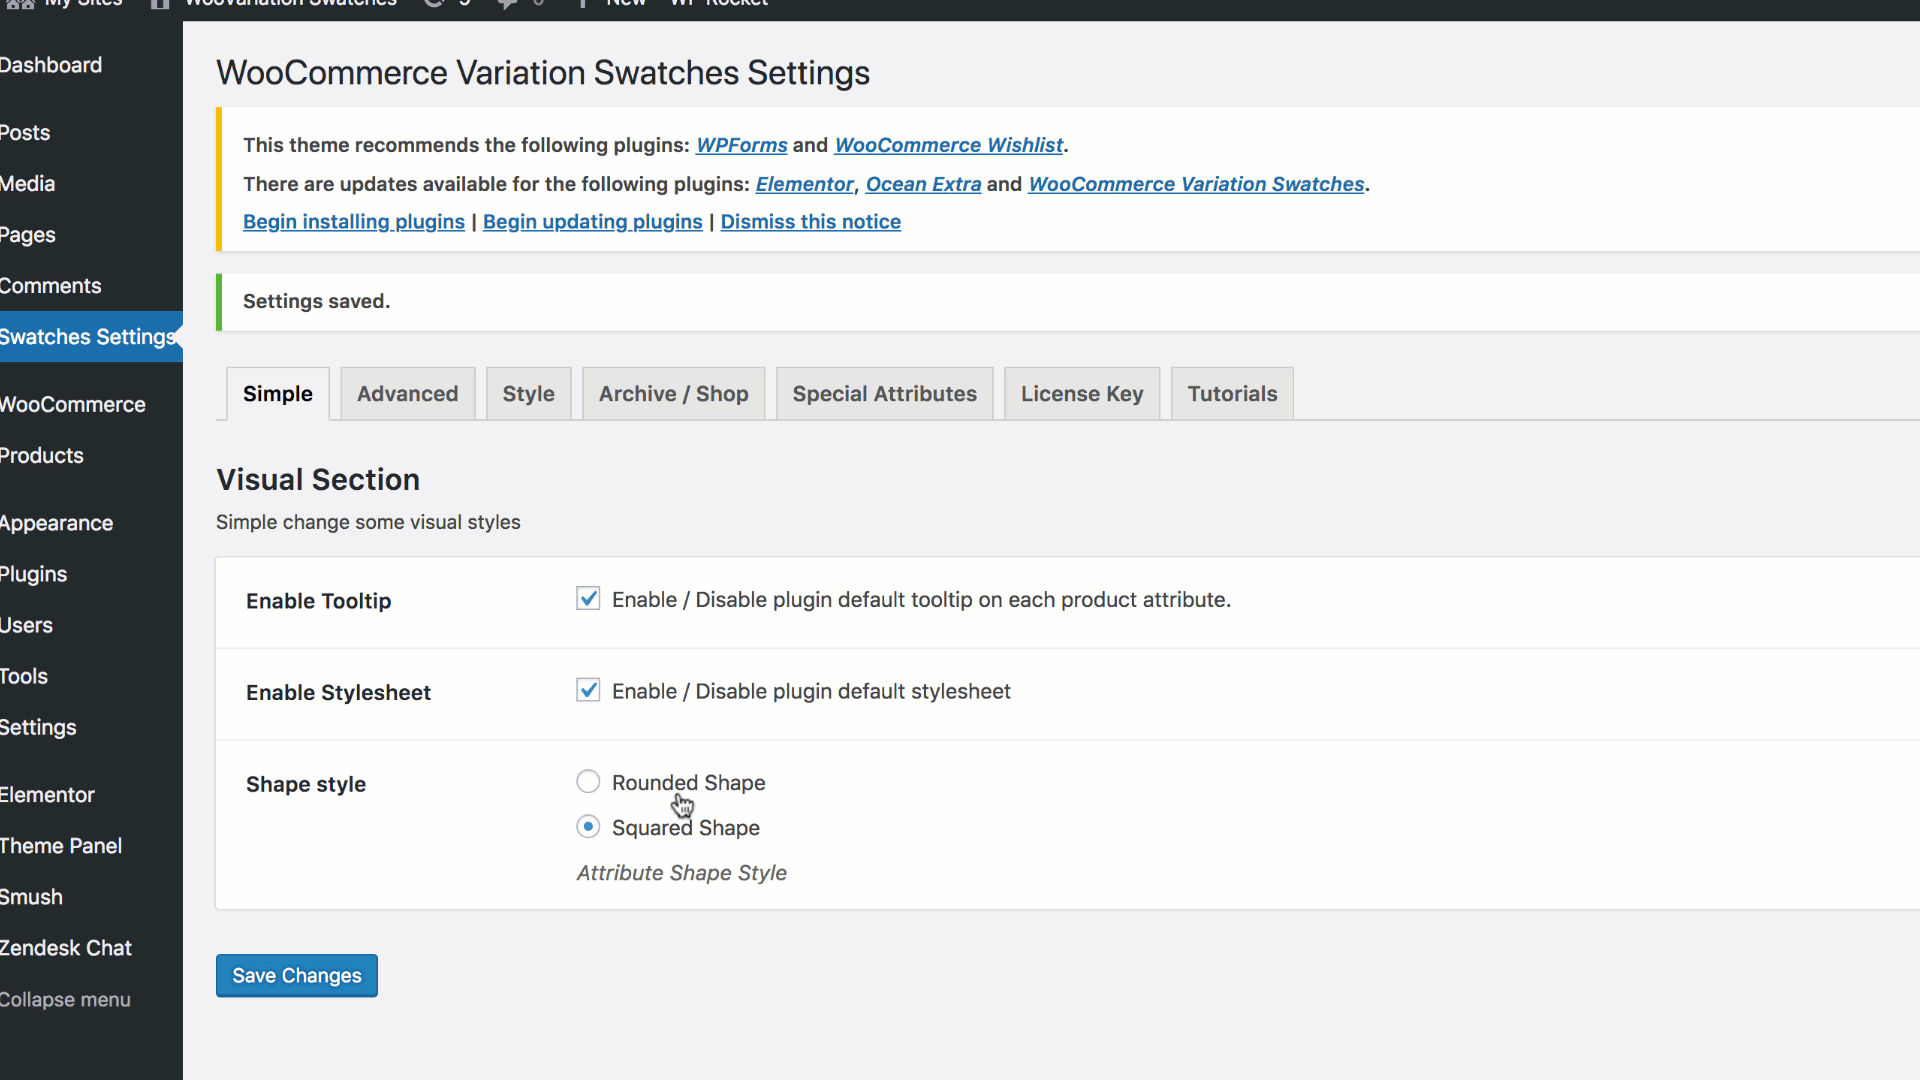
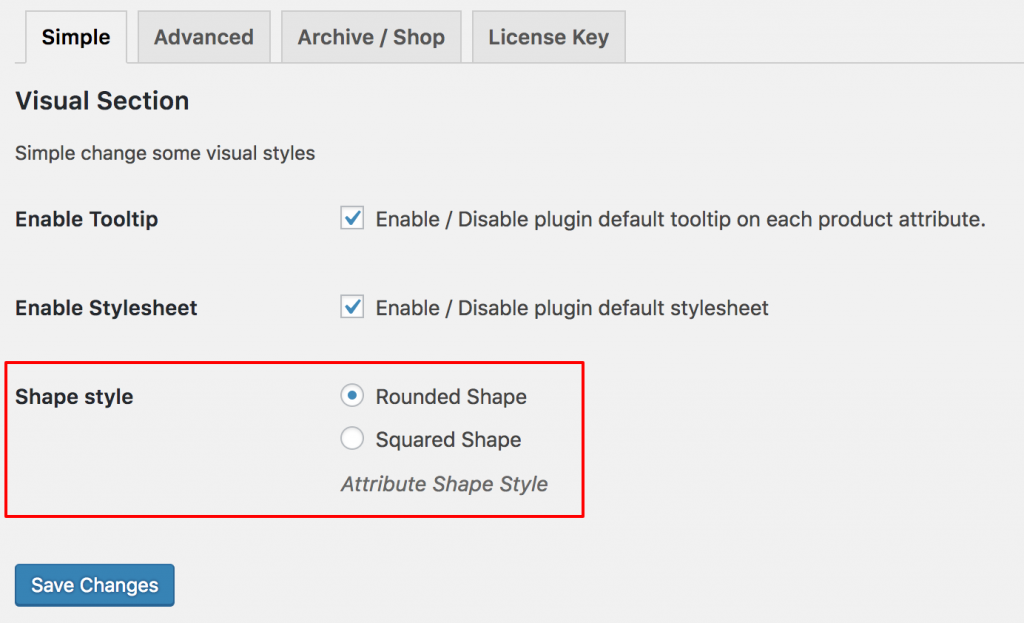
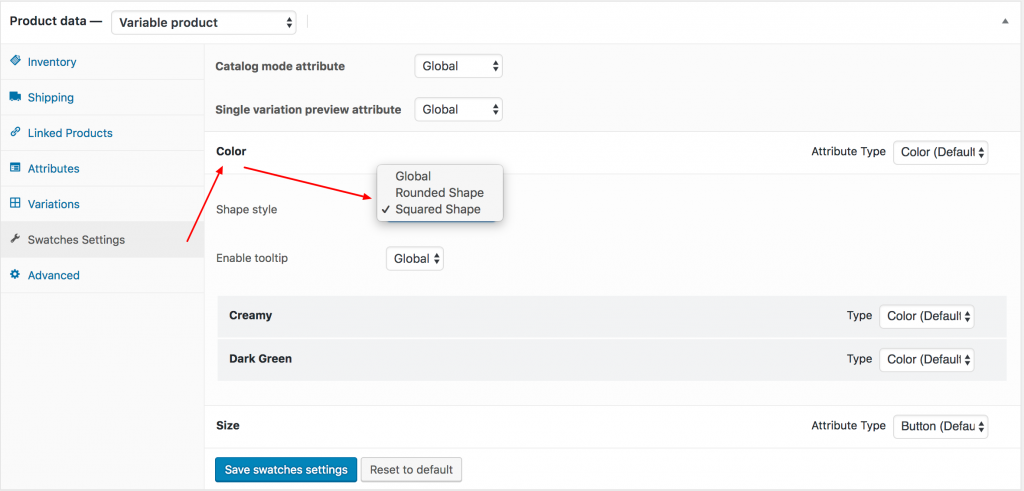
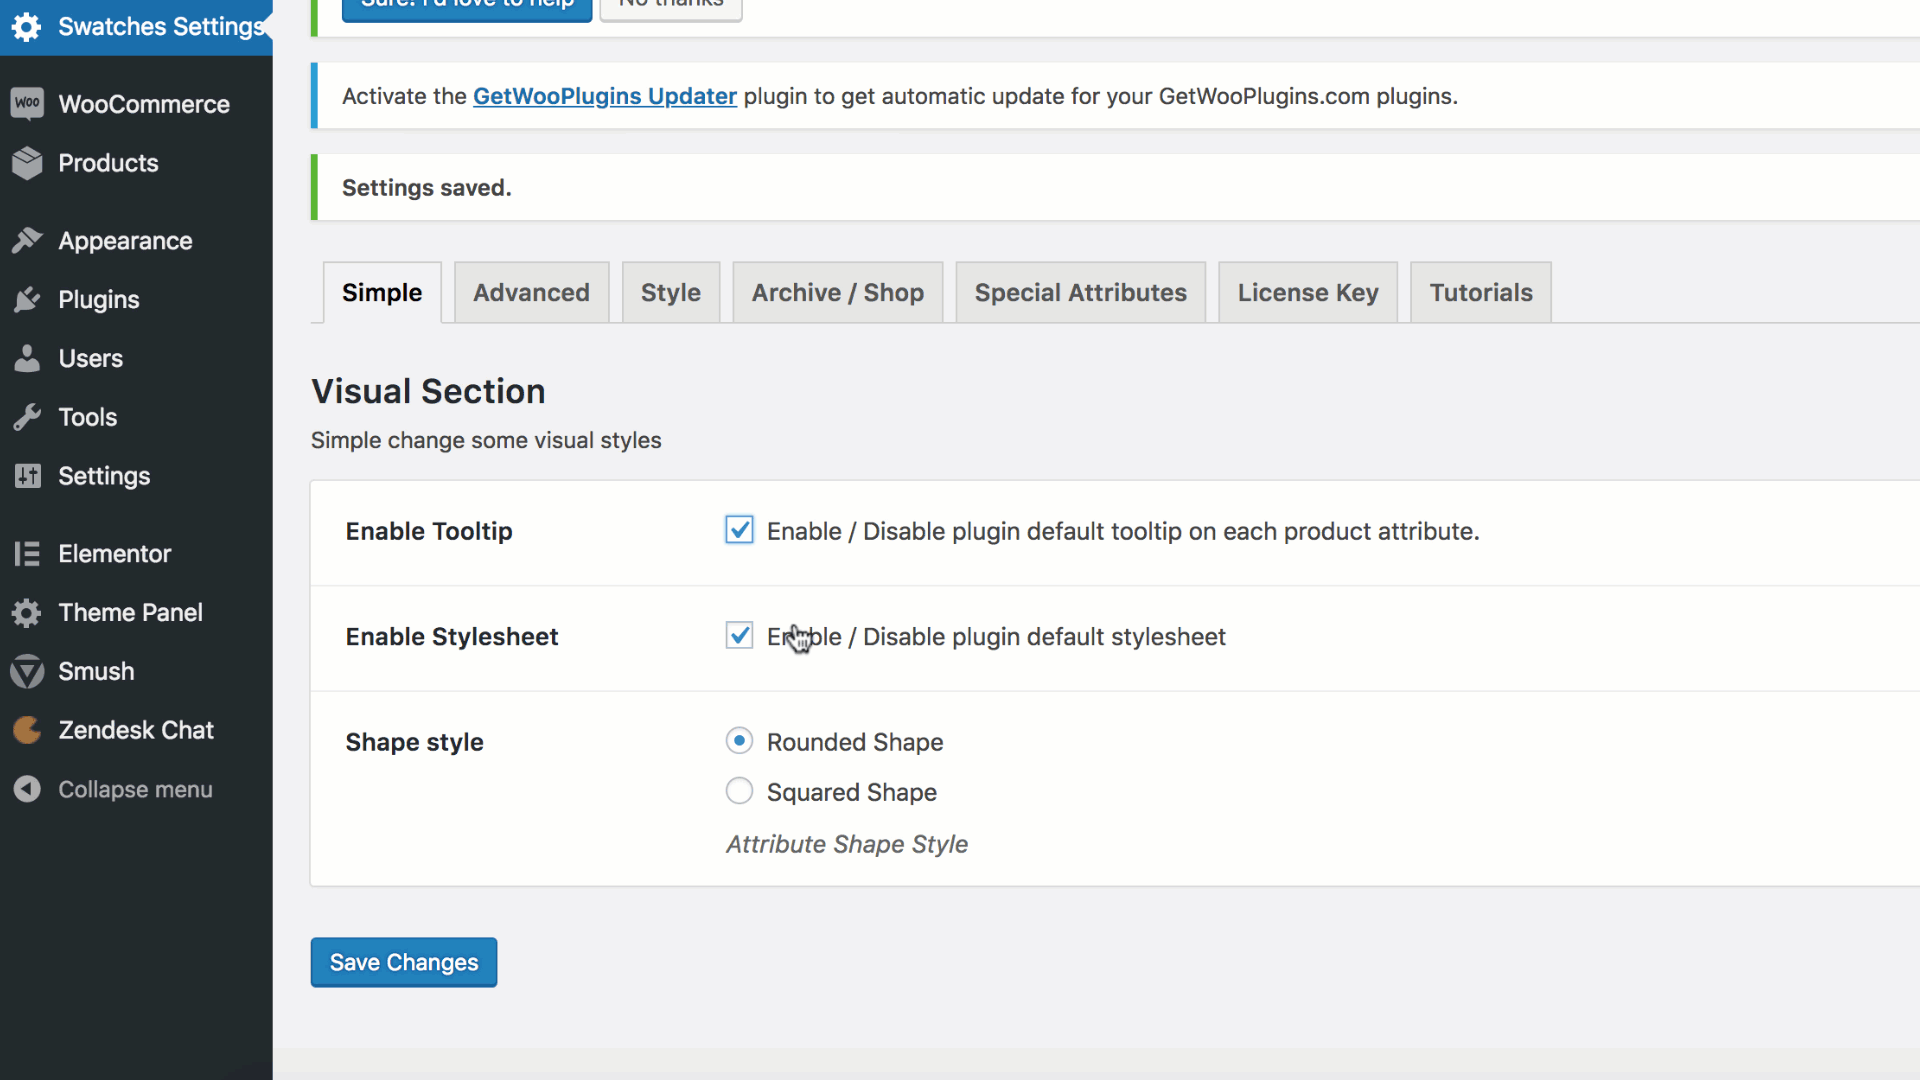
Variation swatches can be displayed in two different shapes: Round and Square. You can switch between these shapes globally by navigating to Swatches Settings >> Simple in the plugin backend.
Individual Product Attribute Based Setting
Step 1: Plugin Setup
This is a premium feature of the WooCommerce Variation Swatches plugin. Ensure you have the WooCommerce Variation Swatches Pro plugin installed alongside the free version.
Step 2: Configure Global Settings
When you choose Round or Square shape in Swatches Settings → Simple, it applies the style globally to all store attributes. If you’ve set Round shape globally but want a specific product attribute to appear in Square shape, you can override this setting in the product edit mode under Swatches Settings → Settings.
How To Enable Image Tooltip
Frontend Preview
Video Tutorial
Step 1: Plugin Setup
This is a premium feature of the WooCommerce Variation Swatches plugin. Ensure you have the WooCommerce Variation Swatches Pro plugin installed alongside the free version.
Step 2: Image Tooltip Setup
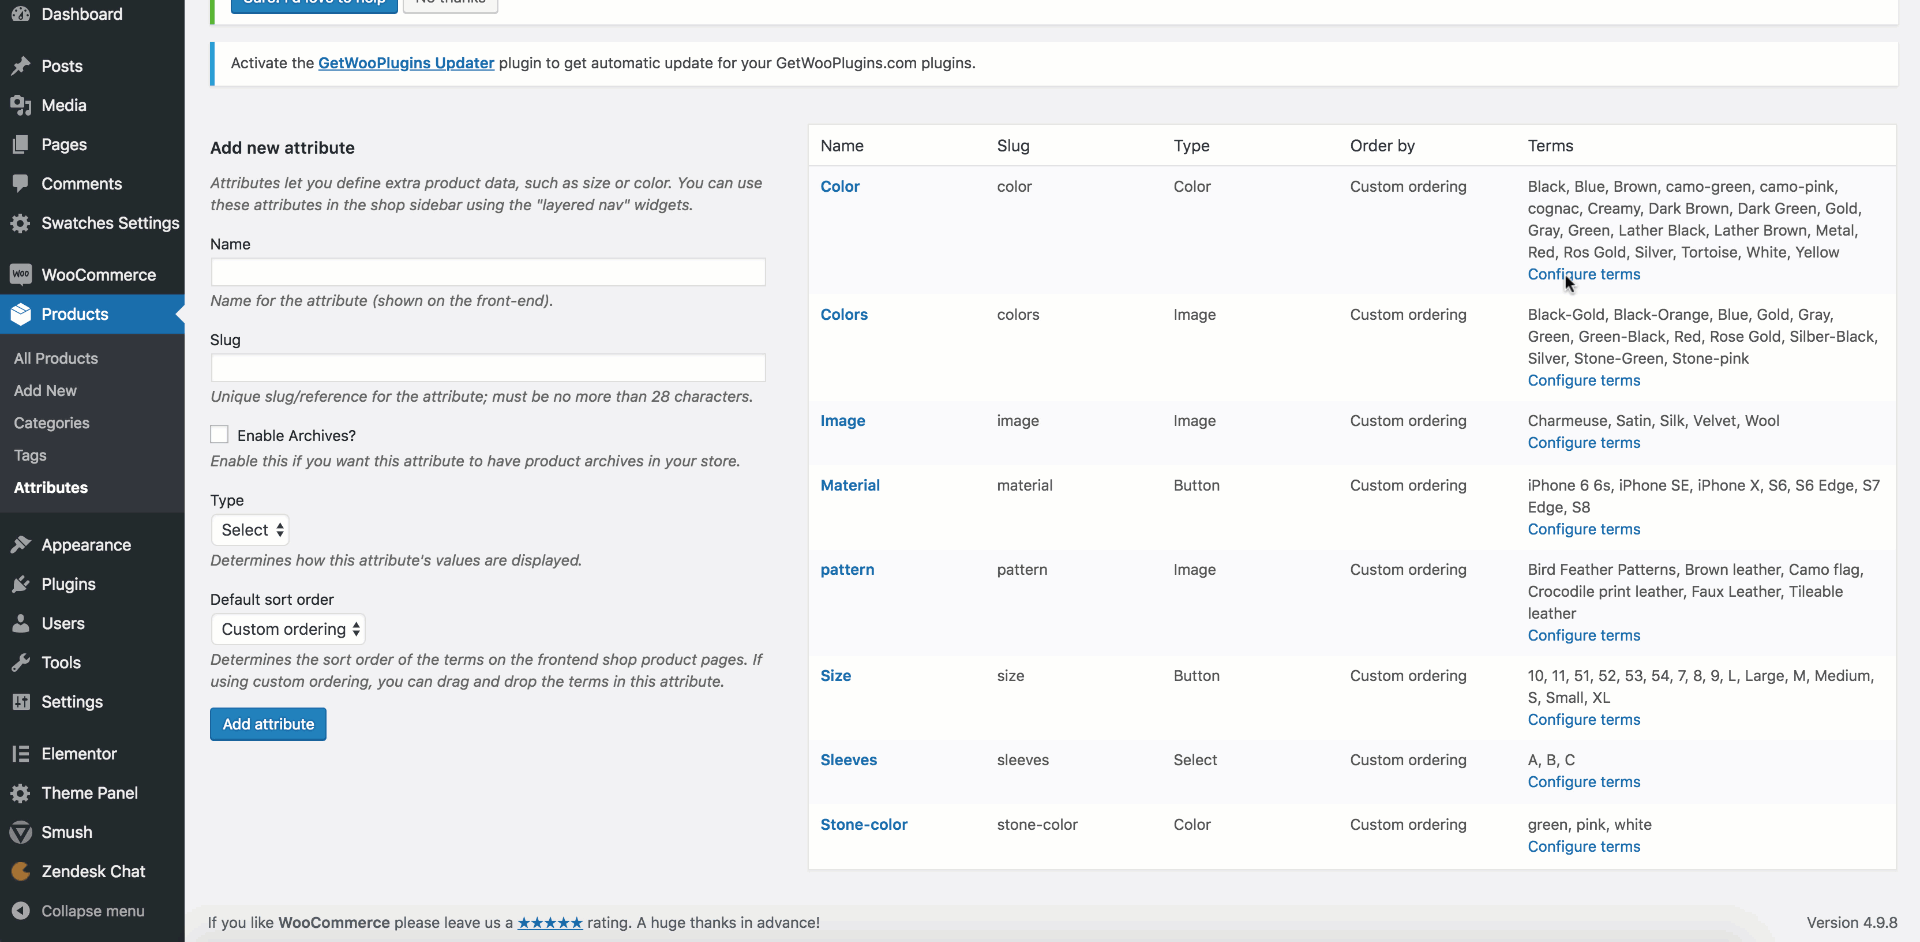
Go to Products → Attributes and click Configure Terms for your desired attribute. Inside the variation edit mode, add an image for the tooltip by using the Tooltip Image setting and clicking the Upload/Add Image button.
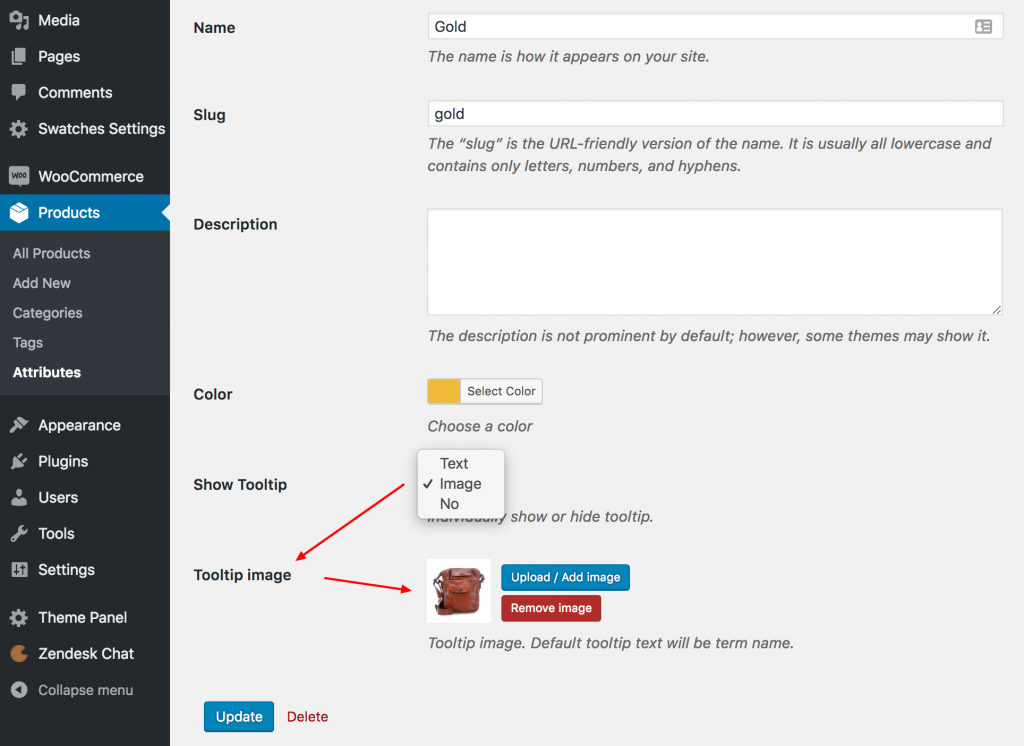
Now, any product linked to this variation will display the selected image as a tooltip across the store.
Individual Product Settings
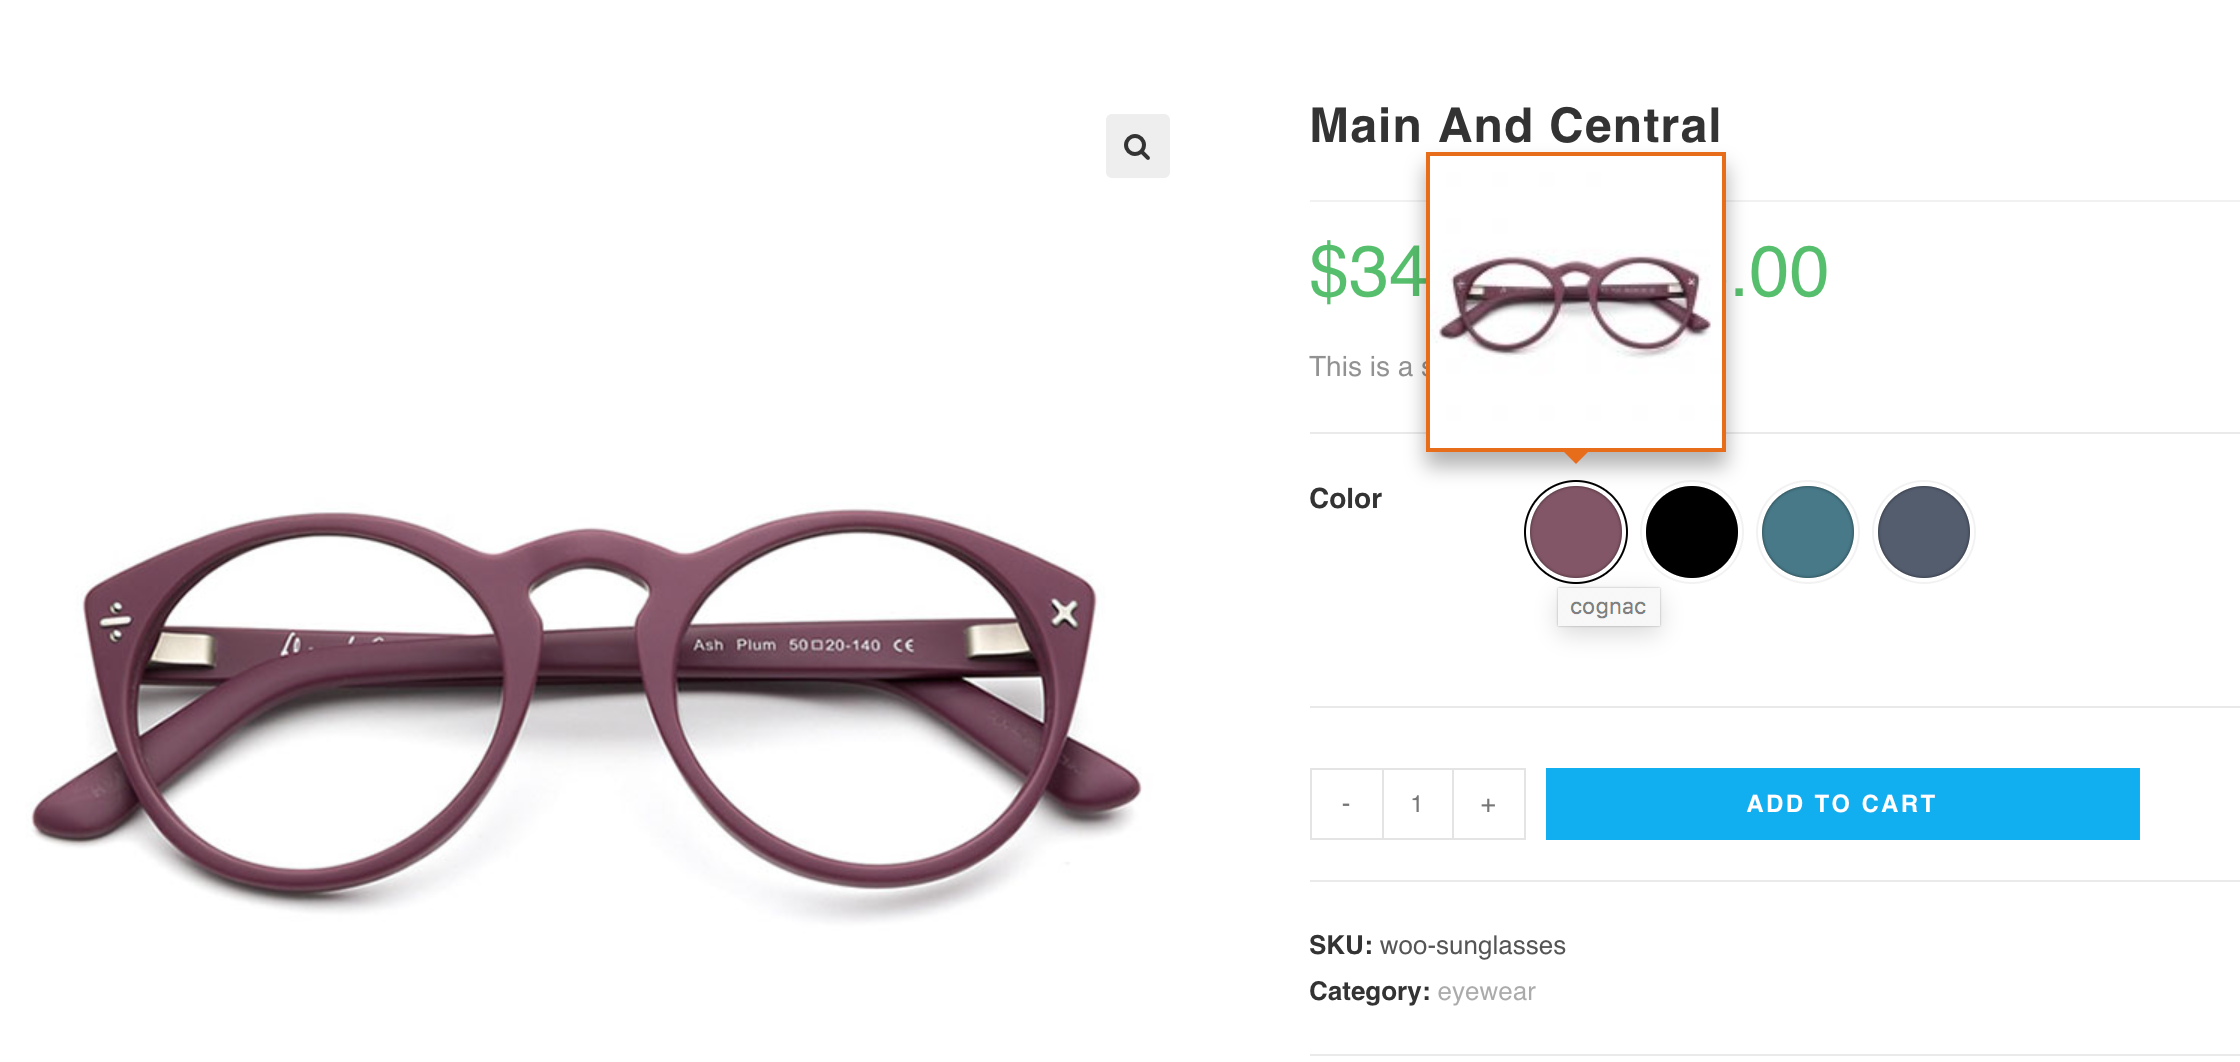
If you want to add tooltip images for variations on a per-product basis, WooCommerce Variation Swatches provides this option. To do this, open the product in edit mode and go to the Swatches Settings tab under Product Data.

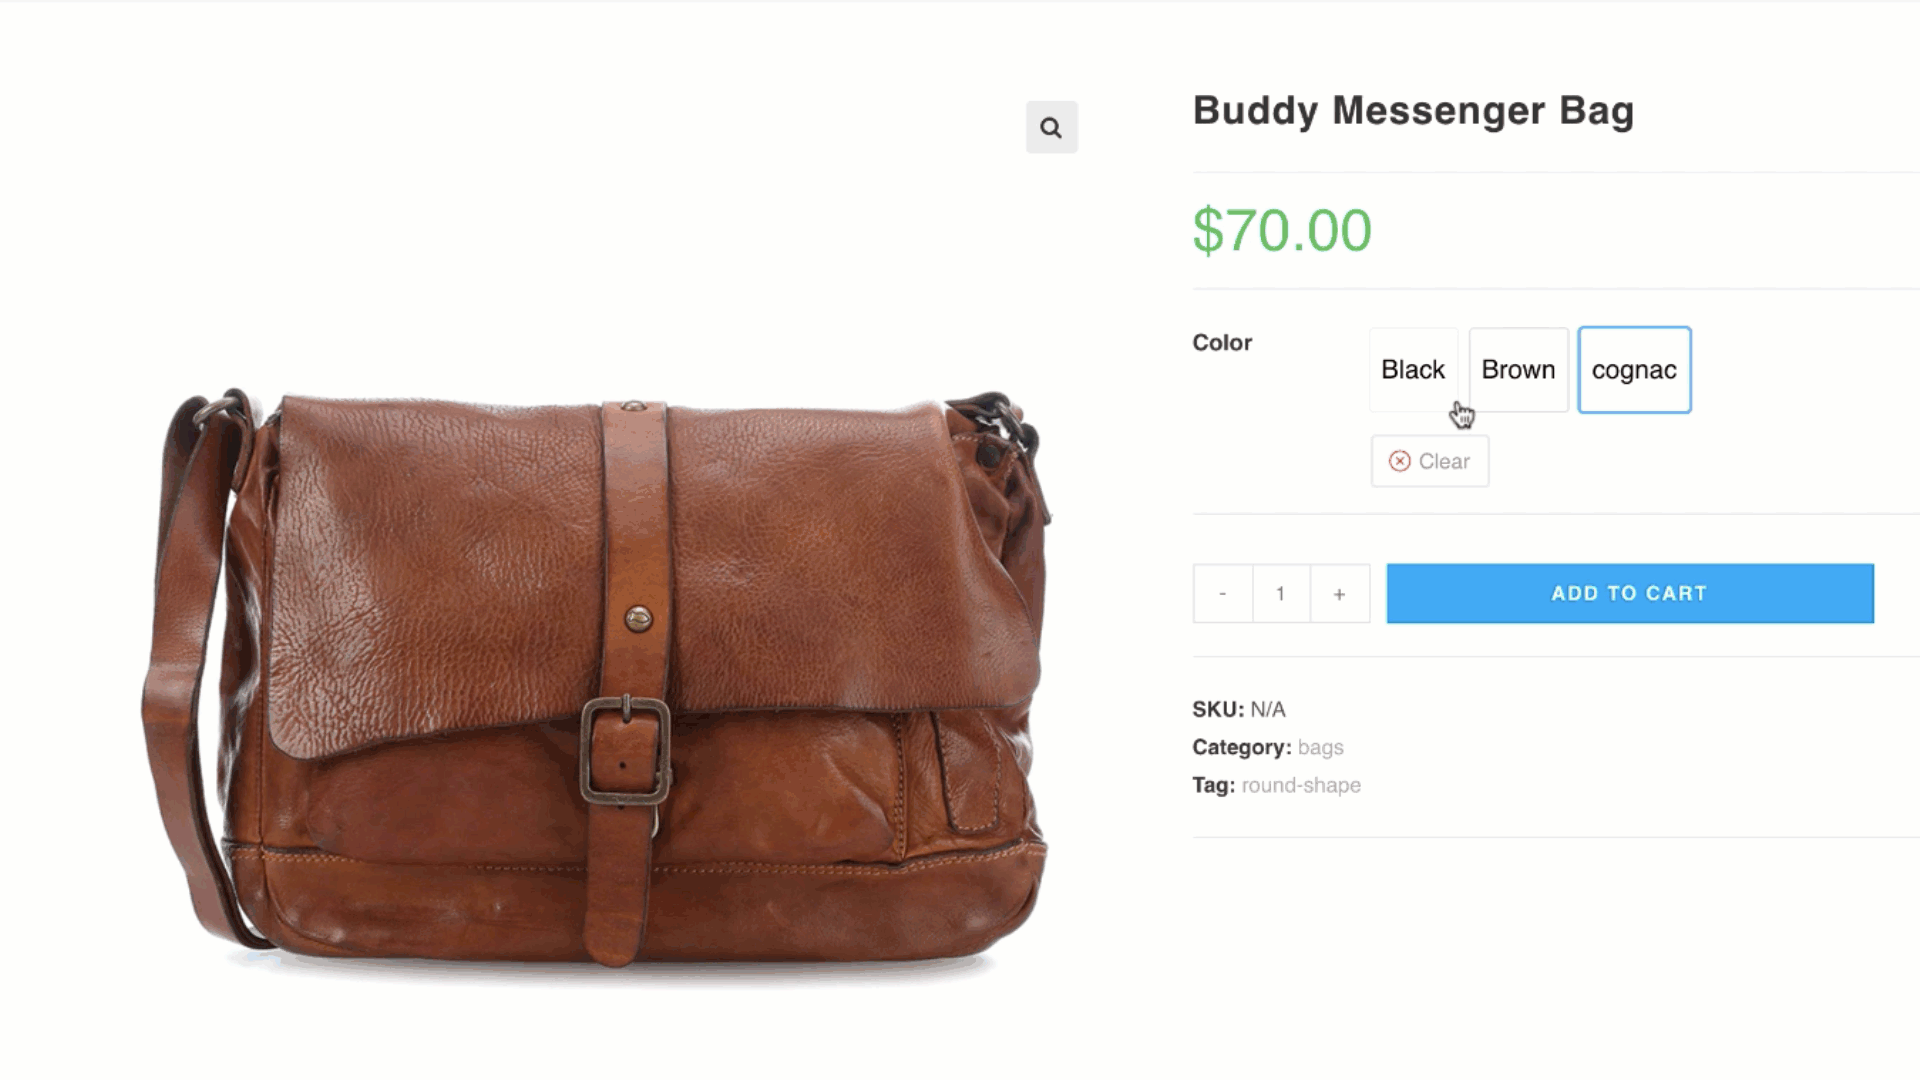
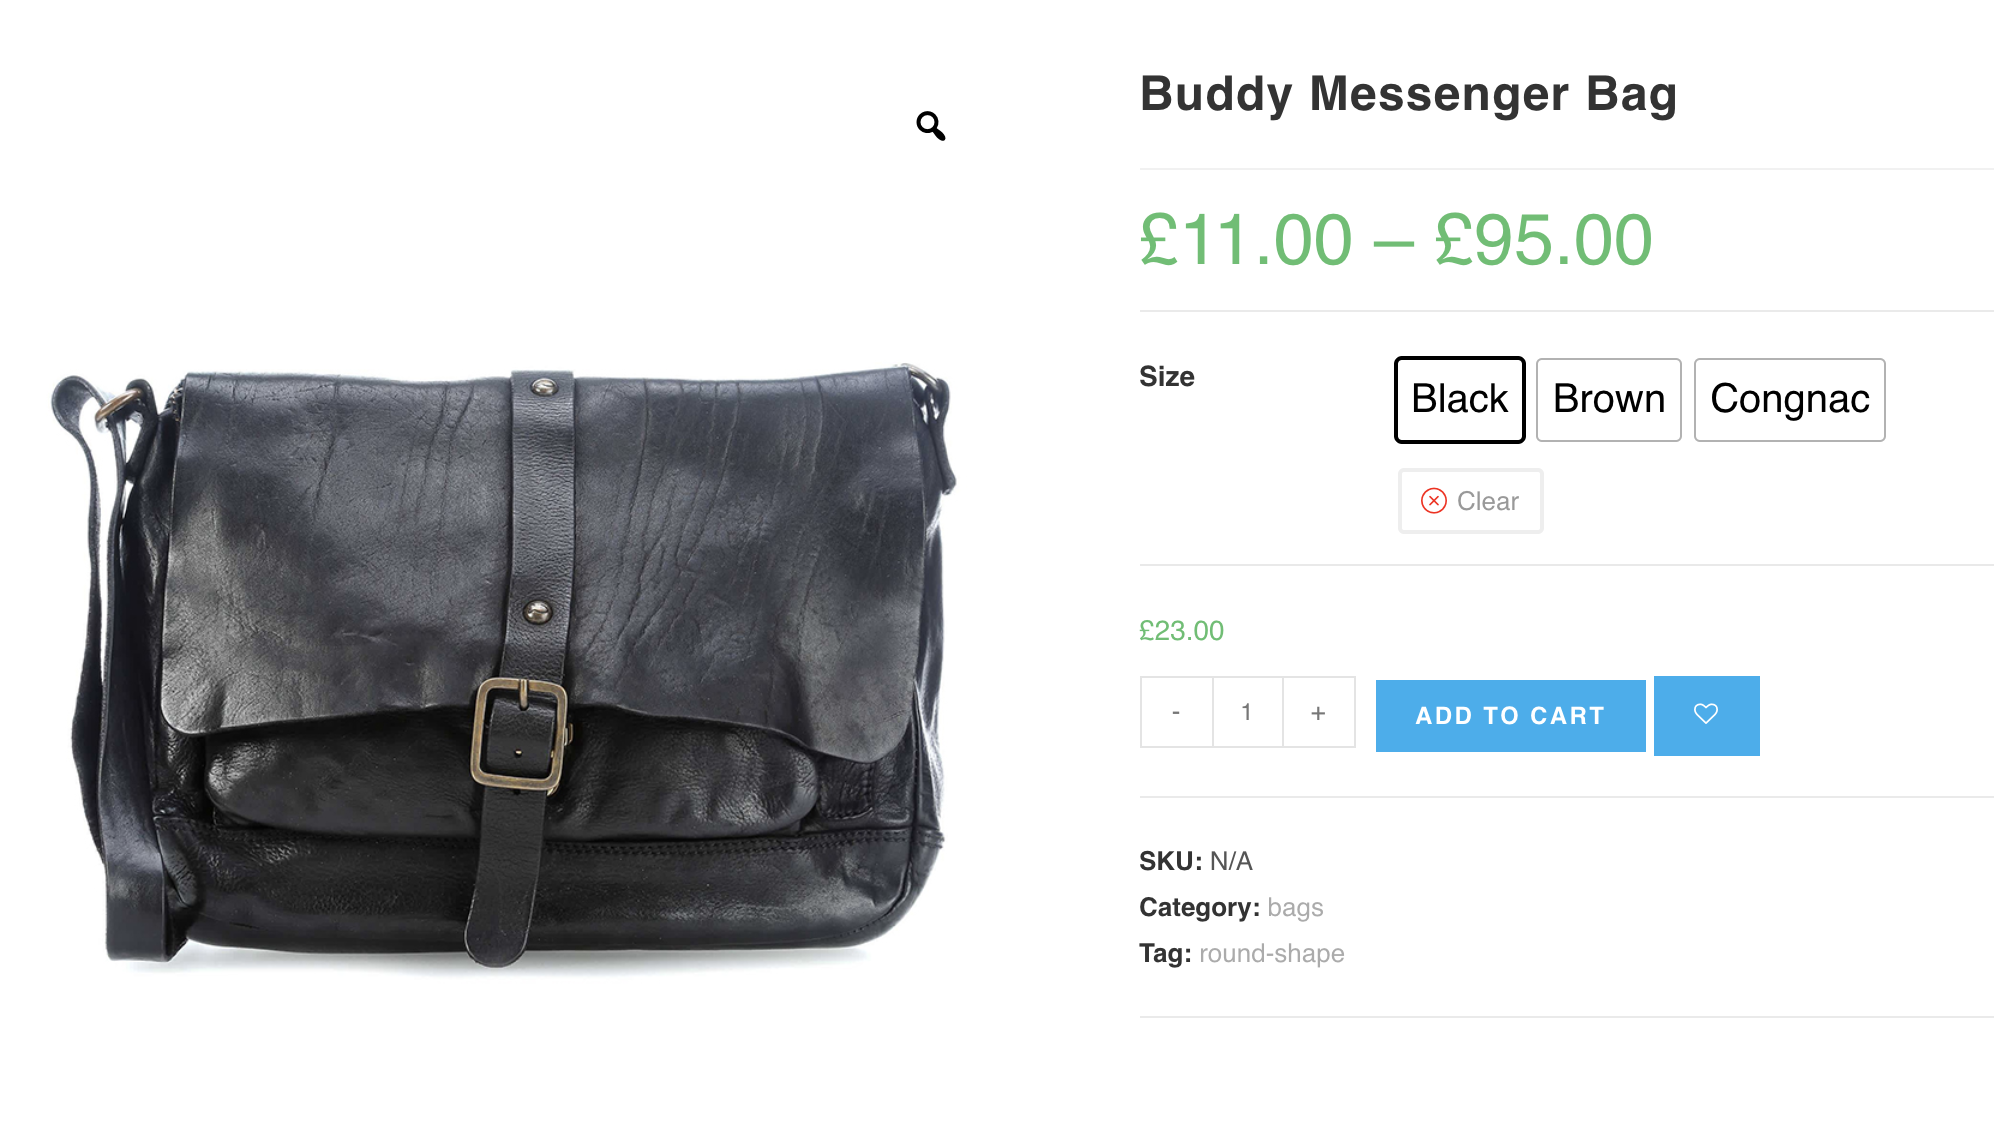
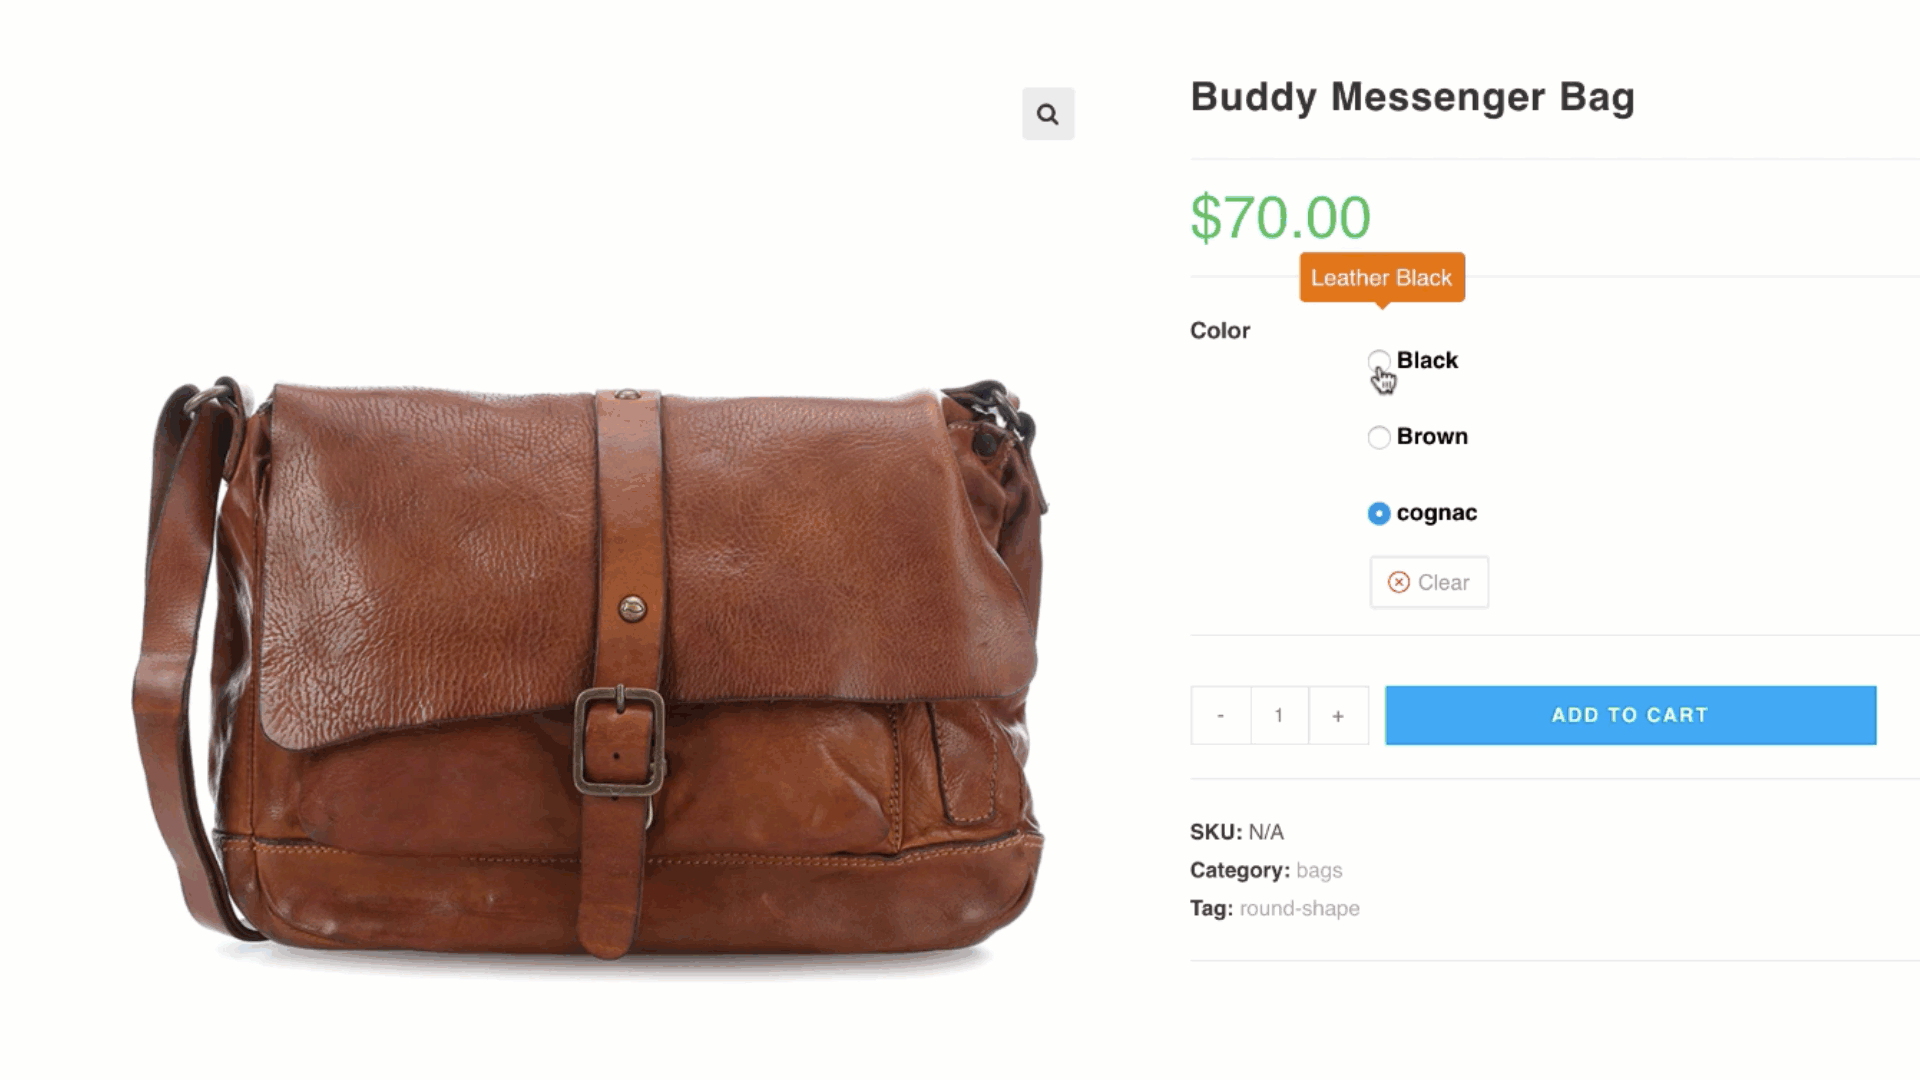
As shown with the Cognac variation, I’ve added a new tooltip image specifically for this product variation. This will override the globally set tooltip image from Products → Attributes. After this, the frontend will appear as shown in the image.
How To Enable Text Tooltip
How To Disable Tooltip Globally
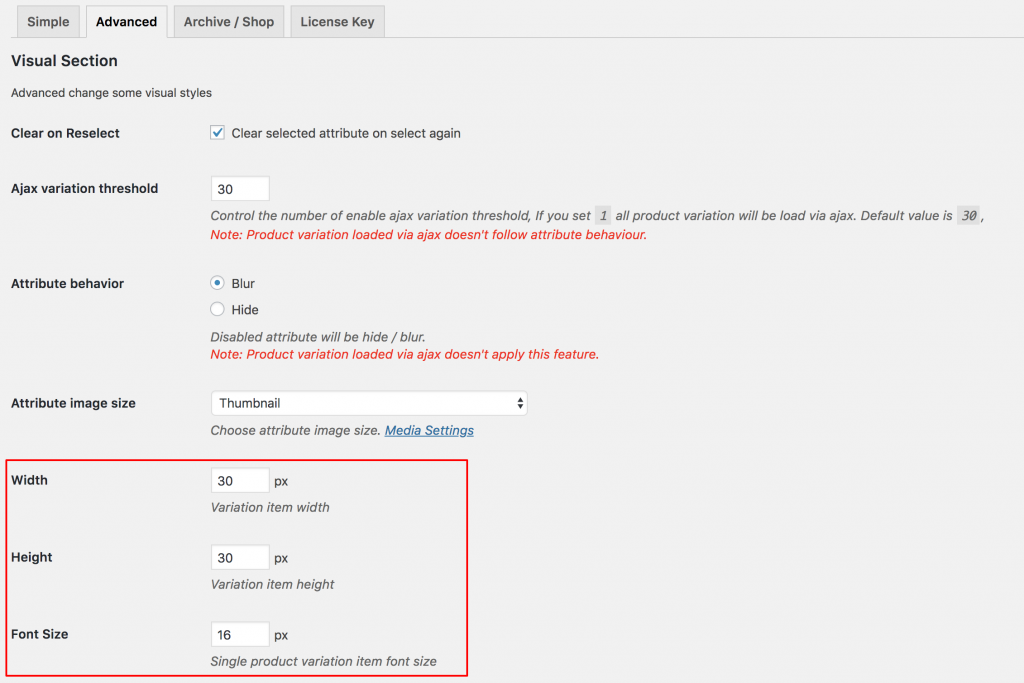
Customize Swatches Width, Height and Font Size (Advanced)
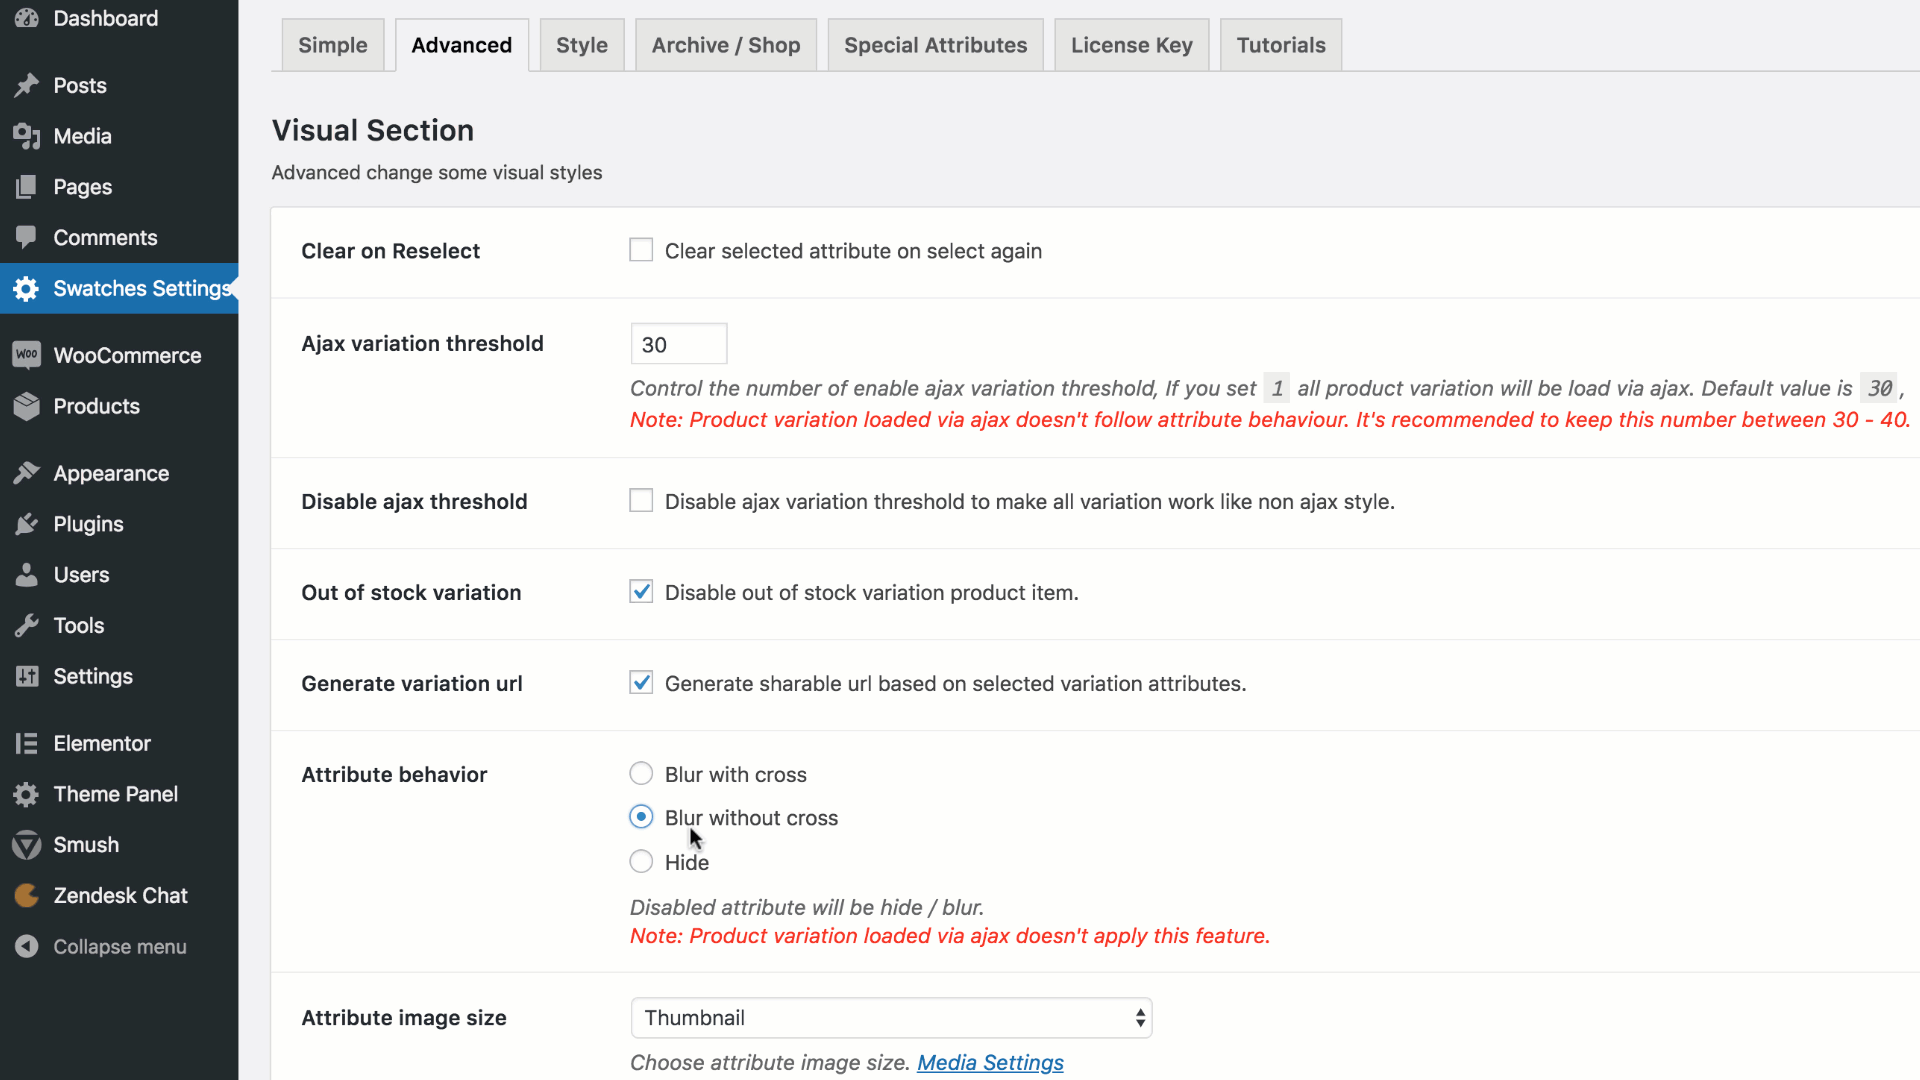
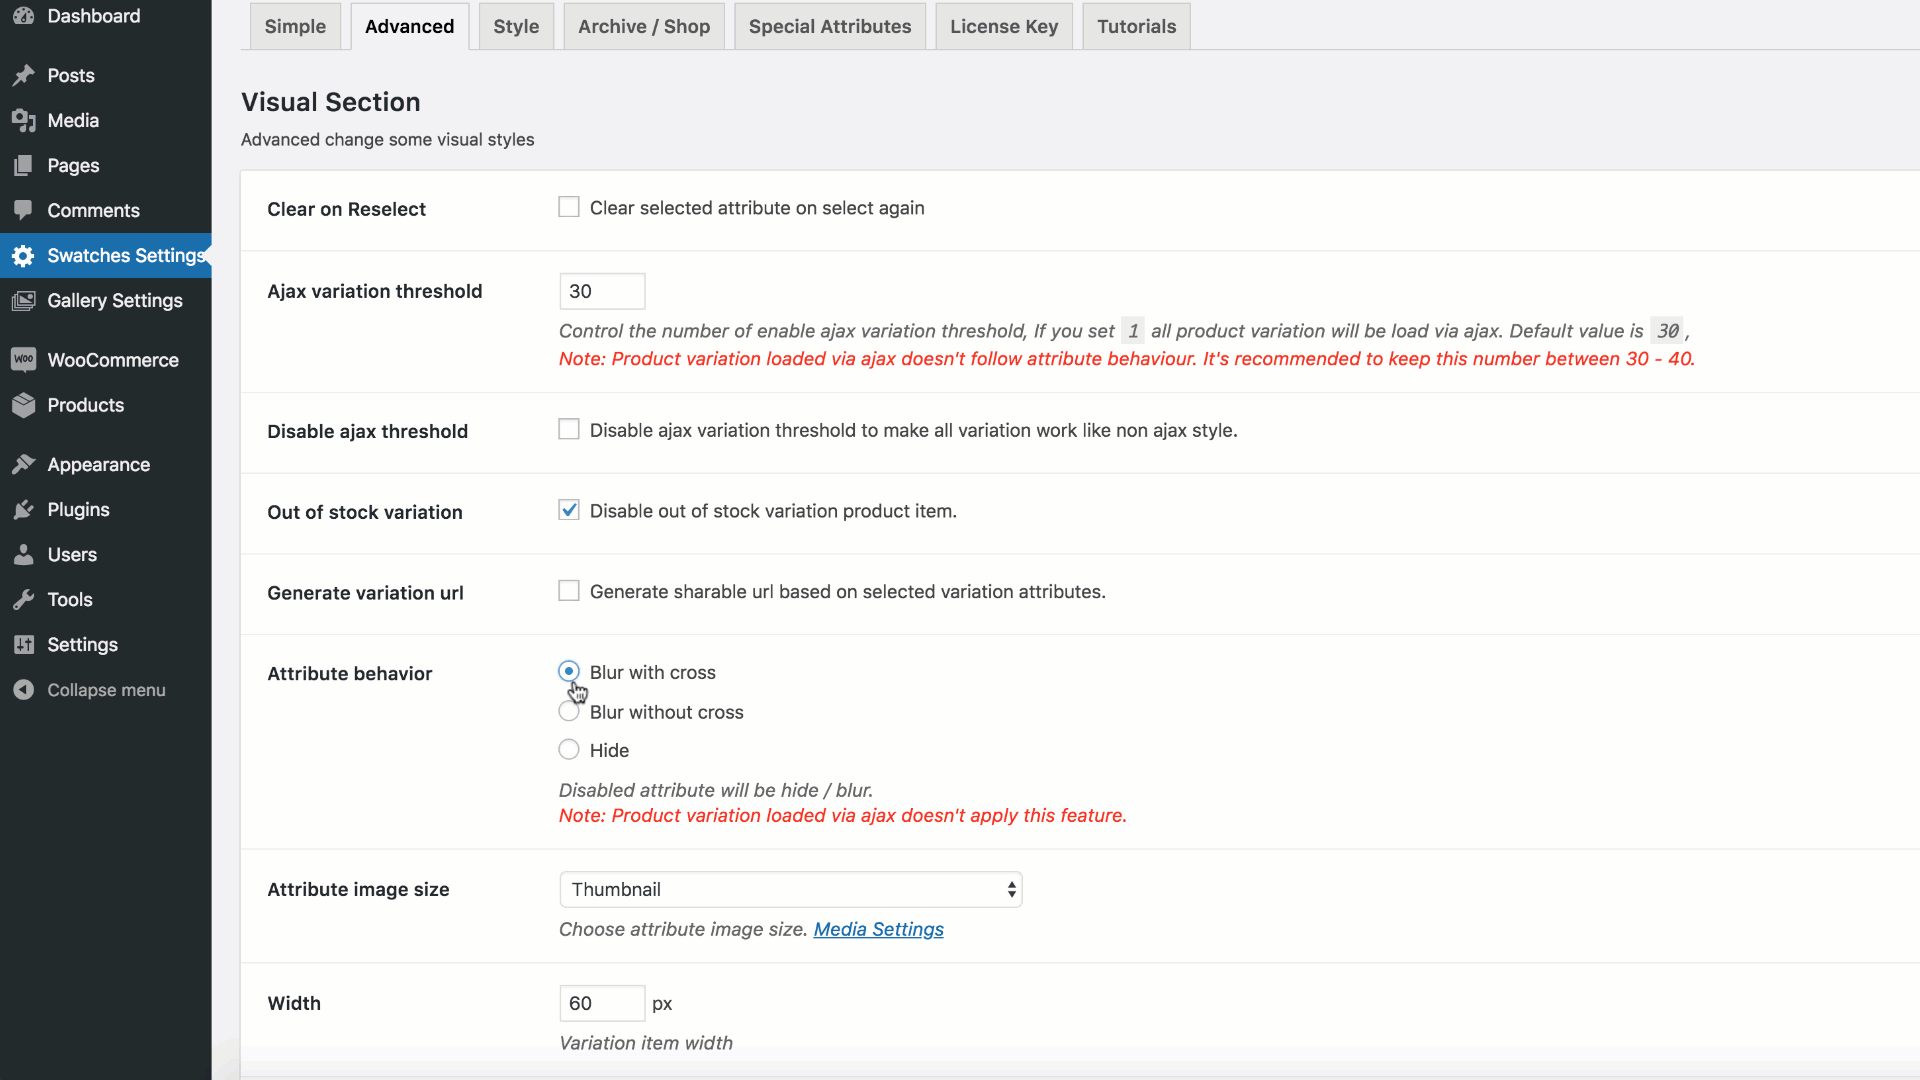
Whether you want to customize the swatches’ width, height, or font size on product pages or archive/shop/category pages, the WooCommerce Variation Swatches plugin makes it easy from the backend. To adjust these settings for product pages, go to Swatches Settings → Advanced.
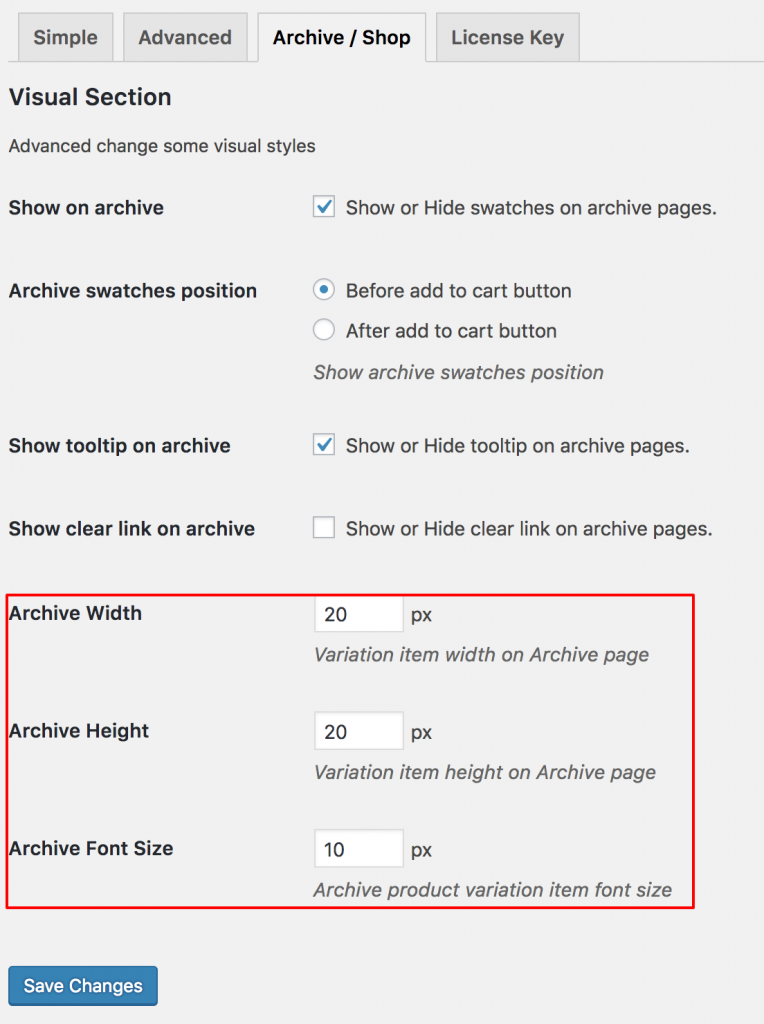
To change swatches width, height, and font size in the shop / archive / category / tag page, head to archive / shop tab.
WooCommerce Color Filter Widget
Enable / Disable Swatch Tooltip
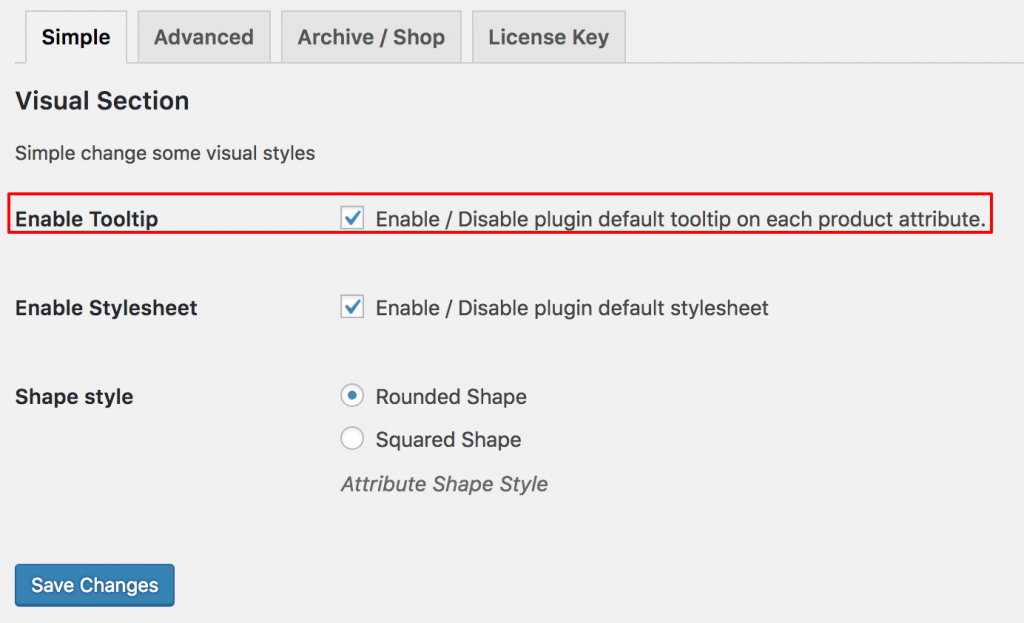
The WooCommerce Variation Swatches plugin allows you to enable or disable tooltips on product pages. To do this, go to Swatches Settings → Simple and toggle the Enable Tooltip option.
Shortcodes For Archive Swatches
[wvs_show_archive_variation]
Cross / Blur / Hide Out of Stock Product
Cross Preview (Up To 30 Variations)

Cross Preview (More Than 30 Variations)
blur preview (up to 30 variations)
blur preview more than 30 variations
hide preview up to 30 variations
hide preview more than 30 variations
Video Tutorial
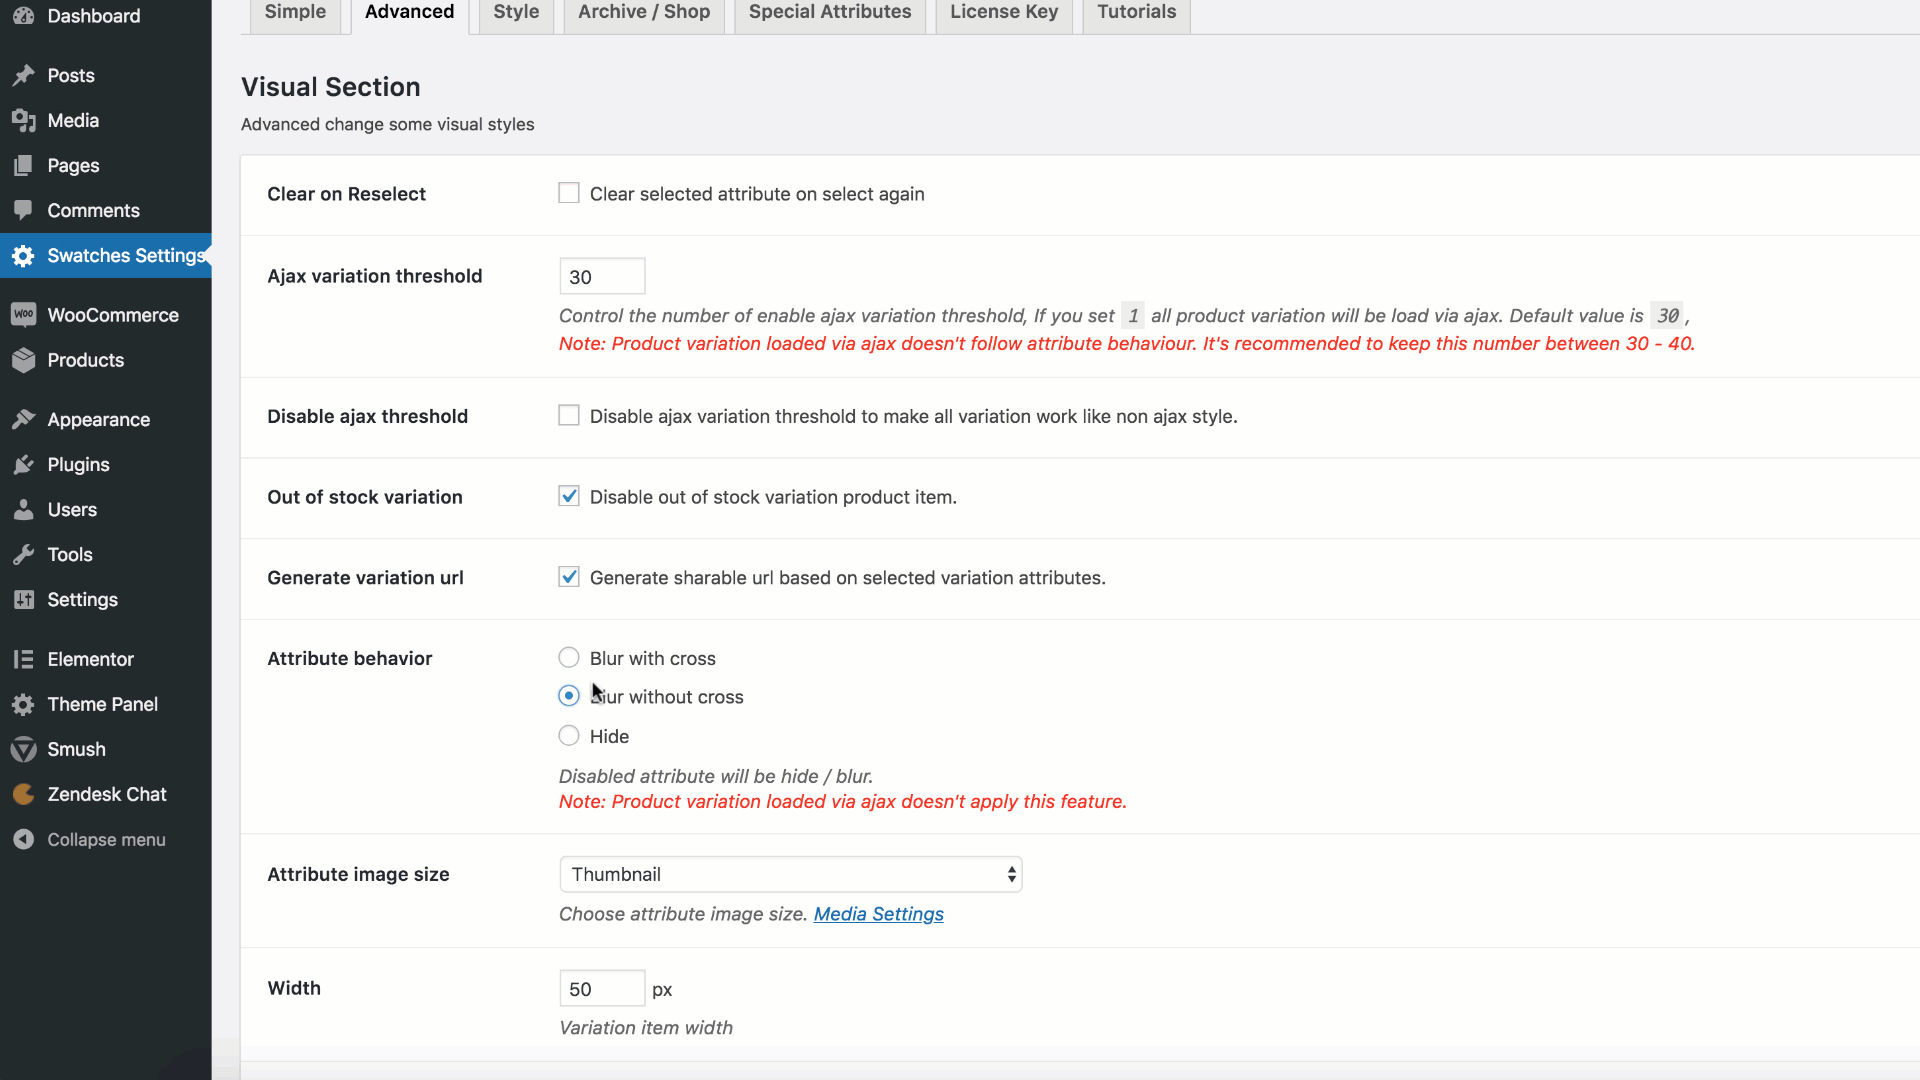
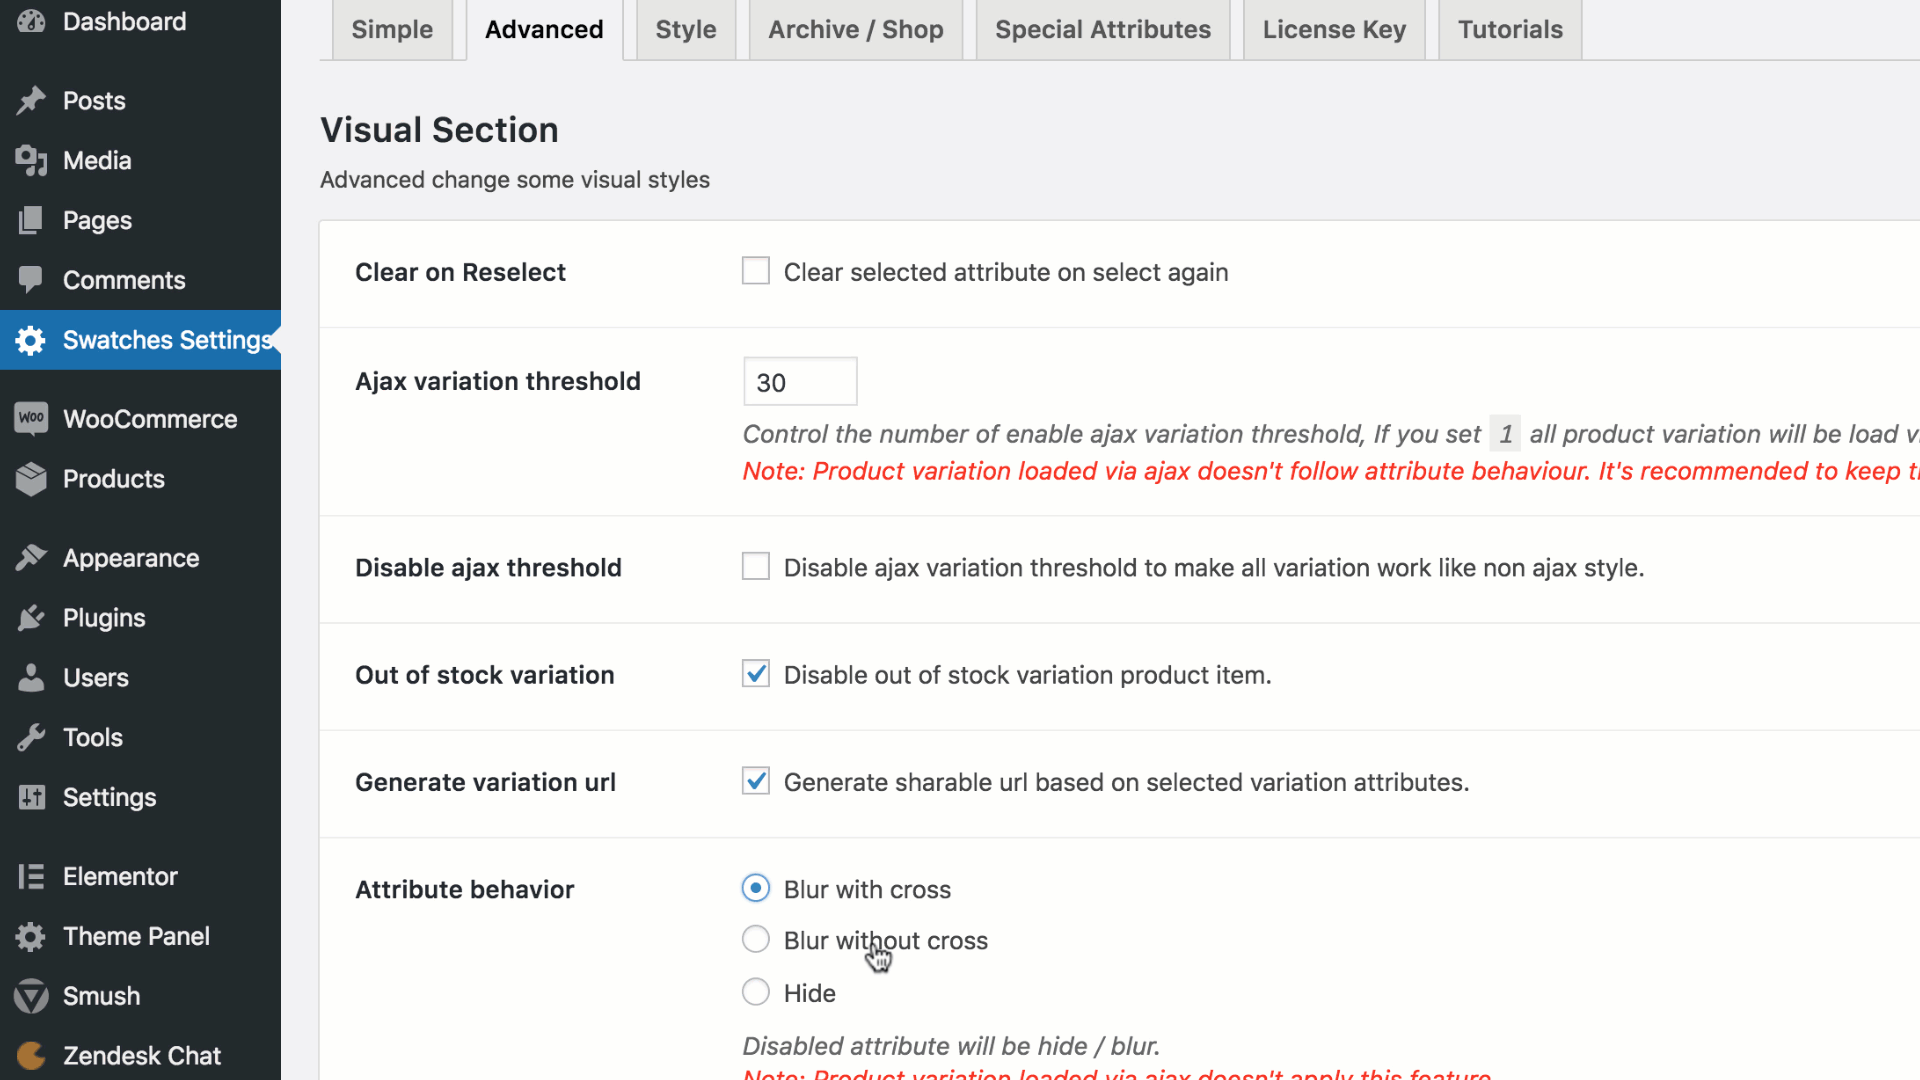
To hide or blur out-of-stock attribute variations with a cross mark, go to the Advanced tab in Swatches Settings and choose your preferred behavior from the Attribute Behavior settings.

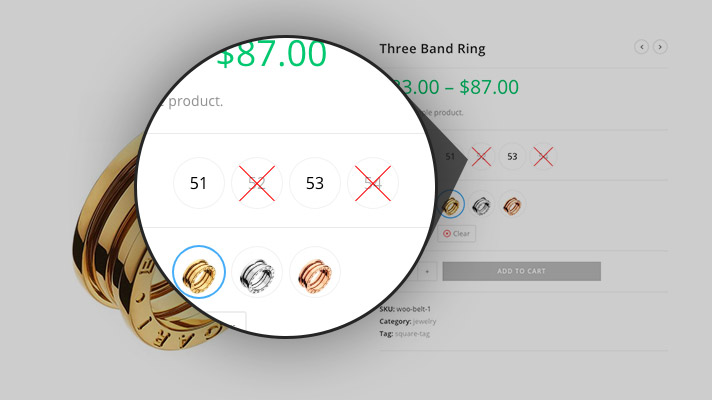
If you choose the Blur setting, out-of-stock attribute variations will appear blurred with a cross icon. See the screenshot below for a frontend preview.
If the blurred cross icon doesn’t appear on out-of-stock variation swatches, you need to hide out-of-stock items in the inventory settings. Go to WooCommerce → Settings → Products → Inventory and enable Hide out of stock items from the catalog.

Duplicate Variation Image With Its Image, Price, SKU and etc
This feature lets you duplicate a product variation along with all its properties, including price, image, SKU, stock, and more. To enable it, install and activate the Variation Duplicate for WooCommerce plugin.
Copy Variation Image To Other Variations
This plugin allows you to copy the image of a selected variation to other variations. To use this feature, install and activate the Variation Duplicate for WooCommerce plugin.
WPML + Swatches Setup
In addition to the Variation Swatches plugin, ensure the following WPML extensions are activated:
- WPML Multilingual CMS
- WPML String Translation
- WooCommerce Multilingual & Multi-currency
For detailed guidance on setting up WPML correctly, follow this documentation: WPML Getting Started Guide.
Let’s follow these steps to configure WPML and the Swatches plugin perfectly.
Install the required WPML plugins
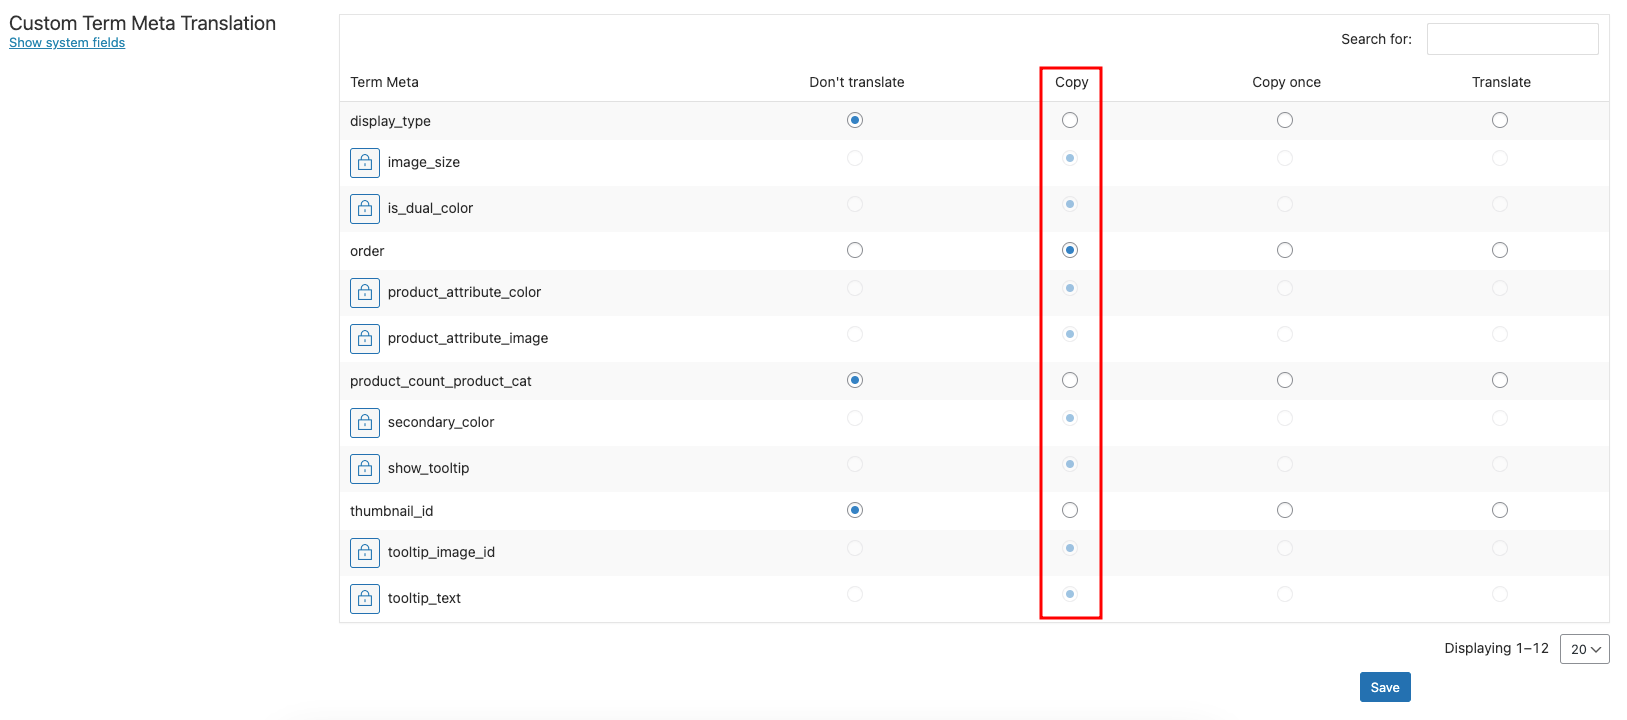
Next, go to WPML → Settings → Custom Term Meta Translation.
If you are using WooCommerce Variation Swatches version 2.1.0 or earlier, make sure the following fields are checked in the Copy checkbox.
- image_size
- is_dual_color
- product_attribute_color
- product_attribute_image
- secondary_color
- show_tooltip
- thumbnail_id
- tooltip_image_id
- tooltip_text
After selecting the required fields in the Copy list, click the Save button. I’ve also added a Custom Term Meta Translation table below for your reference and guidance.
Note: If your store is running version 2.1.0 or later, you don’t need to follow the previous steps, as the plugin will handle everything automatically.
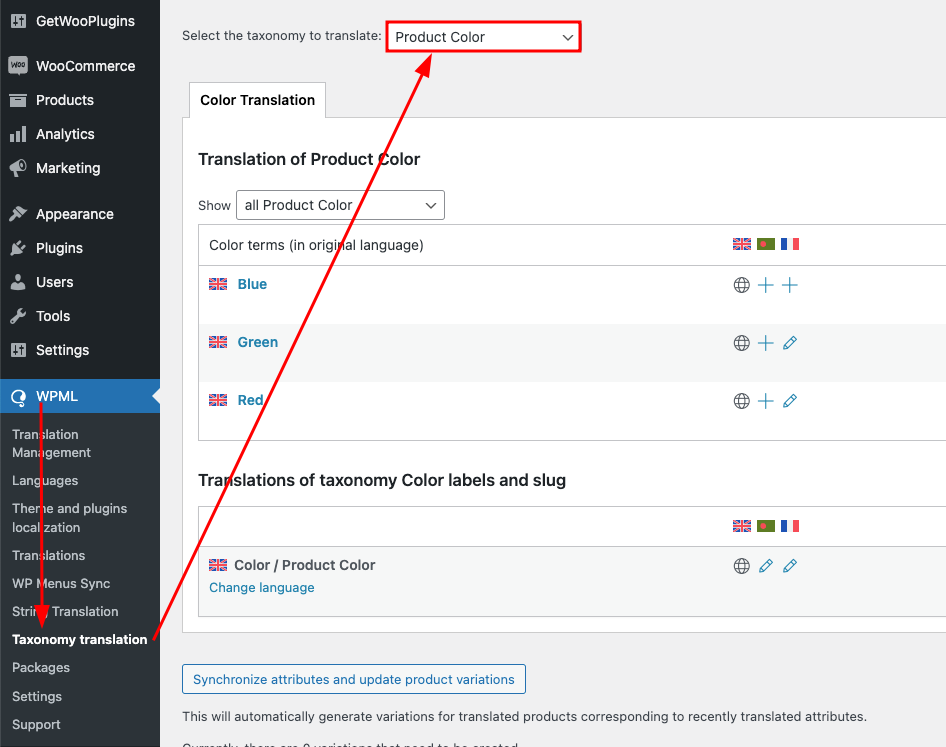
Translate Attribute from WPML Taxonomy Translation settings
You can translate all meta data by going to WPML → Taxonomy Translation and selecting the taxonomy you want to translate. Choose your desired taxonomy and translate it according to your requirements.
Manually Translate Attribute Meta
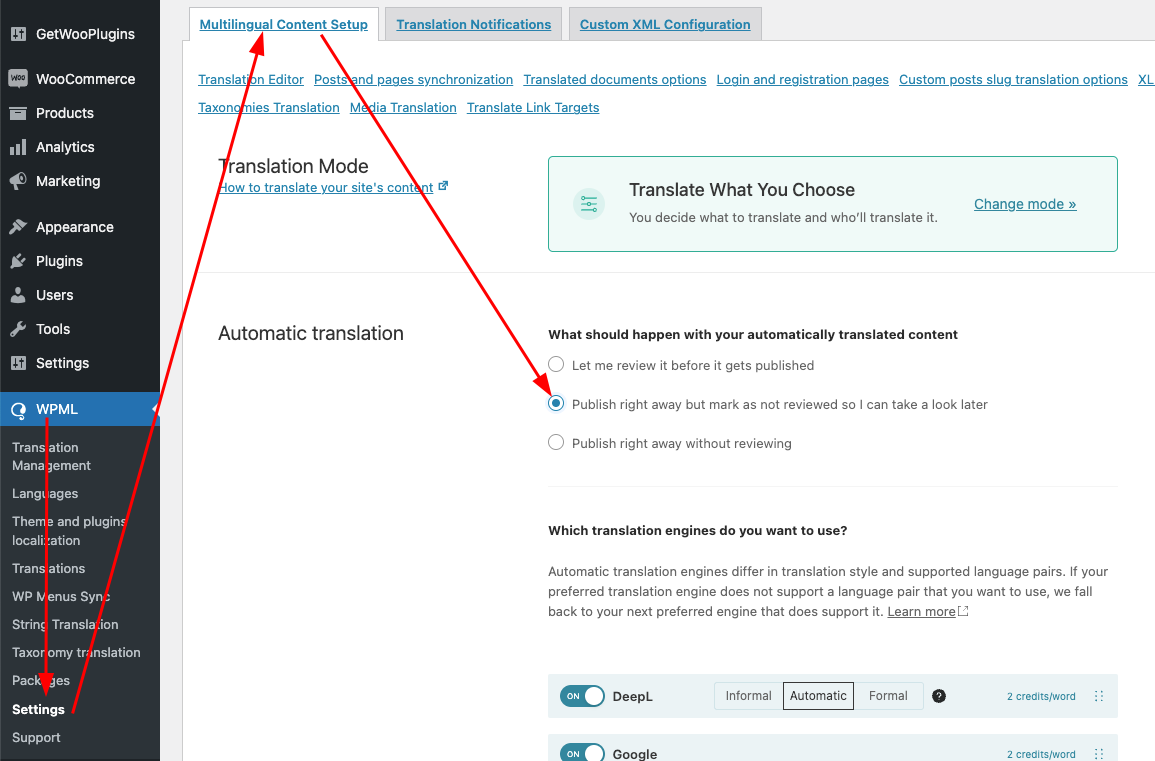
If the settings shown in the screenshot are enabled, the attribute meta will be translated automatically.
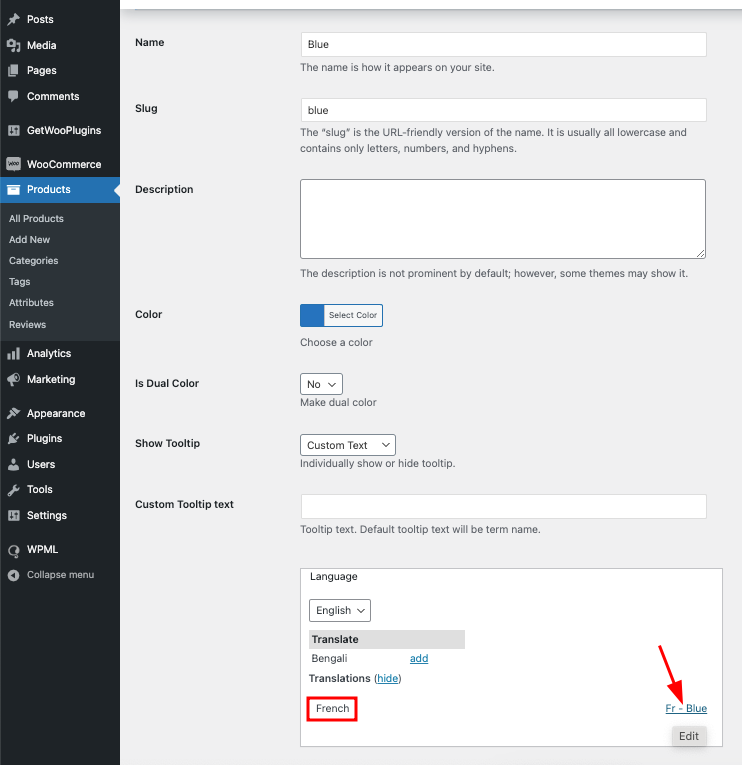
If you want to manually translate any specific attribute term, you can do it from Products > Attributes > Configure terms.
Troubleshooting Variation Translation (If needed)
If you’ve enabled Automatic Translation but your variation values still aren’t showing the translated versions, you can fix it from the troubleshooting panel.
Go to:
WooCommerce > WooCommerce Multilingual & Multicurrency > Status > Troubleshooting
(You’ll find it at the bottom of the page.)
There, you will see an interface like this:

Now, from the mentioned screen, you can sync all the translation data from this interface.
Infinite Scroll or Ajax load more
If you’re using Jetpack’s infinite scroll, no additional steps are required. However, if you’re using a custom or third-party “load more” solution, you must trigger the following event after the Ajax content finishes loading:
$(document).trigger(‘woo_variation_swatches_pro_init’)
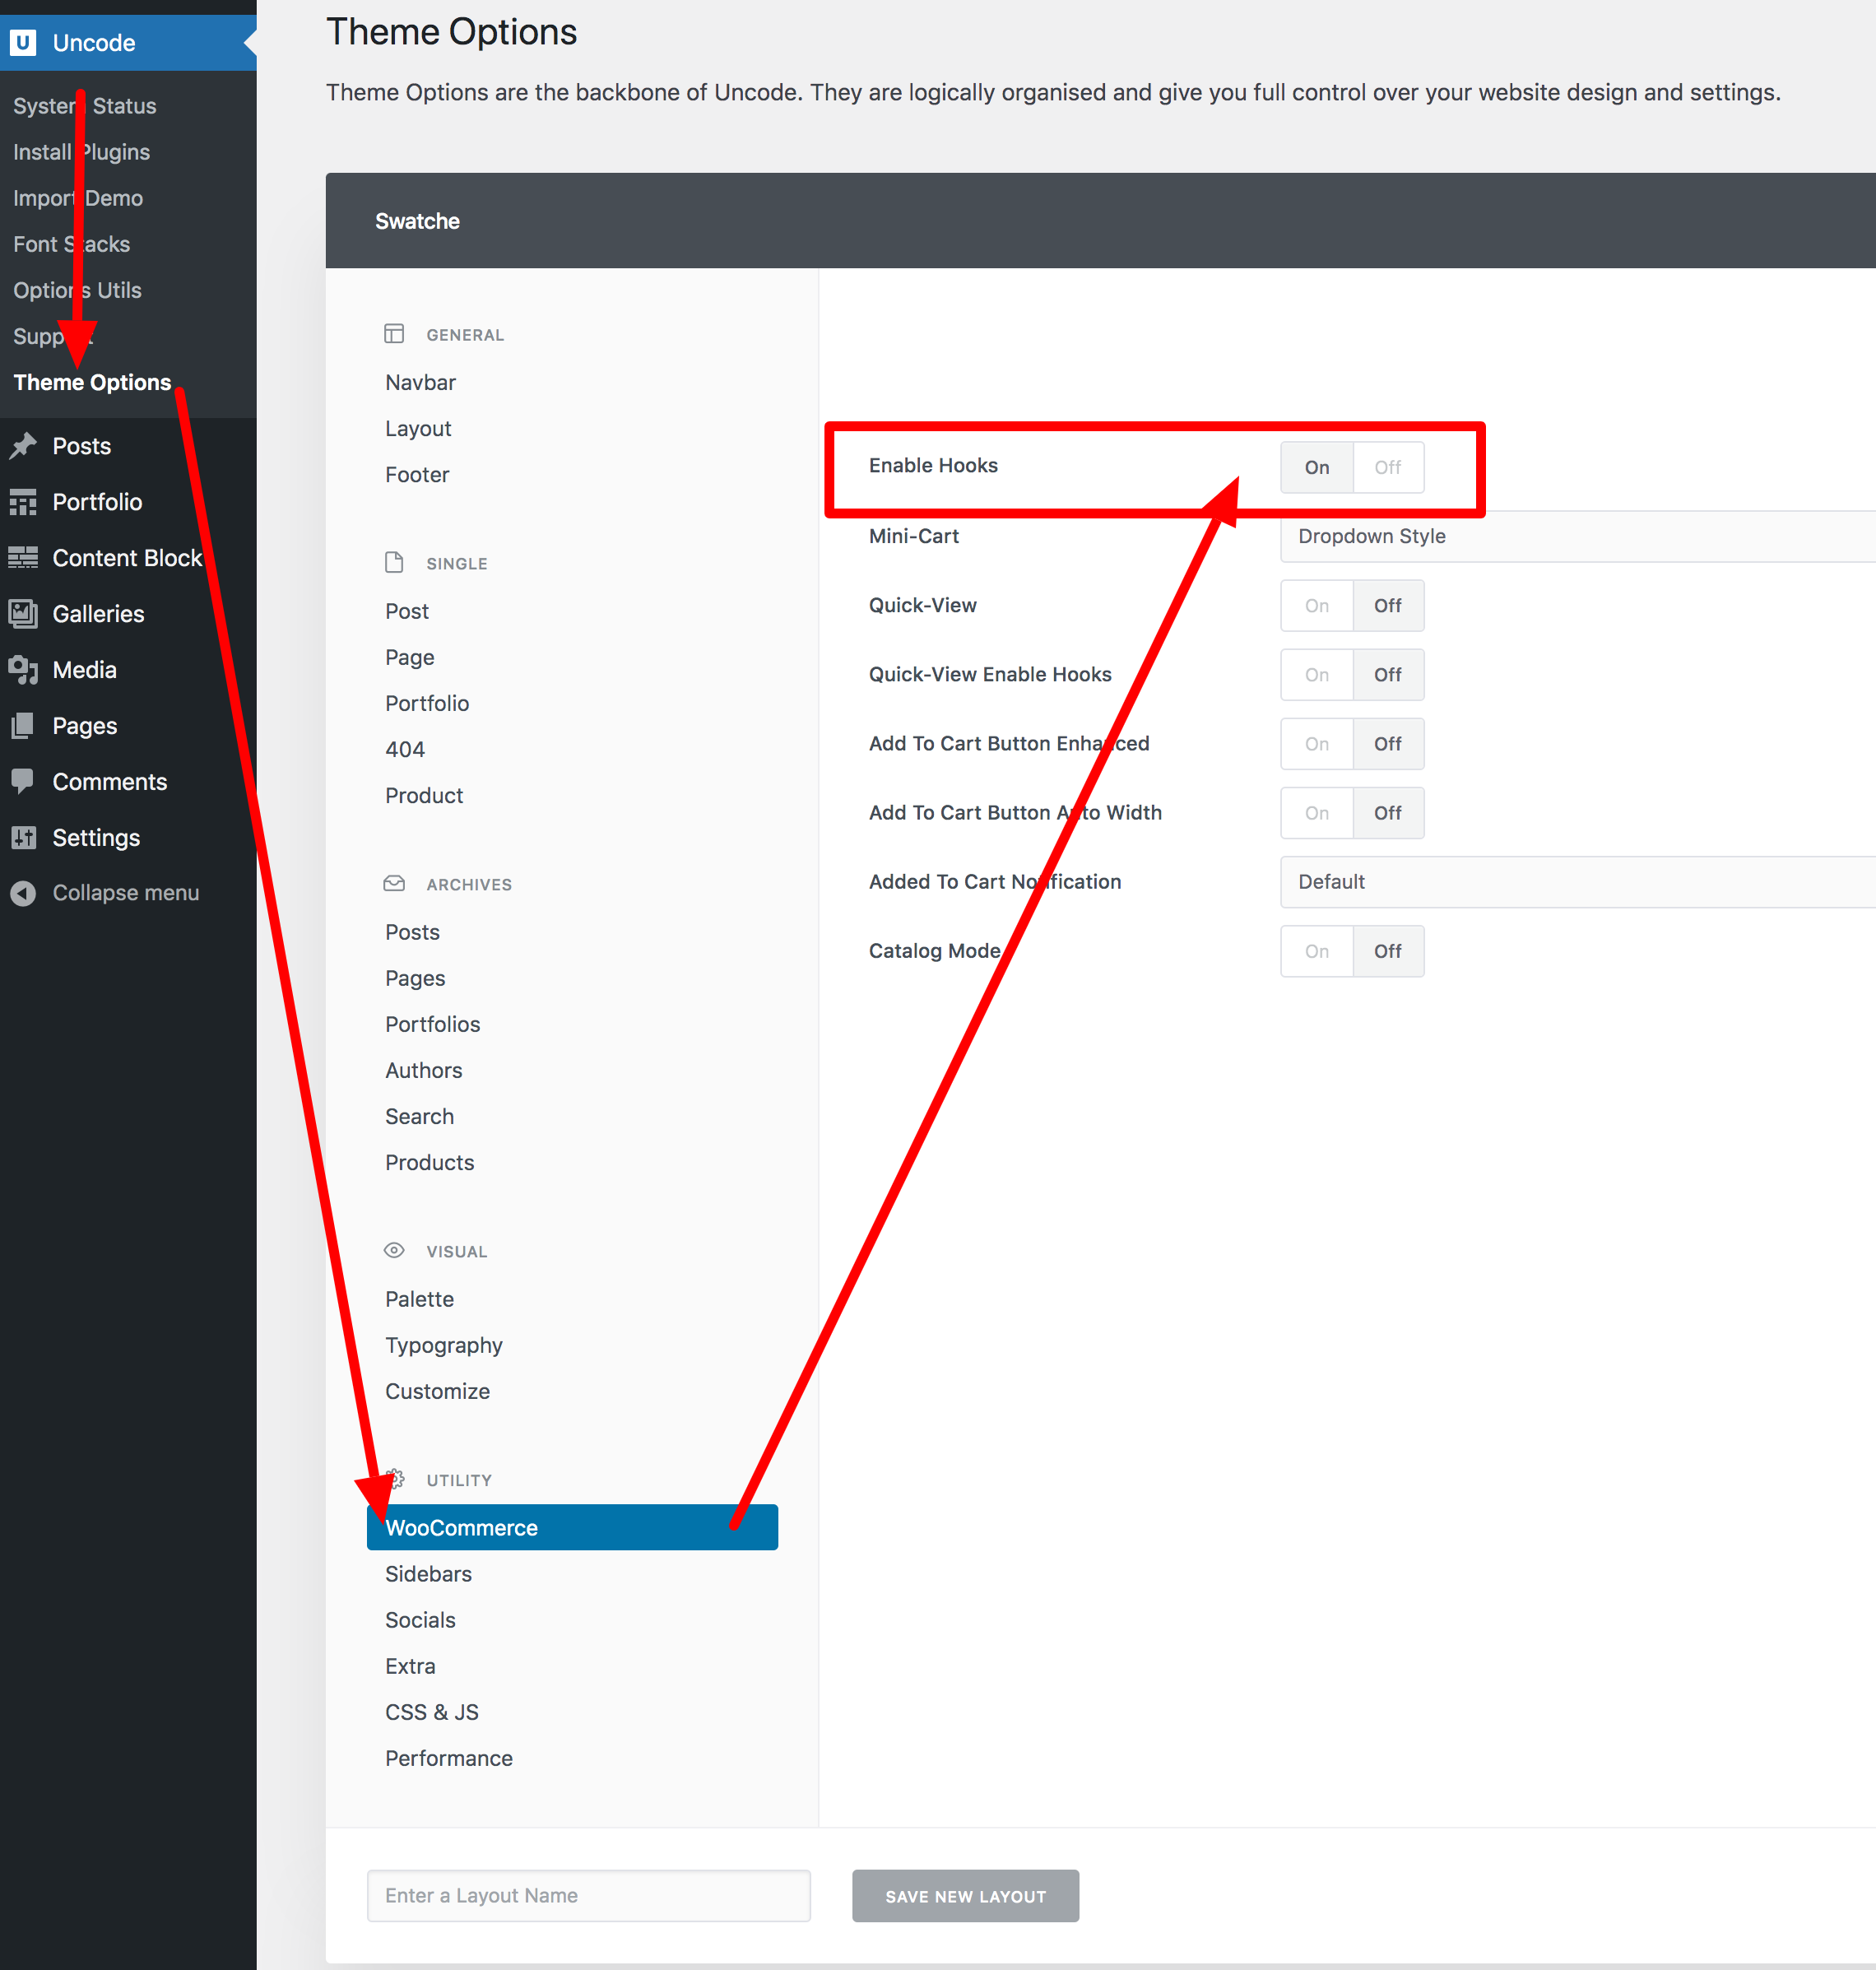
Uncode Theme Compatibility
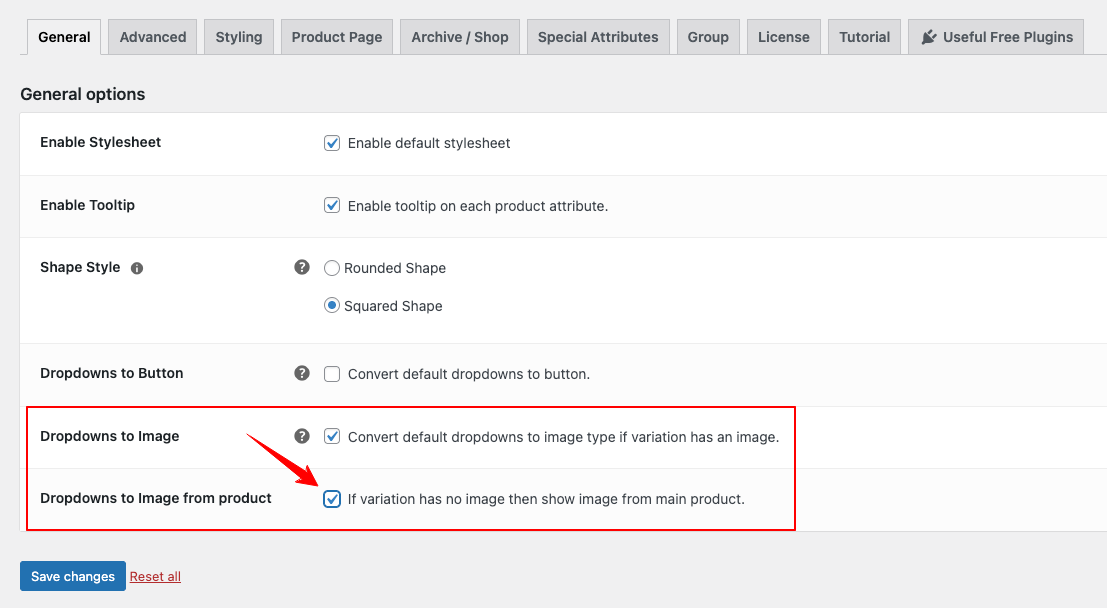
Dropdowns to Image From Main Product
You can replace the default dropdowns with images if variation has an image. Even if variation has no image then you can show images from main product.
This is the product page with default dropdowns having two attributes (color, size).
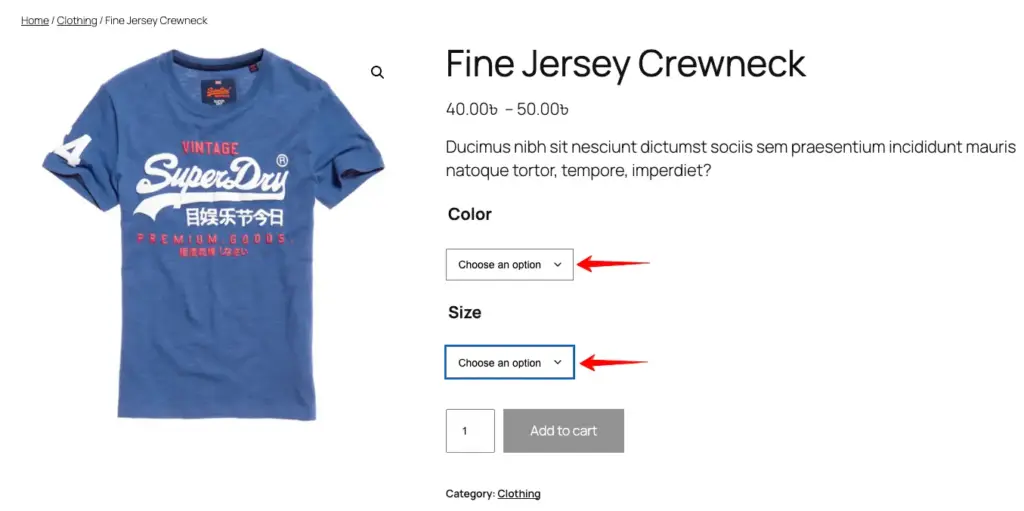
To convert default dropdowns for the color attribute to images from main product:
Go to General > enable the dropdowns to image option first > then select the dropdowns to image from product option > press save changes button.
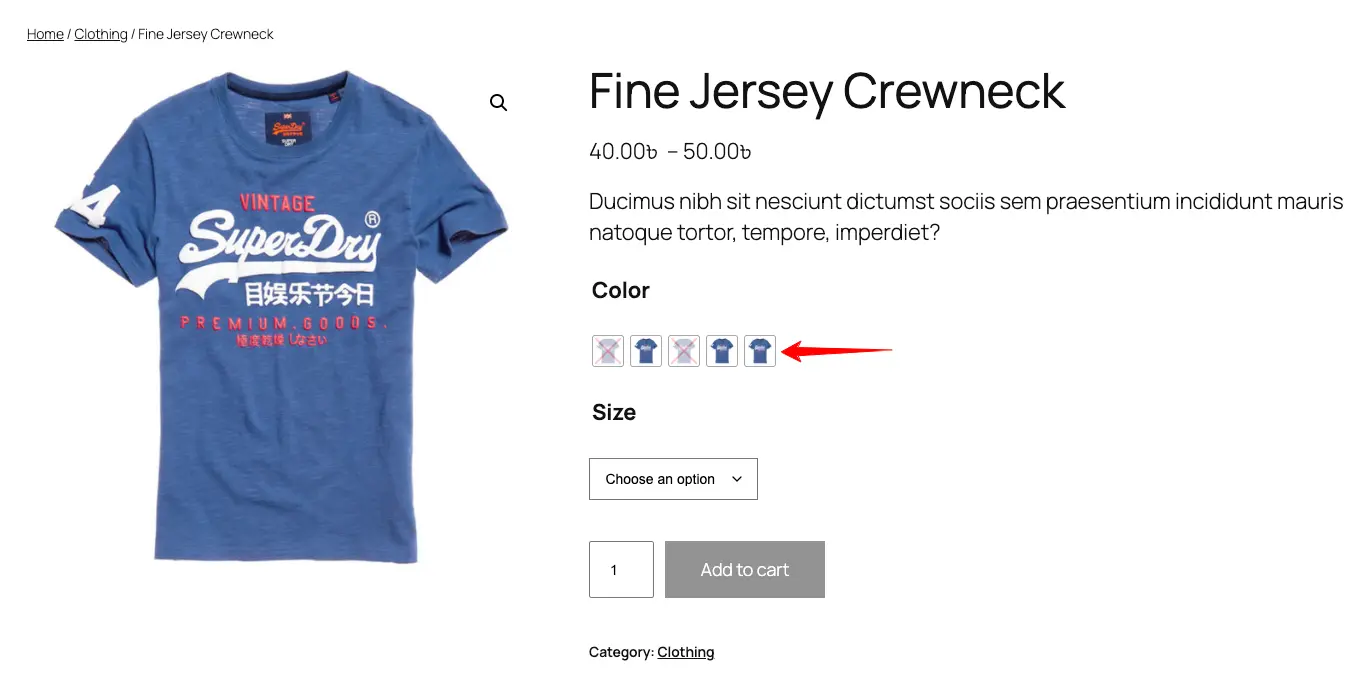
Go back to the product page and refresh it. Look the dropdown of color attribute converted into images fetched from the main product.
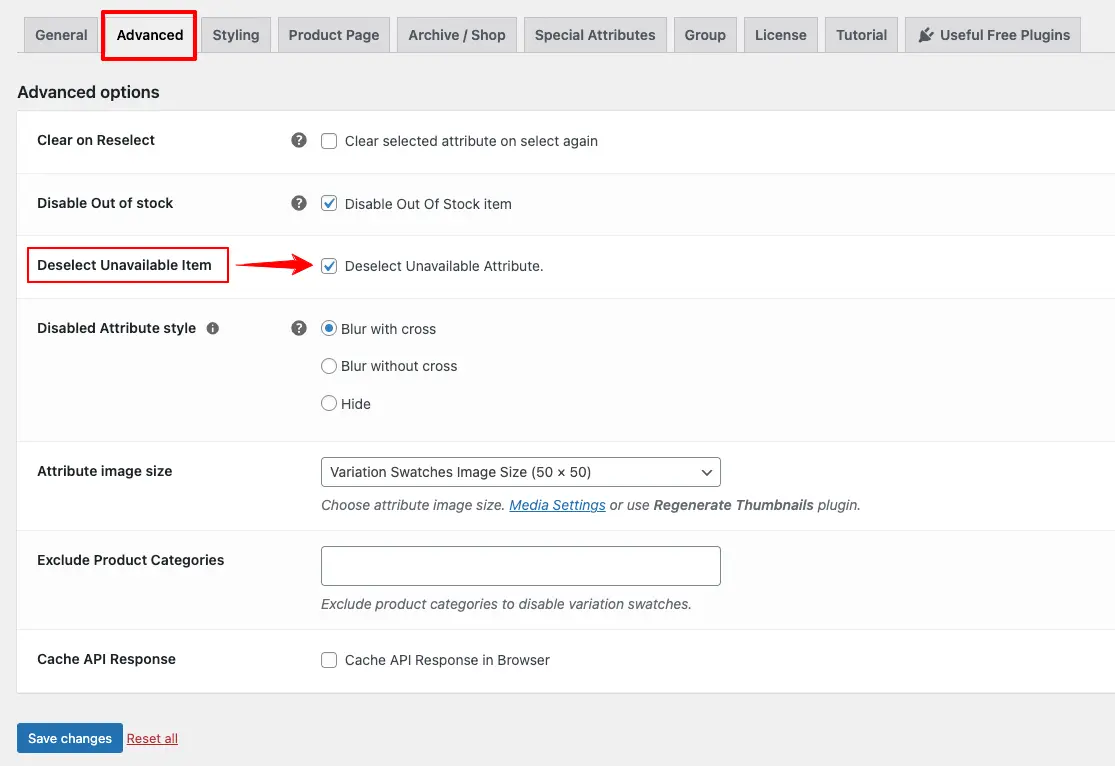
Deselect Unavailable Item
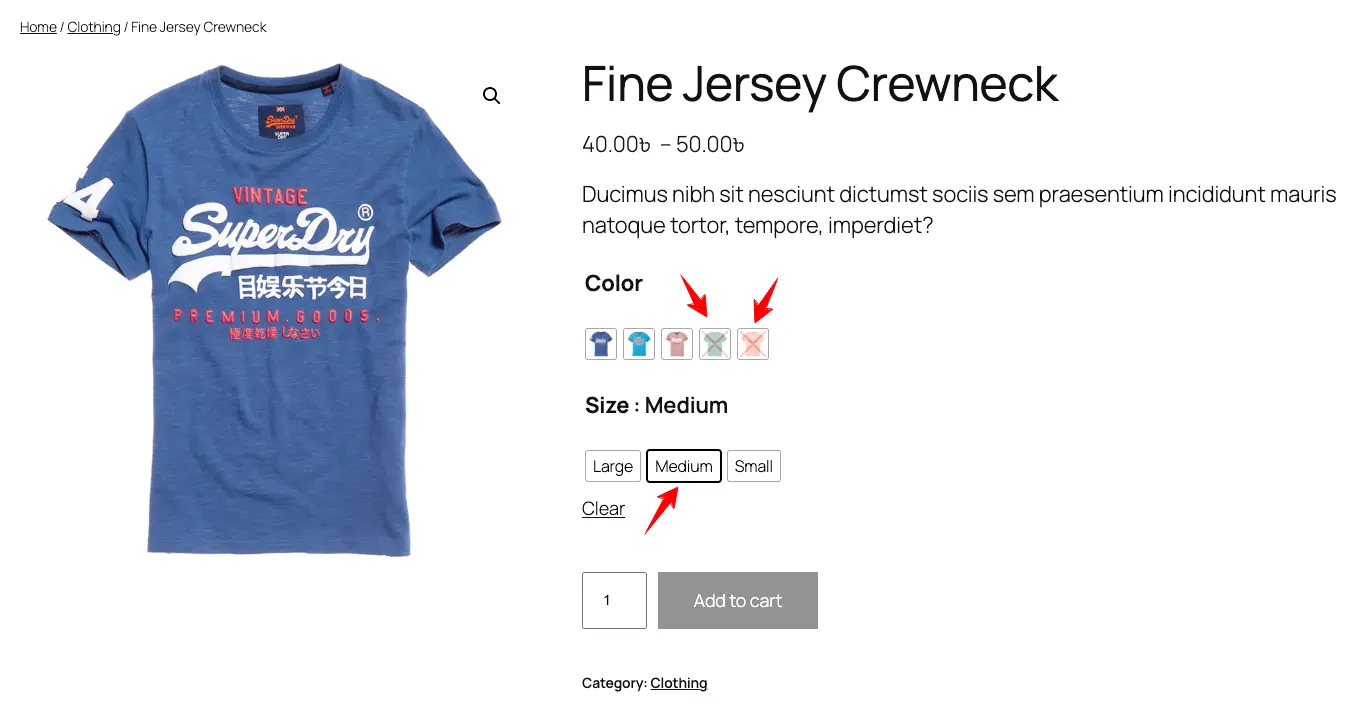
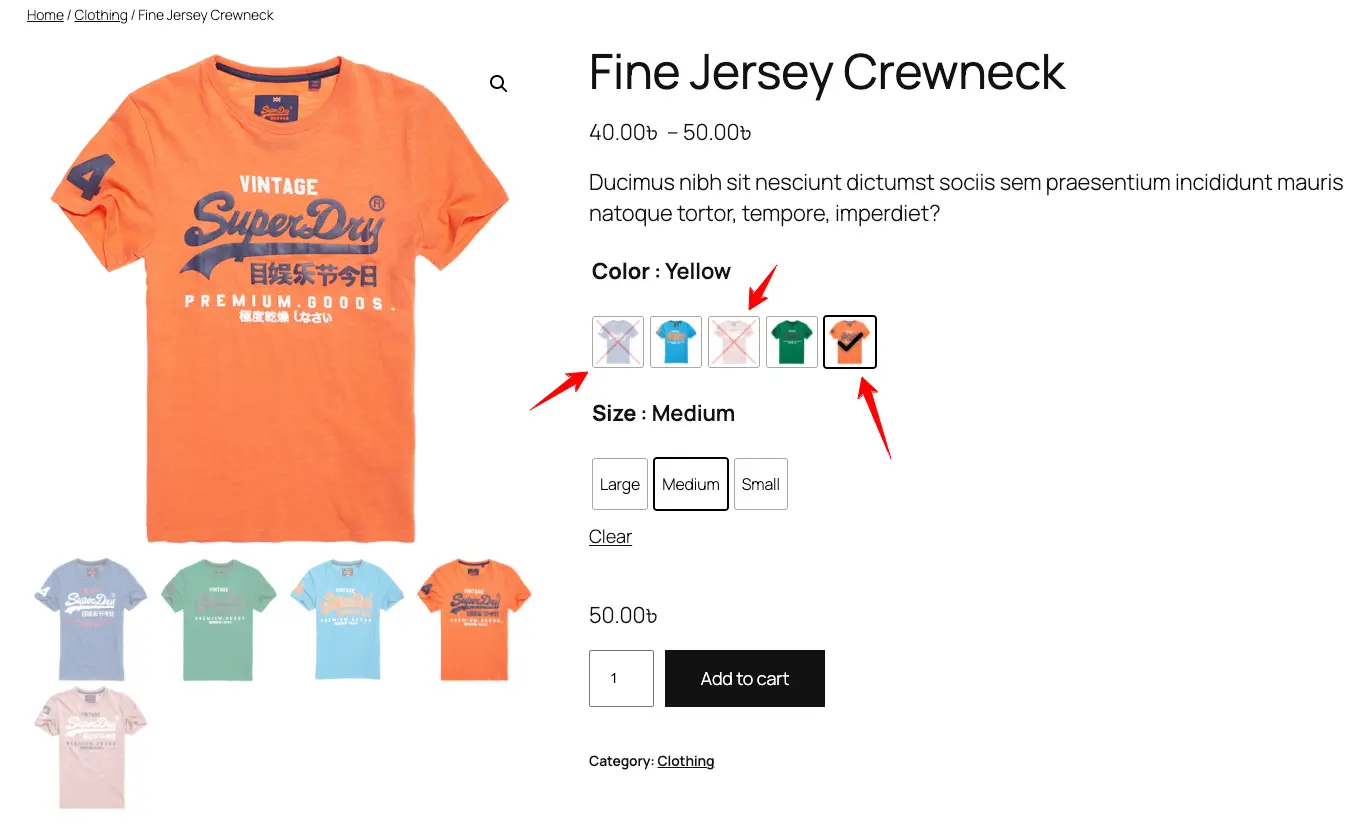
Suppose, you don’t have the medium and small size for the green and yellow color T-shirt. In that case, if you select the size medium, then the unavailable items (green & yellow) will be displayed with cross or blur according to your setup. And at this point if you click on the unavailable item, nothing will happen as showing below the screenshot.
But sometimes it becomes necessary to make it clickable for increasing users interaction performance so that the users don’t feel stuck while selecting attribute.
To do that, head back to > Advanced > Deselect unavailable item > click save changes button.
Now go back to your product page and refresh it. Then try to deselect the unavailable product. In this case, let’s click on the green item. Look! the green item has instantly been selected and still the unavailable size (Medium & Small) are showing up with cross mark.
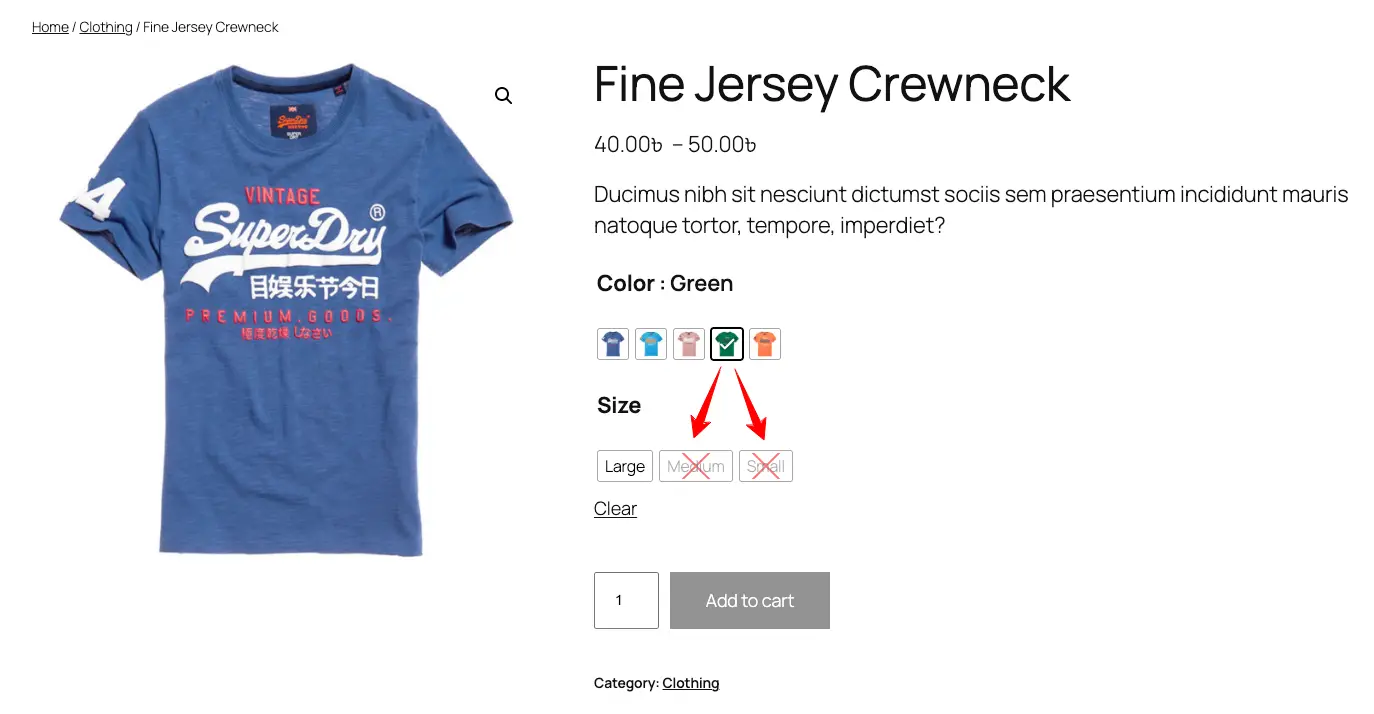
You can also deselect the Medium and small size which are showing here with cross mark.
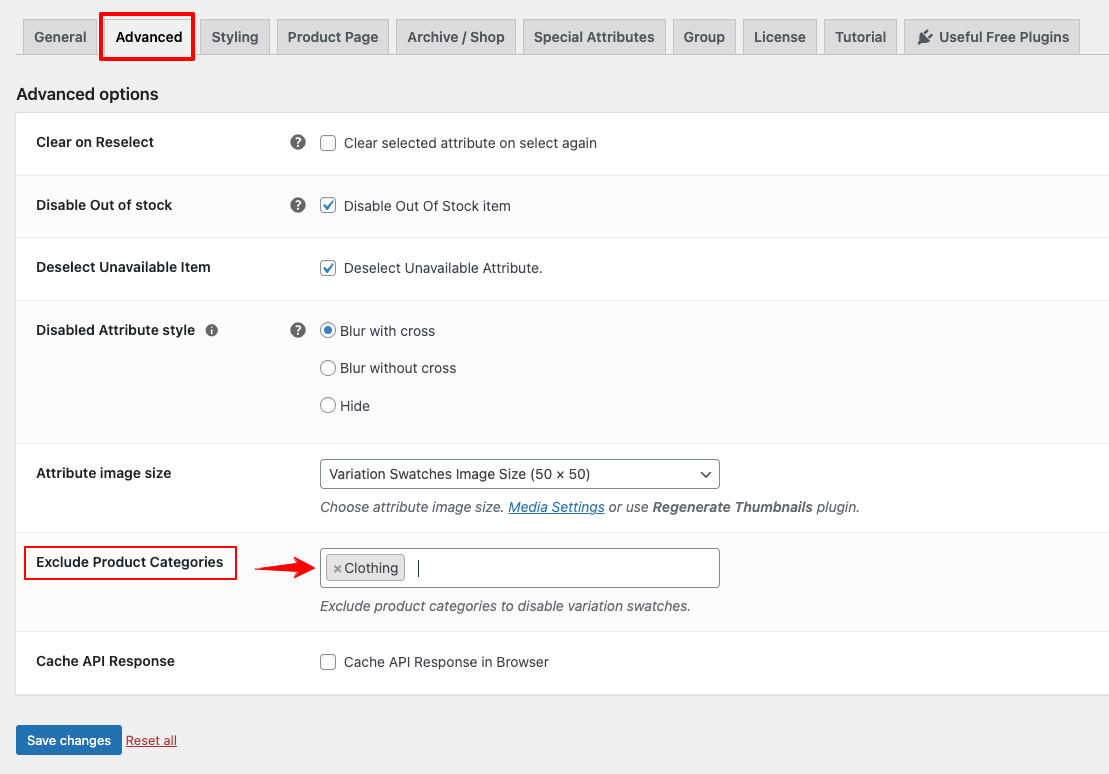
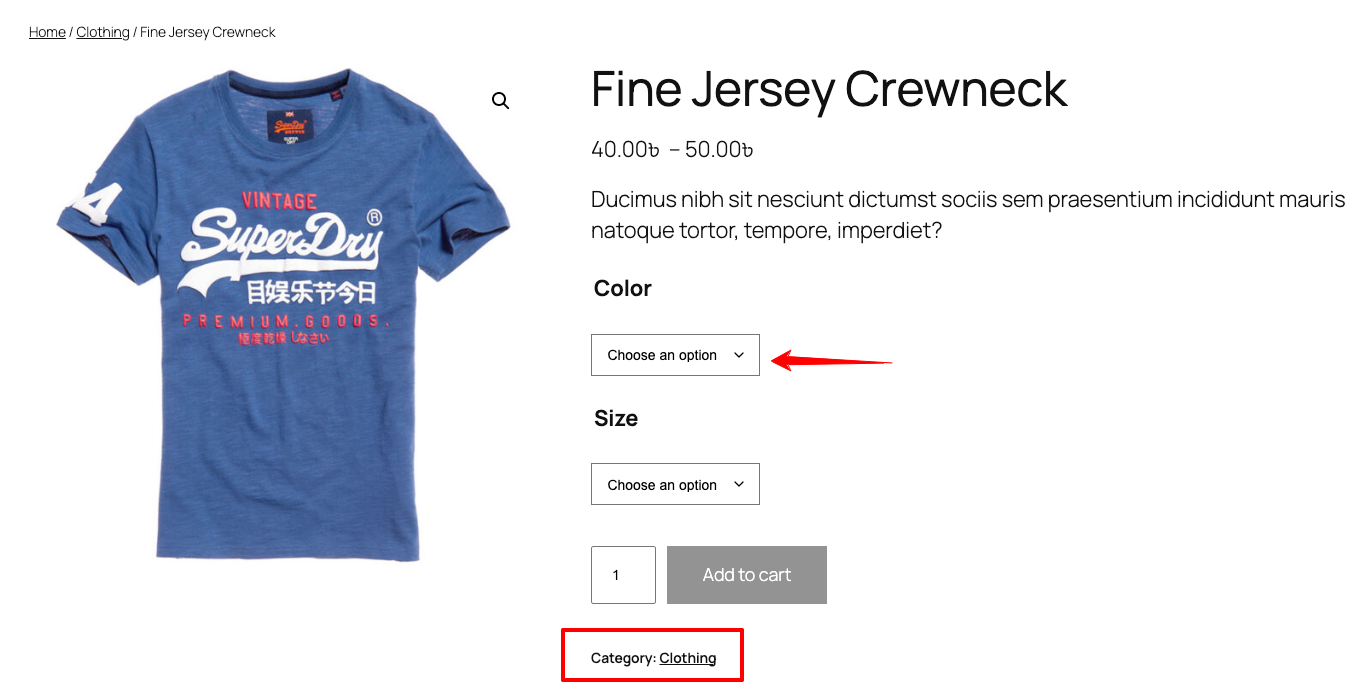
Exclude Product Categories to Disable Variation Swatches
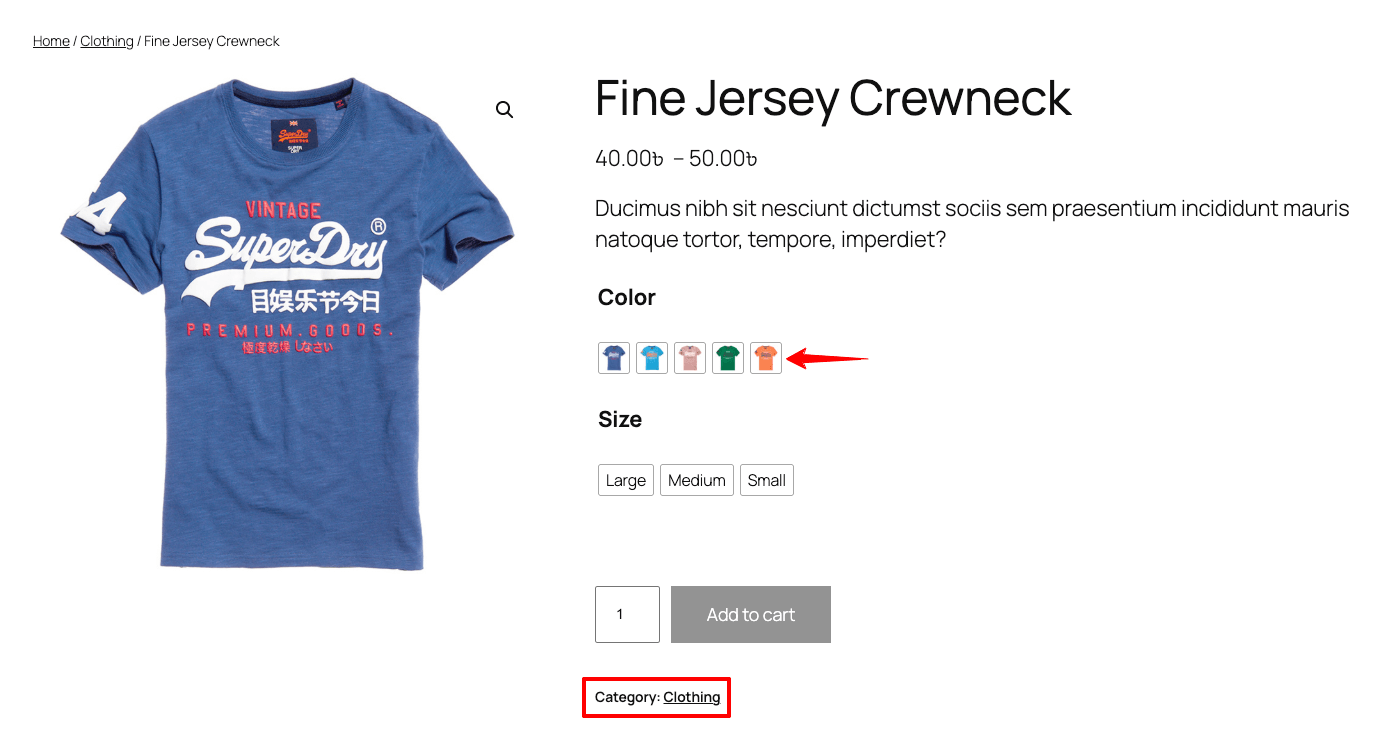
Let’s assume you have so many categories with lots of product variations. And you want not to show variation swatches on some specific category. For instance, you don’t want to show variations for clothing category.
To do that, head back to > Advanced > Exclude Product Categories > Choose the attribute (Here: clothing) > press save changes button.
Now, go back to the product page and refresh it. Look no variation swatches for the clothing category.
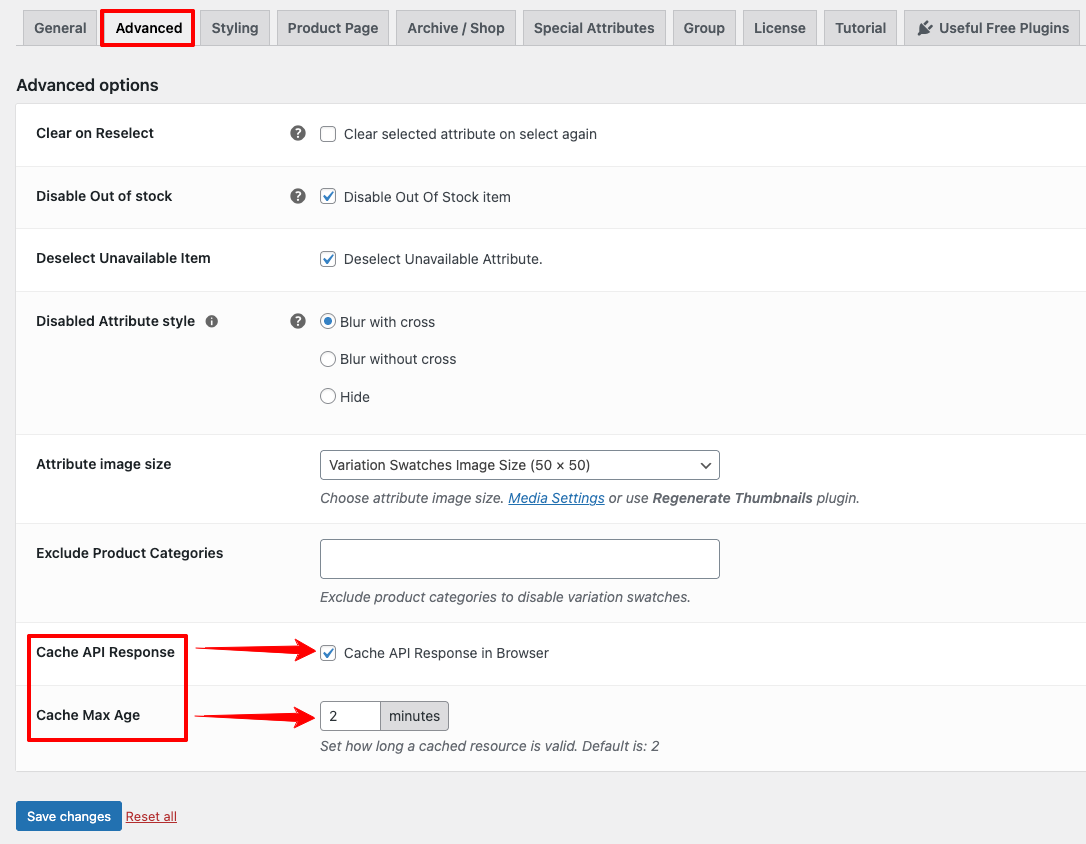
Cache API Response & Cache Max Age
You can see from the screenshot below that when a user land on your page and scroll down, the data are being fetched from the server (red marked from the dev tool). And if the user refresh the page or see the same products again and again, every time the request will be sent to the website’s server that eventually slow down the site speed.
Cache API allows you to store data on users browser without hitting your server for the same requests. It helps your website speed fast as you stop sending continuous request to your own server.

To activate it, go to advanced > check the box “Cache API Response” > Set the Cache Max Age (We recommend 2 minutes) > click save changes button.
By default, the cache will be stored for 2 minutes. You can increase the Cache Max Age as you want. If your inventory changes frequently, we recommend the default behavior.
After activating the Cache API Response option refresh the page and scroll down a little bit. Look! Those same products appeared at the dev tool and the data are coming from the users browser cache (disc cache).
Change Swatches Indicator Color
You can change the Tick color and Cross color on your product page as well as your shop/archive page. This small changes increase the visibility of your users item selection.
To change the color, head back to the Styling tab > Now select your desired color for the Tick and Cross > Then click the save changes button.
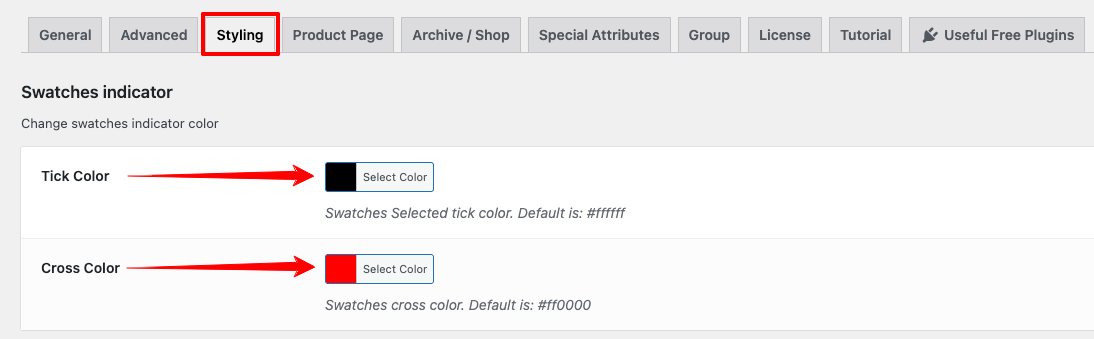
Now refresh the page and select any item to see the changes.
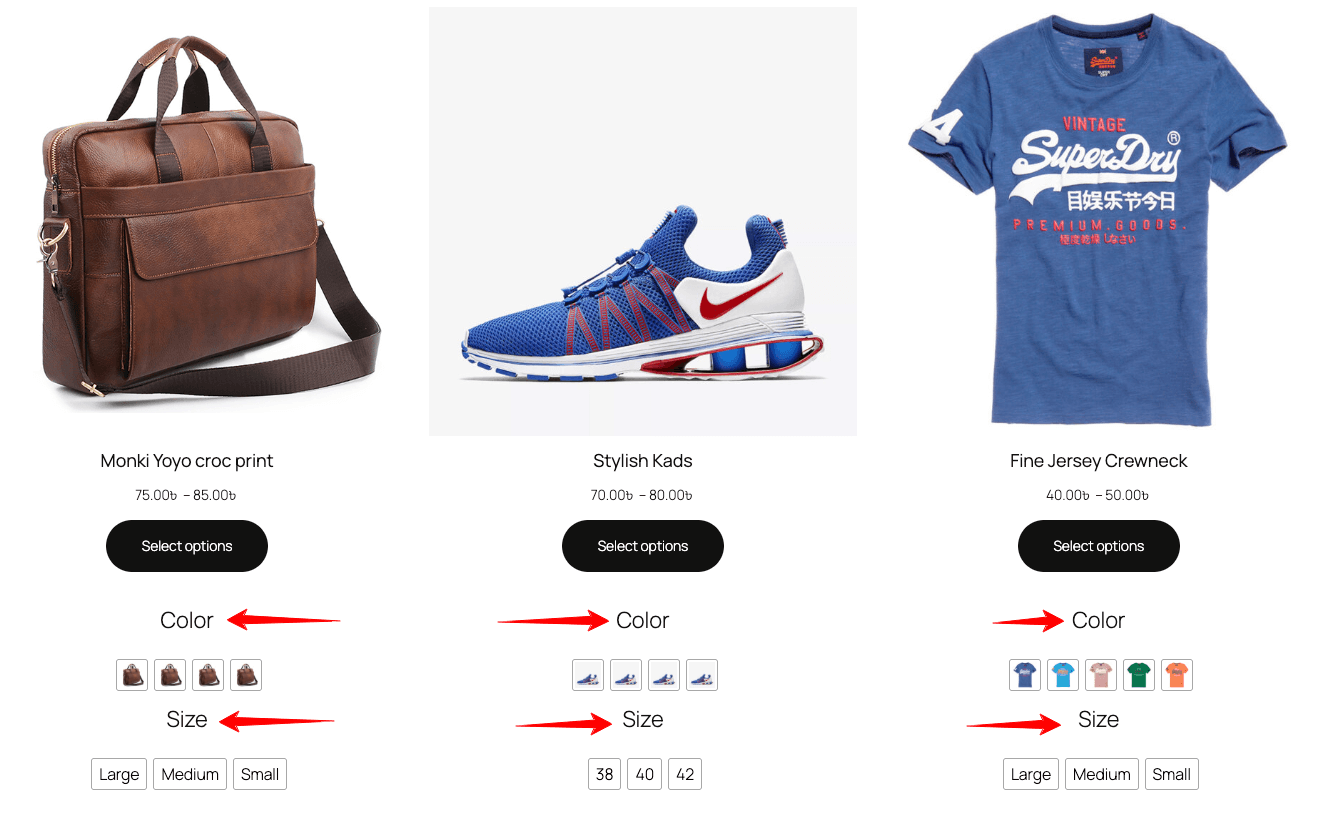
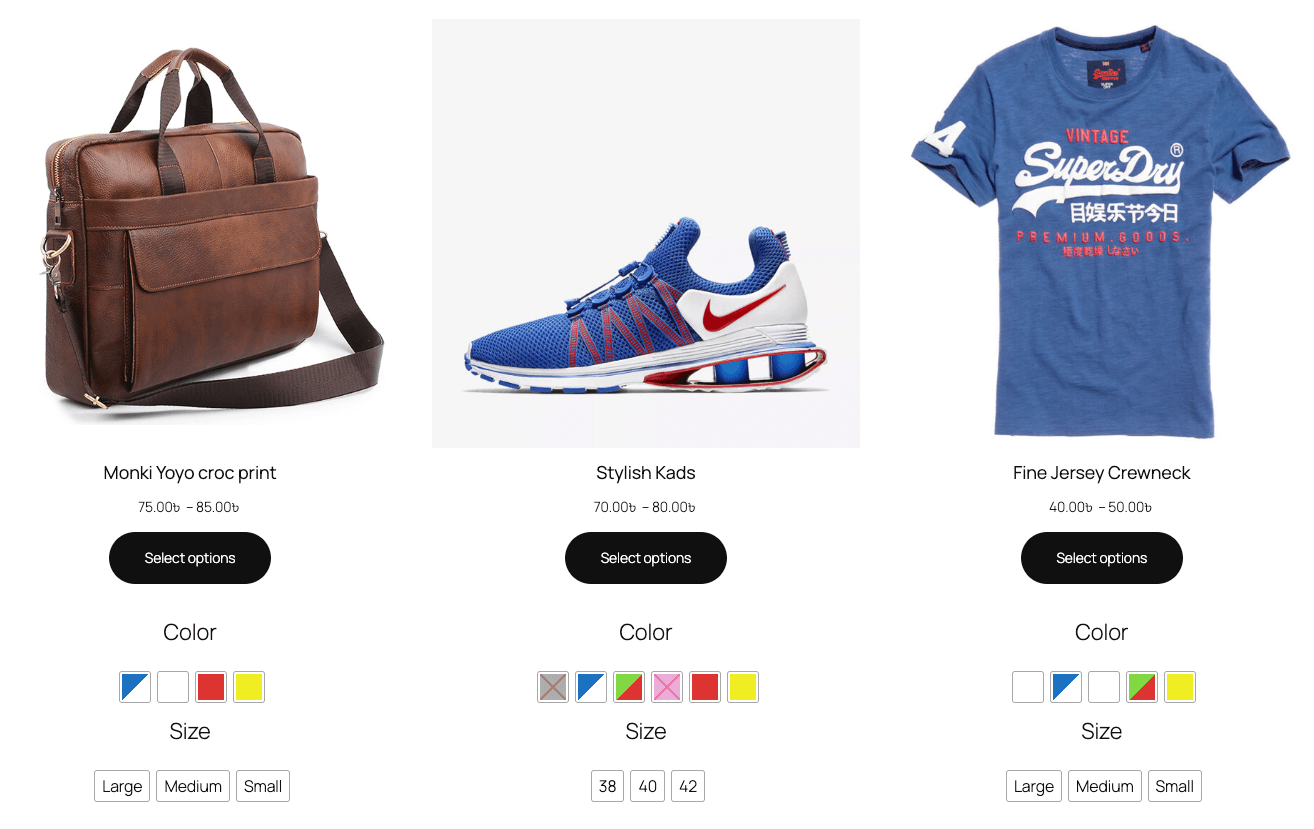
Show Attribute label on Archive Page Swatches
You can display the attribute label on archive page swatches to provide your customers more visibility.
Right now, look the screenshot below where only swatches are visible without any attribute label that we are going to modify now.
To make this change Go to the Archive/Shop > Tick the box “Show Attribute label” > Press save changes button.
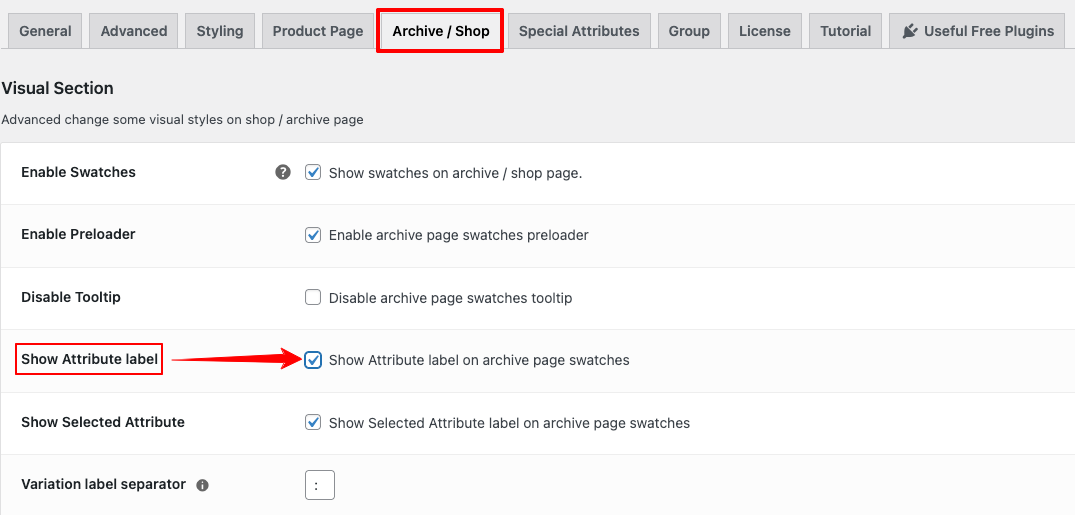
Now, you can see the attribute label with each swatches on your archive page.
Archive Variation Threshold
Archive Variation Threshold defines how variation data is handled on WooCommerce shop and archive pages. Based on this threshold, the variations data may be embedded directly in a WooCommerce way or fetched via API.
Benefit: If you fetch data using API, your site’s other contents (such as the header, menu, etc) will be loaded first. It will not wait for the Swatches data. It will fetch the Swatches data after rendering the other contents. This setting exists to balance performance, and data loading strategy for variable products displayed in archives.
By default the data are loaded by API but if you want you can load your data on html attribute / WooCommerce default system.
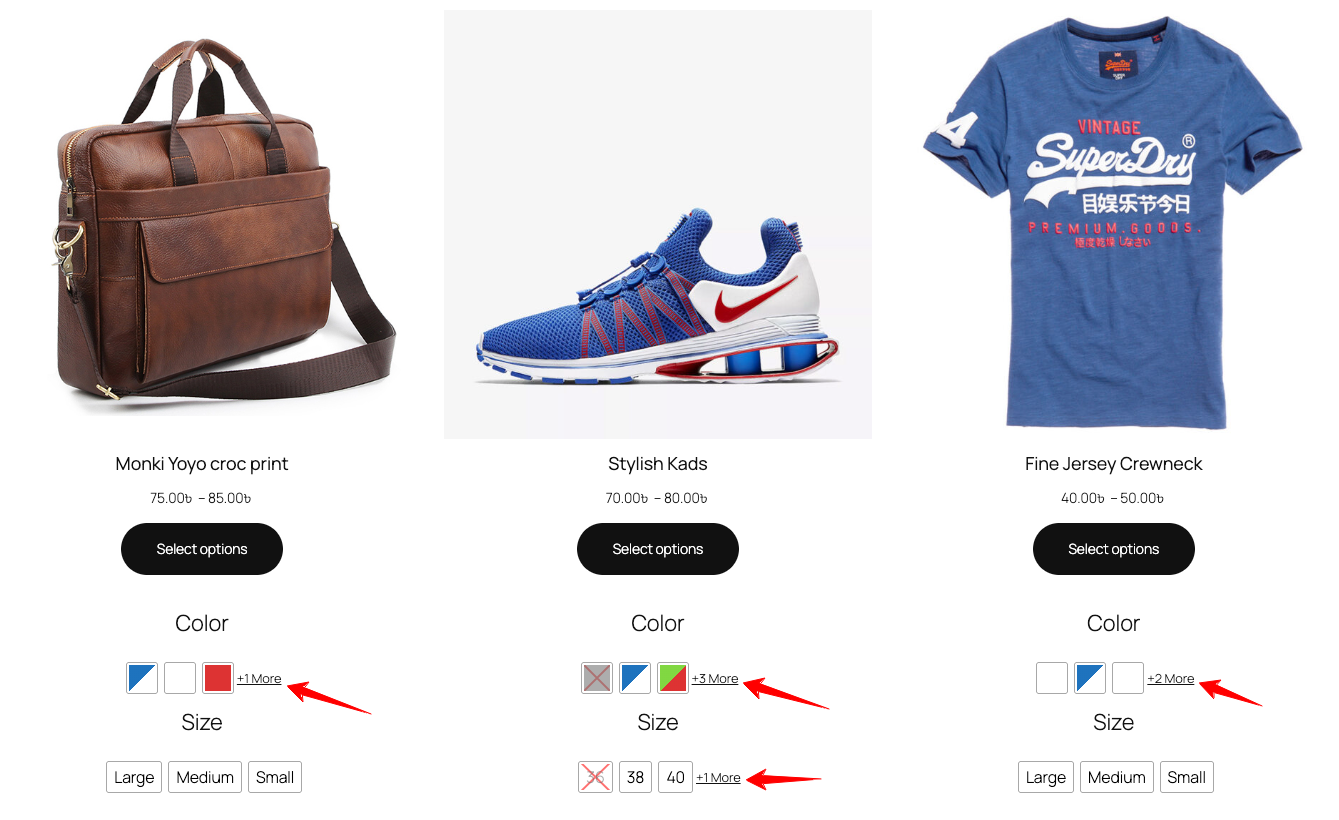
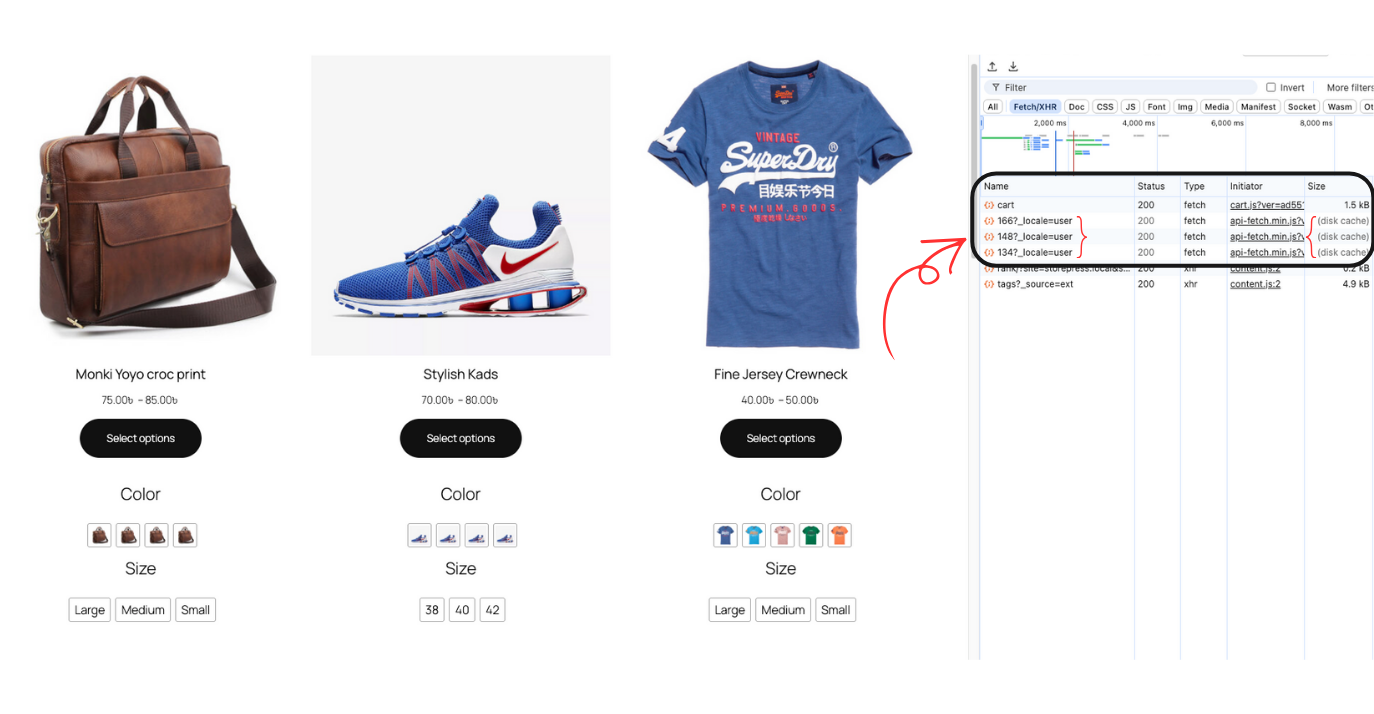
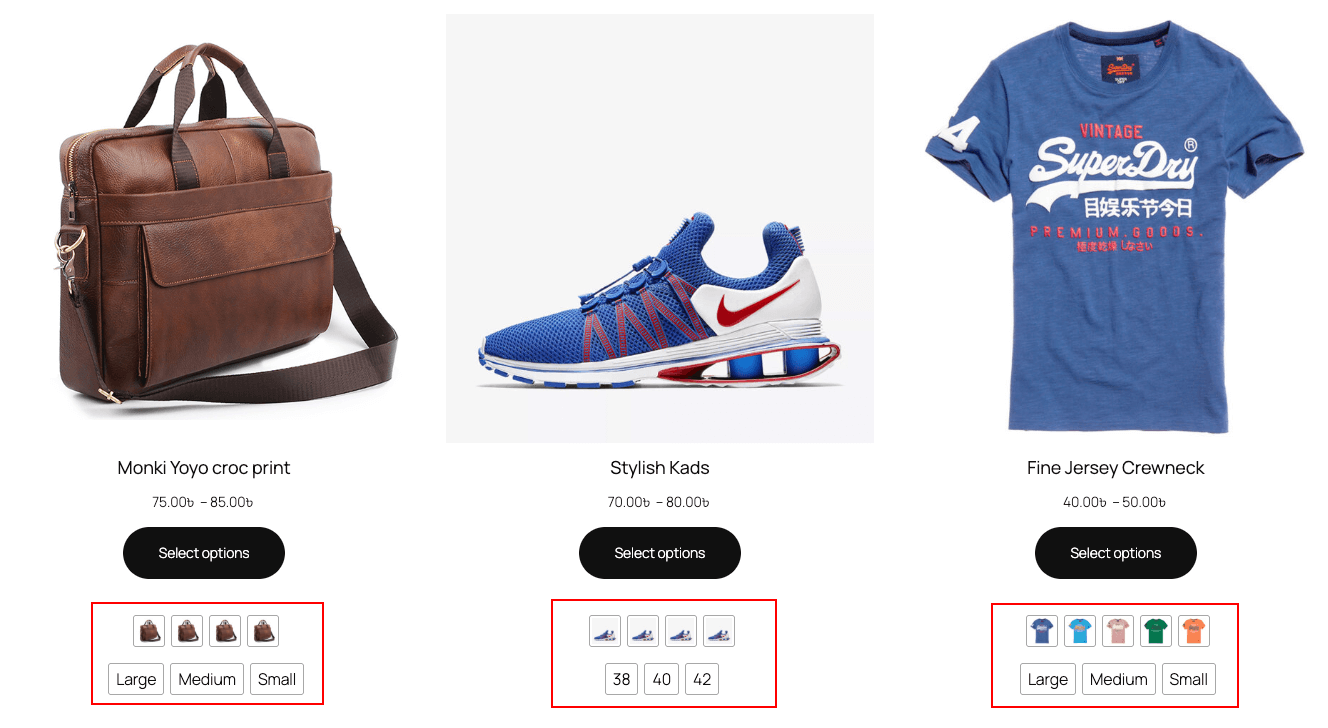
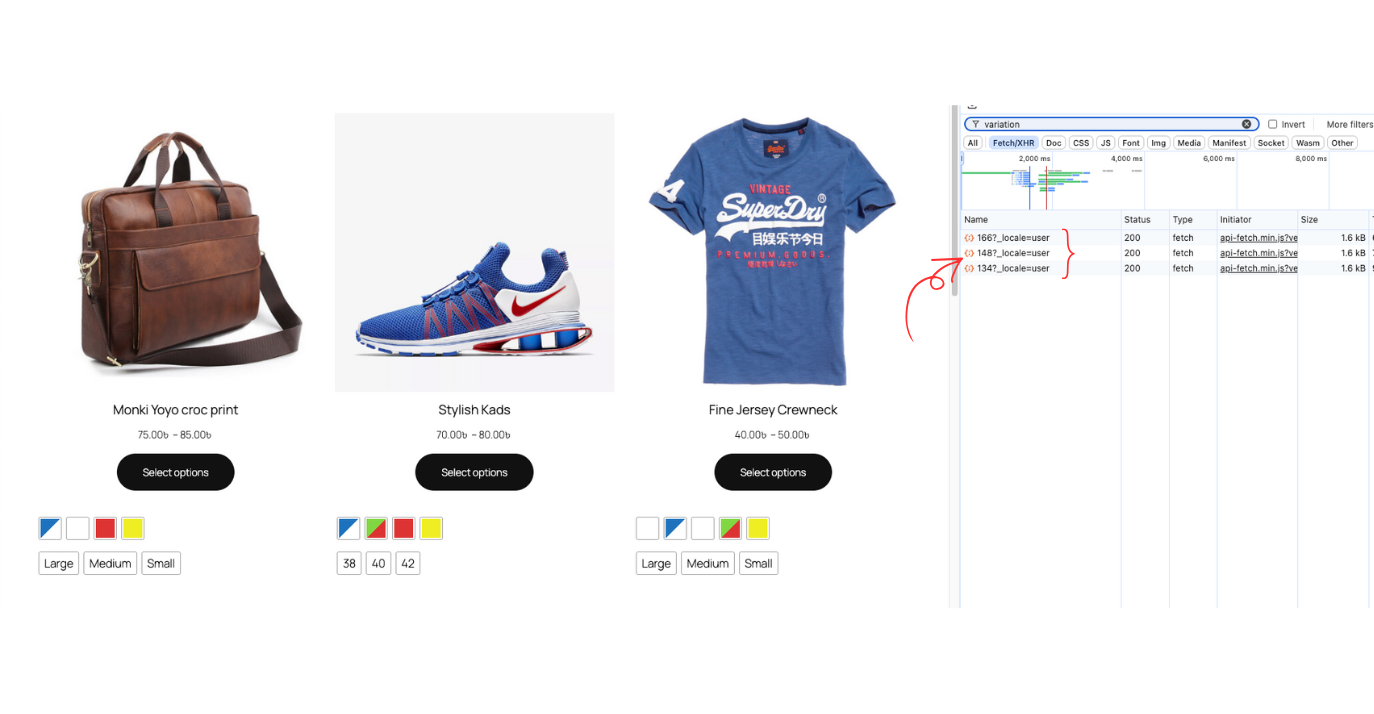
Let’s make it simplified here. This is the shop page interface with 3 variable products.
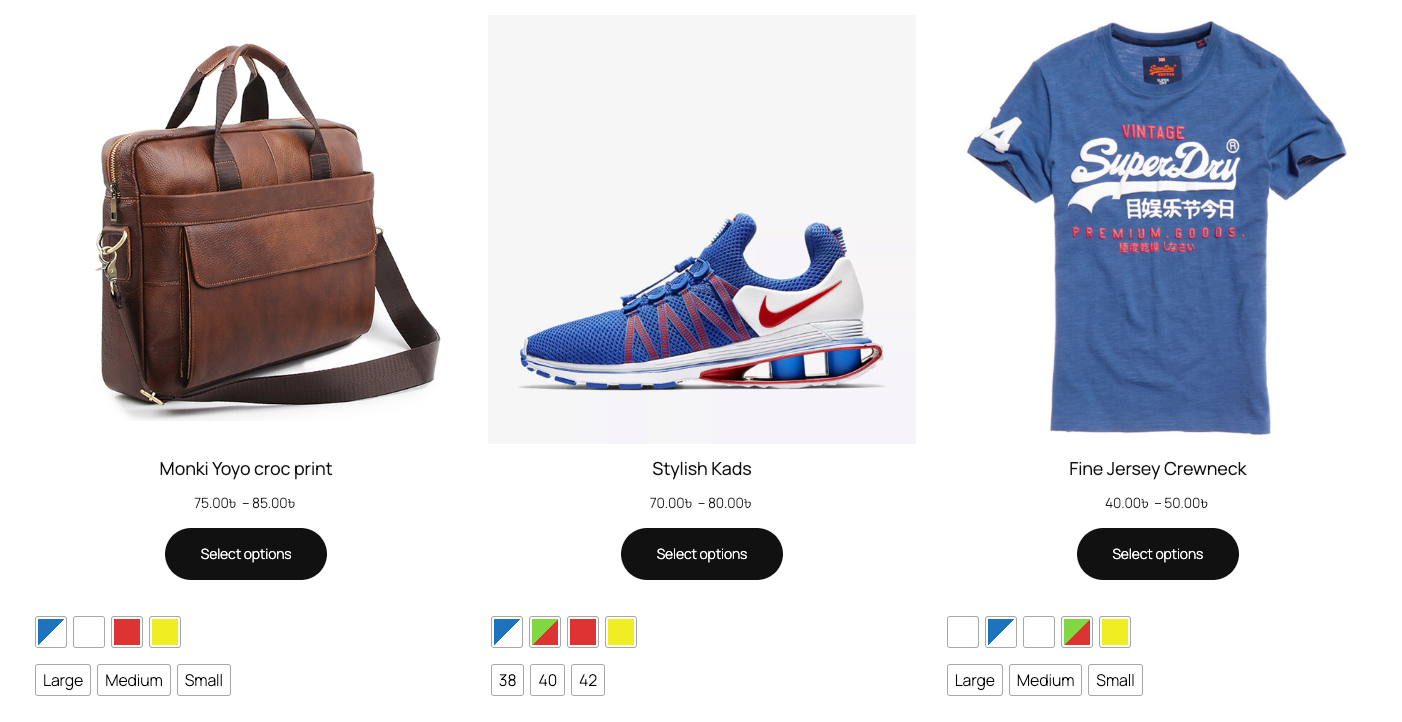
Let’s check the backend to see the variations each product has.
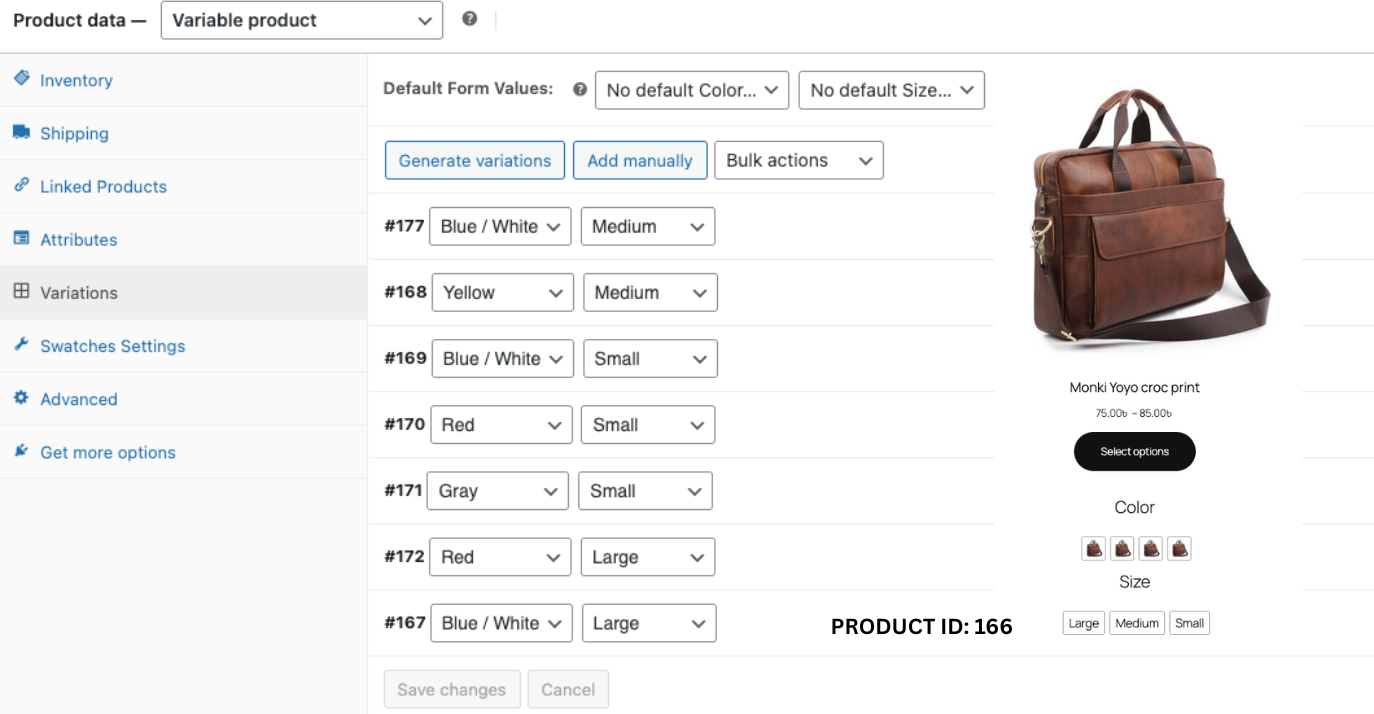
Product 1: Monki Yoyo croc print with 7 (seven) variations. And the product Id is 166.
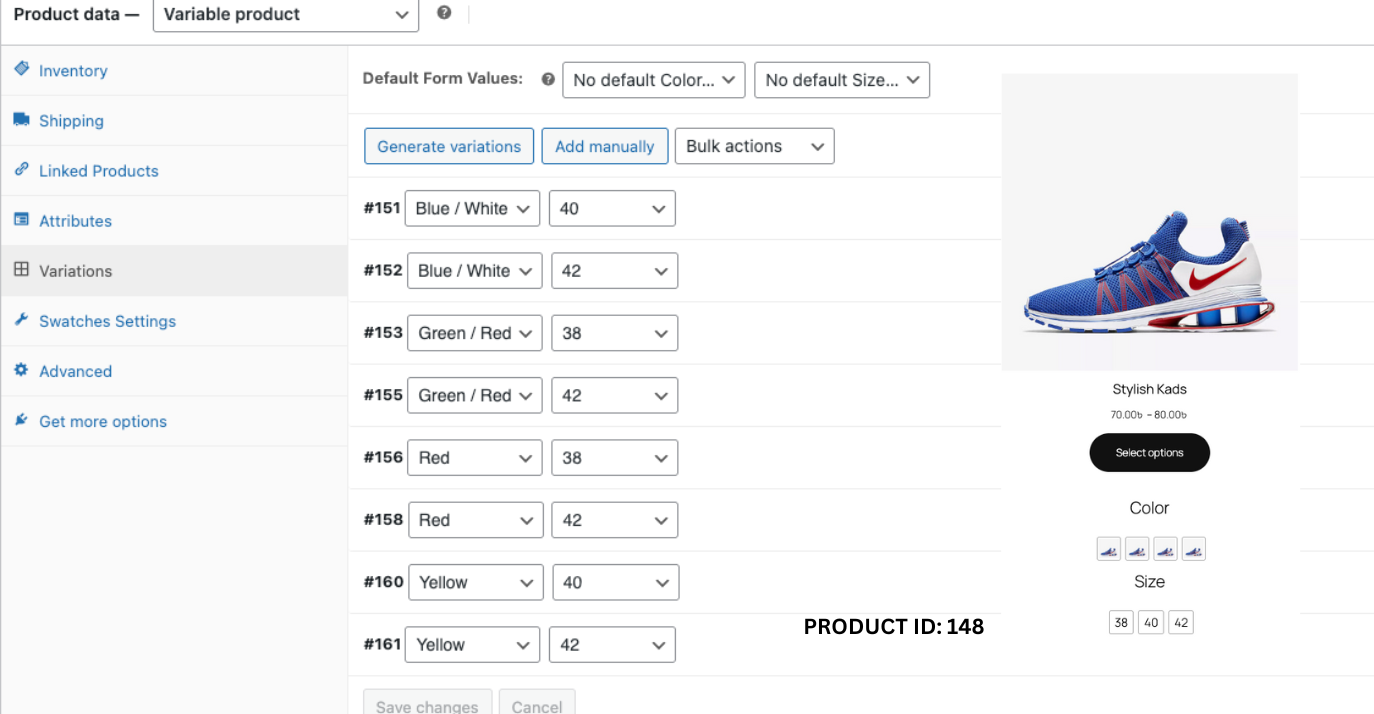
Product 2: Stylish Kads with 8 (eight) variations. And the product Id is 148.
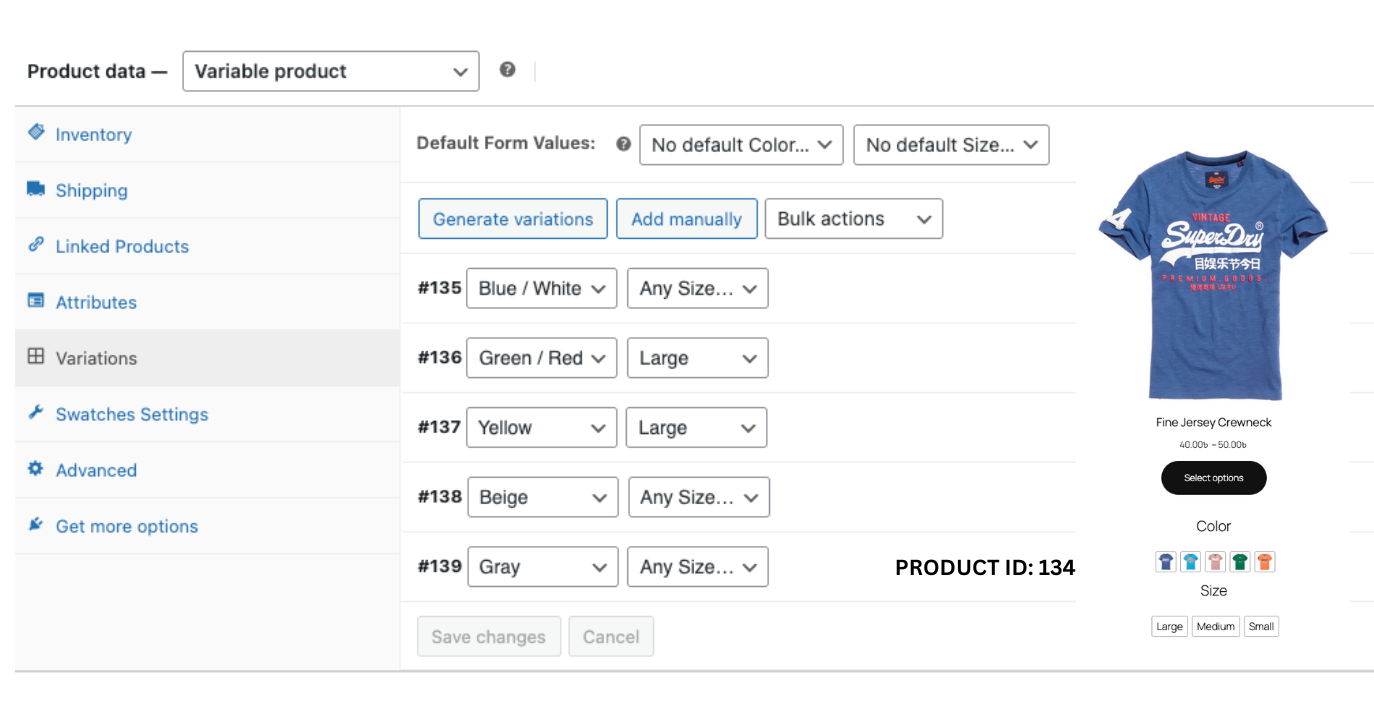
Product 3: Fine Jersey Crewneck with 5 (five) variations. And the product Id is 134.
If you refresh the page keeping the dev tool open, you can see the variation data for these products are loaded by API.
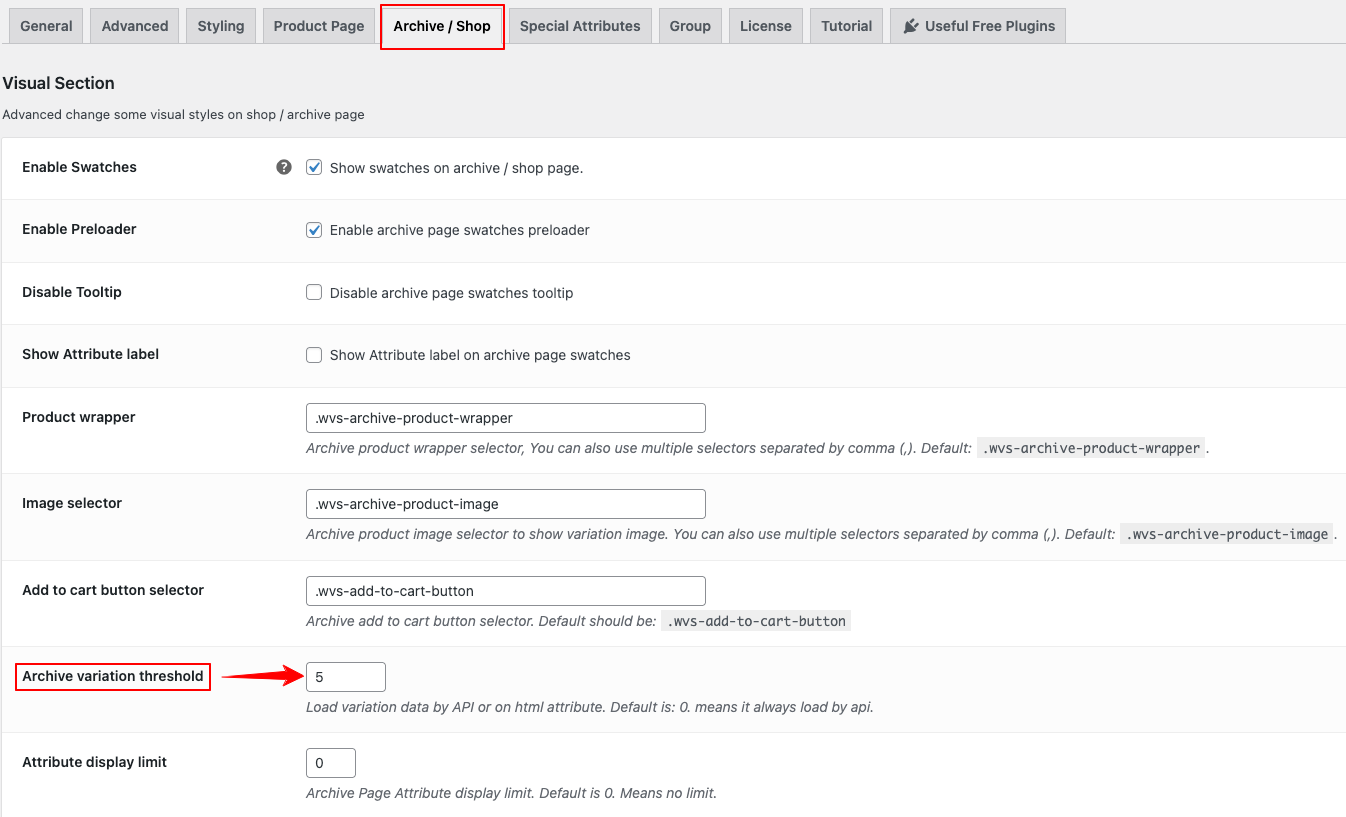
Now, to activate the archive variation threshold go to Archive / Shop > Archive variation threshold > Input your desired number at the box.
By default, it is set to 0; means it always load by API which is recommended. But in this case, let input the number 5; meaning the products with 5 or less variations will be loaded via WooCommerce’s default behavior, not from API.
After setting your number click save changes button.
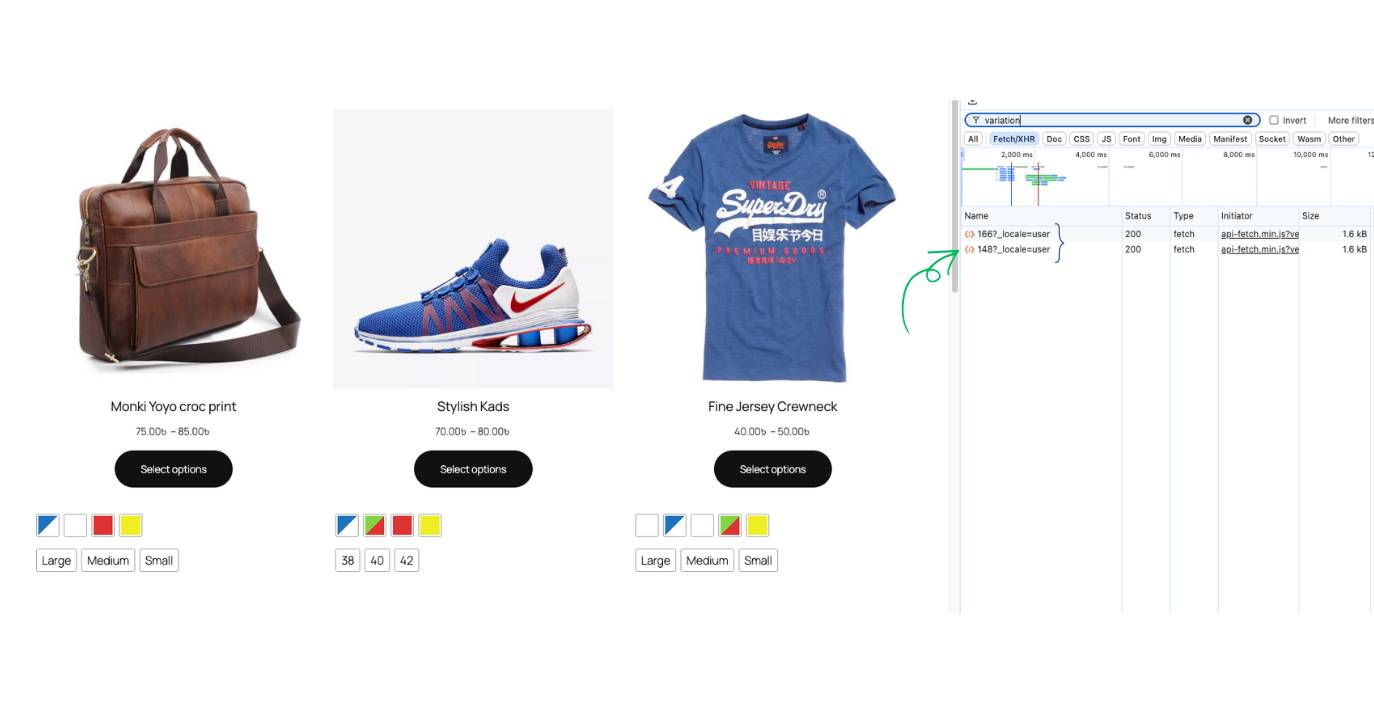
Now, head back to your shop page and refresh it. Done! The two products with product id 166 and 148 are loaded by API as they have more than 5 variations but the product (id: 134) is not loaded by API rather it is being loaded via WooCommerce’s default behavior as it has 5 variations.
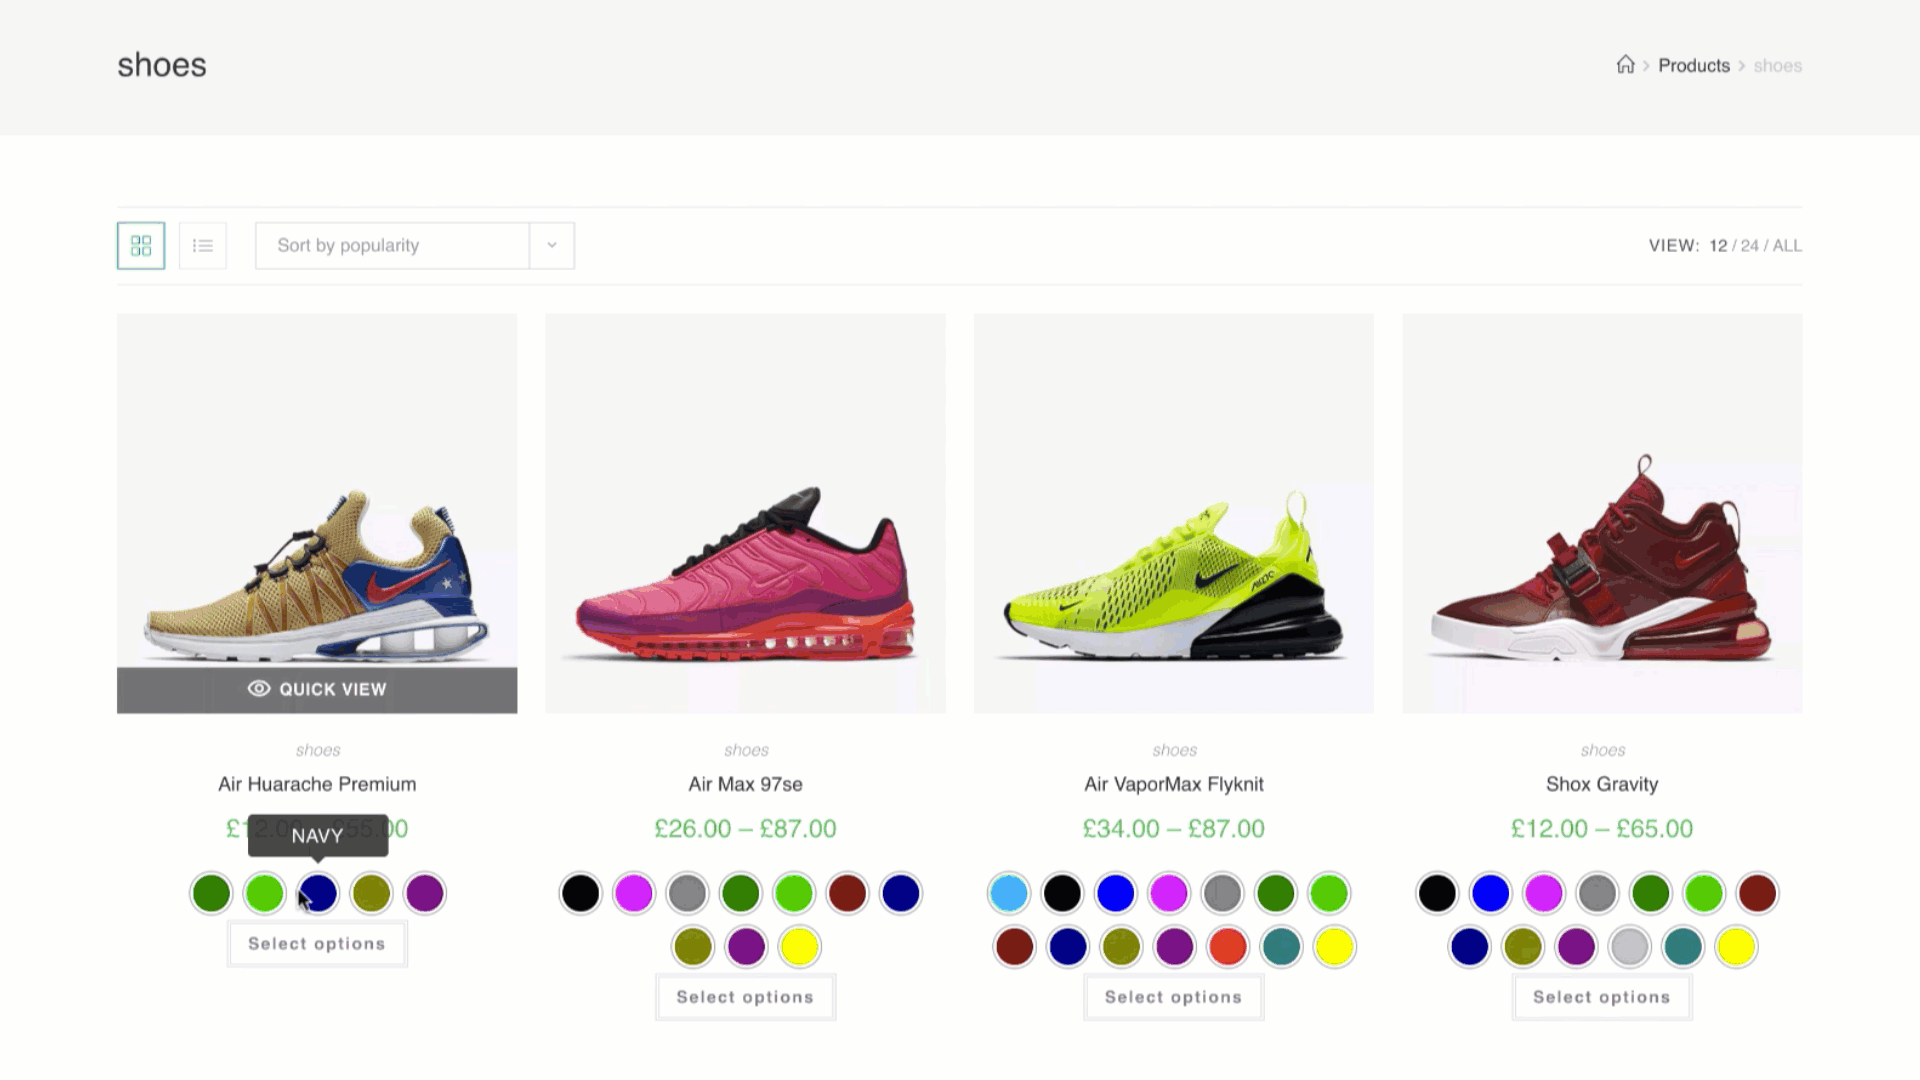
Attribute Display Limit on Archive Page
You might have so many colors or sizes for a variable product in your store. But it looks bad when so many attributes displaying together on your shop page. You can solve it by another of this plugin’s feature termed as “Attribute display limit”.
To control the attribute display limit go to Archive / Shop > Attribute display limit > Set the number you want. By default the number is set to 0, means no limit. For the demonstration purposes, let’s set the number 3 > Now, press save changes button.
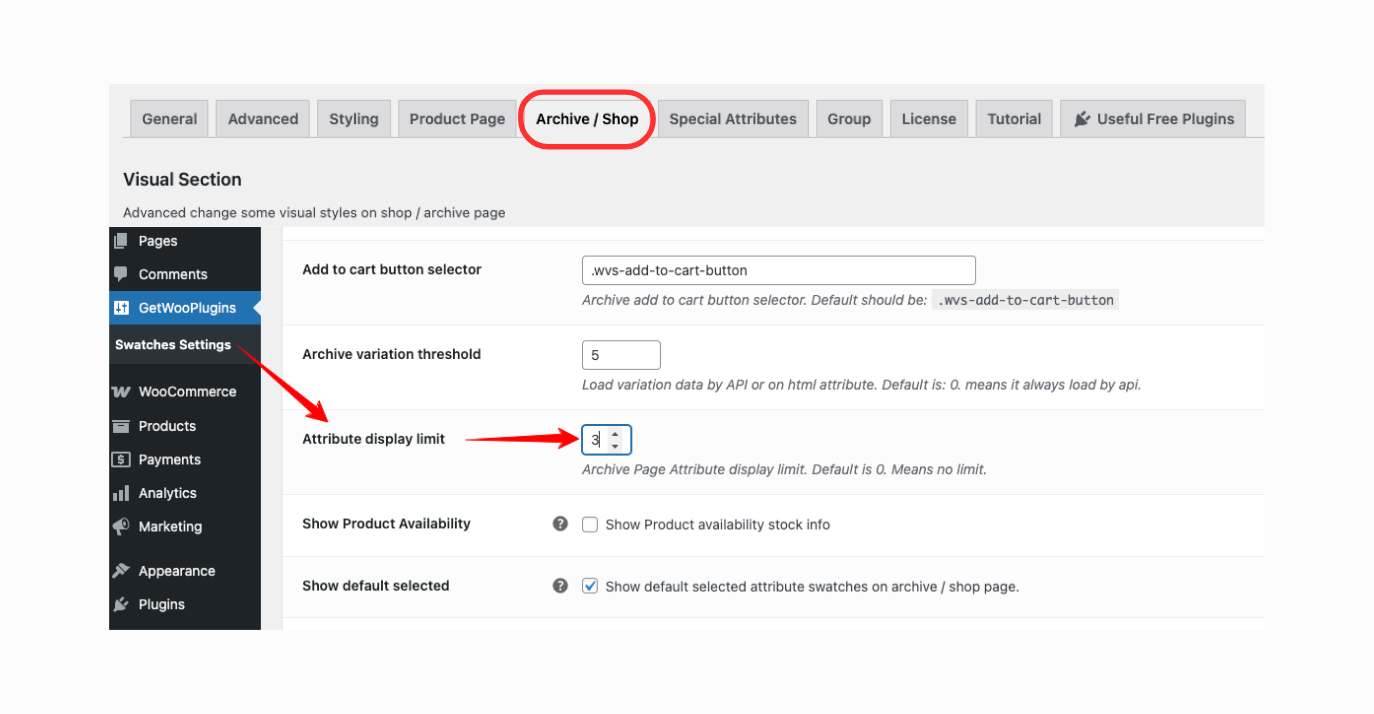
Come back to the shop page and refresh it. Look! the attribute display limit has been applied to all our variable products.